1. Introduzione e oltreview
This manual provides essential instructions for the safe and effective operation of the Mxmoonfree HP-500N Digital Force Gauge. This precision instrument is designed for accurate measurement of push and pull forces, making it suitable for various laboratory and industrial applications, including tension and compression destructive tests.
Key features of the HP-500N include high accuracy, multiple test modes (Real-time, Peak, Auto-Peak), unit conversion (N, kgf, lbf), extensive data storage capabilities, USB output for PC connectivity, automatic power-off, a backlit LCD, and a flippable screen for enhanced readability.

Image: The Mxmoonfree HP-500N Digital Force Gauge with its various attachments and accessories.
2. Impostazione
2.1 Disimballaggio e ispezione
Carefully unpack the force gauge and all included accessories. Inspect all components for any signs of damage. If any damage is found, contact customer support immediately.
2.2 Caricamento della batteria
The force gauge is equipped with a built-in Lithium-ion battery. Before initial use, fully charge the device using the provided AC adapter. Connect the adapter to the charging port on the device and plug it into a standard power outlet. A full charge typically provides approximately 6 hours of continuous operation. To preserve battery life, do not exceed 12 hours per charge cycle.
2.3 Attaching Test Parts
Select the appropriate test part (e.g., compression head, tensile hook) for your specific measurement application. Screw the chosen attachment securely onto the threaded end of the force gauge. Ensure it is tightened sufficiently to prevent movement during testing.

Image: The force gauge and its accessories, including the charger, USB output cable, storage box, and calibration certificate.
3. Istruzioni per l'uso
3.1 Accensione/spegnimento
- Per accendere il dispositivo, premere il pulsante 'ON' pulsante.
- Per spegnere il dispositivo, premere il tasto 'OFF' button. The device also features an automatic power-off function to conserve battery life after a period of inactivity.
3.2 Conversione unità
The HP-500N supports three common measurement units: Newtons (N), kilograms-force (kgf), and pounds-force (lbf). To switch between these units, press the 'UNITÀ' button. The currently selected unit will be displayed on the LCD screen.

Image: The force gauge display illustrating the three selectable units: Newtons (N), kilograms-force (kgf), and pounds-force (lbf).
3.3 Modalità di misurazione
The device offers three distinct measurement modes:
- Modalità in tempo reale: Displays the instantaneous force being applied to the sensor. This mode is suitable for continuous monitoring of force changes.
- Modalità PICCO: Captures and holds the maximum force value detected during a test. The display will show the highest force reached until manually reset or a new peak is detected.
- AUTO-PEAK Mode: Similar to PEAK mode, but automatically holds the peak value for a set duration before resetting, allowing for easier recording of multiple peak measurements.
Premere il tasto 'PEAK' button to cycle through these measurement modes.

Image: The force gauge display demonstrating the Real-time, PEAK, and AUTO PEAK measurement modes.
3.4 Azzeramento del display
Before starting any measurement, ensure the display reads zero. If it does not, press the 'ZERO' button to reset the reading. This ensures accurate measurements by eliminating any initial offset.
3.5 Data Storage and Output
In PEAK mode, you can store up to 999 sets of peak test data by pressing the 'MEMO' key. This stored data can be reviewdirettamente sul dispositivo.
For advanced data analysis, connect the force gauge to a computer using the provided RS-232 to USB cable. Utilize the free software (available upon request from Mxmoonfree customer service) to export real-time test data, generate force-time graphs, and perform detailed analysis.

Image: The force gauge connected to a computer via RS232 to USB cable, demonstrating the data output and software interface for analysis.
3.6 Flippable Screen
For improved readability when the force gauge is held in different orientations, press the 'SEND' key to rotate the display 180 degrees. This feature is particularly useful when the device is inverted or used in confined spaces.

Image: The force gauge demonstrating its screen flip function, allowing the display to be rotated 180 degrees for optimal viewing.
4. Manutenzione
4.1 Pulizia
To clean the device, gently wipe its exterior with a soft, dry cloth. Avoid using abrasive cleaners, solvents, or harsh chemicals, as these can damage the casing o display.
4.2 Conservazione
When not in use, store the force gauge and all its accessories in the provided carrying case. Keep the case in a dry, dust-free environment, away from extreme temperatures and direct sunlight. Proper storage helps protect the device from physical damage and environmental factors.
4.3 Cura della batteria
To maximize the lifespan of the built-in Lithium-ion battery, avoid prolonged overcharging (do not exceed 12 hours per charge). If storing the device for an extended period, ensure the battery has a partial charge (e.g., 50%) rather than being fully depleted or fully charged.
5. Risoluzione Dei Problemi
- Il dispositivo non si accende: Ensure the battery is charged. Connect the AC adapter and attempt to power on. Verify the 'ON' button is pressed firmly.
- Letture imprecise: Press the 'ZERO' button to reset the display before each measurement. Ensure the test attachment is securely fastened. Refer to the calibration certificate for expected accuracy.
- Problemi di connessione software: Verify that the RS-232 to USB cable is correctly connected to both the force gauge and the computer. Ensure any necessary drivers for the CH340 chip (if applicable) are installed on your computer. Contact Mxmoonfree customer service for assistance with software installation or troubleshooting.
- Screen not displaying correctly or is upside down: Press the 'SEND' button to rotate the display 180 degrees. If the issue persists, power cycle the device.
- No data stored: Ensure the device is in PEAK mode when attempting to store data using the 'MEMO' button.
6. Specifiche
| Caratteristica | Specificazione |
|---|---|
| Numero di modello | HP-500N |
| Marca | Mxmoonfree |
| Materiale | Acrilonitrile Butadiene Stirene (ABS) |
| Dimensioni (L x P x A) | Dimensioni: 50 x 240 x 30 mm |
| Peso dell'articolo | 1.22 kg |
| Fonte di alimentazione | 1 batteria agli ioni di litio (inclusa) |
| Contenuto energetico della batteria | 6.66 Watt ora |
| Unità di misura | N, kgf, lbf |
| Capacità di archiviazione dei dati | 999 sets of peak data |
| Interfaccia di uscita | USB (via RS-232 to USB cable) |
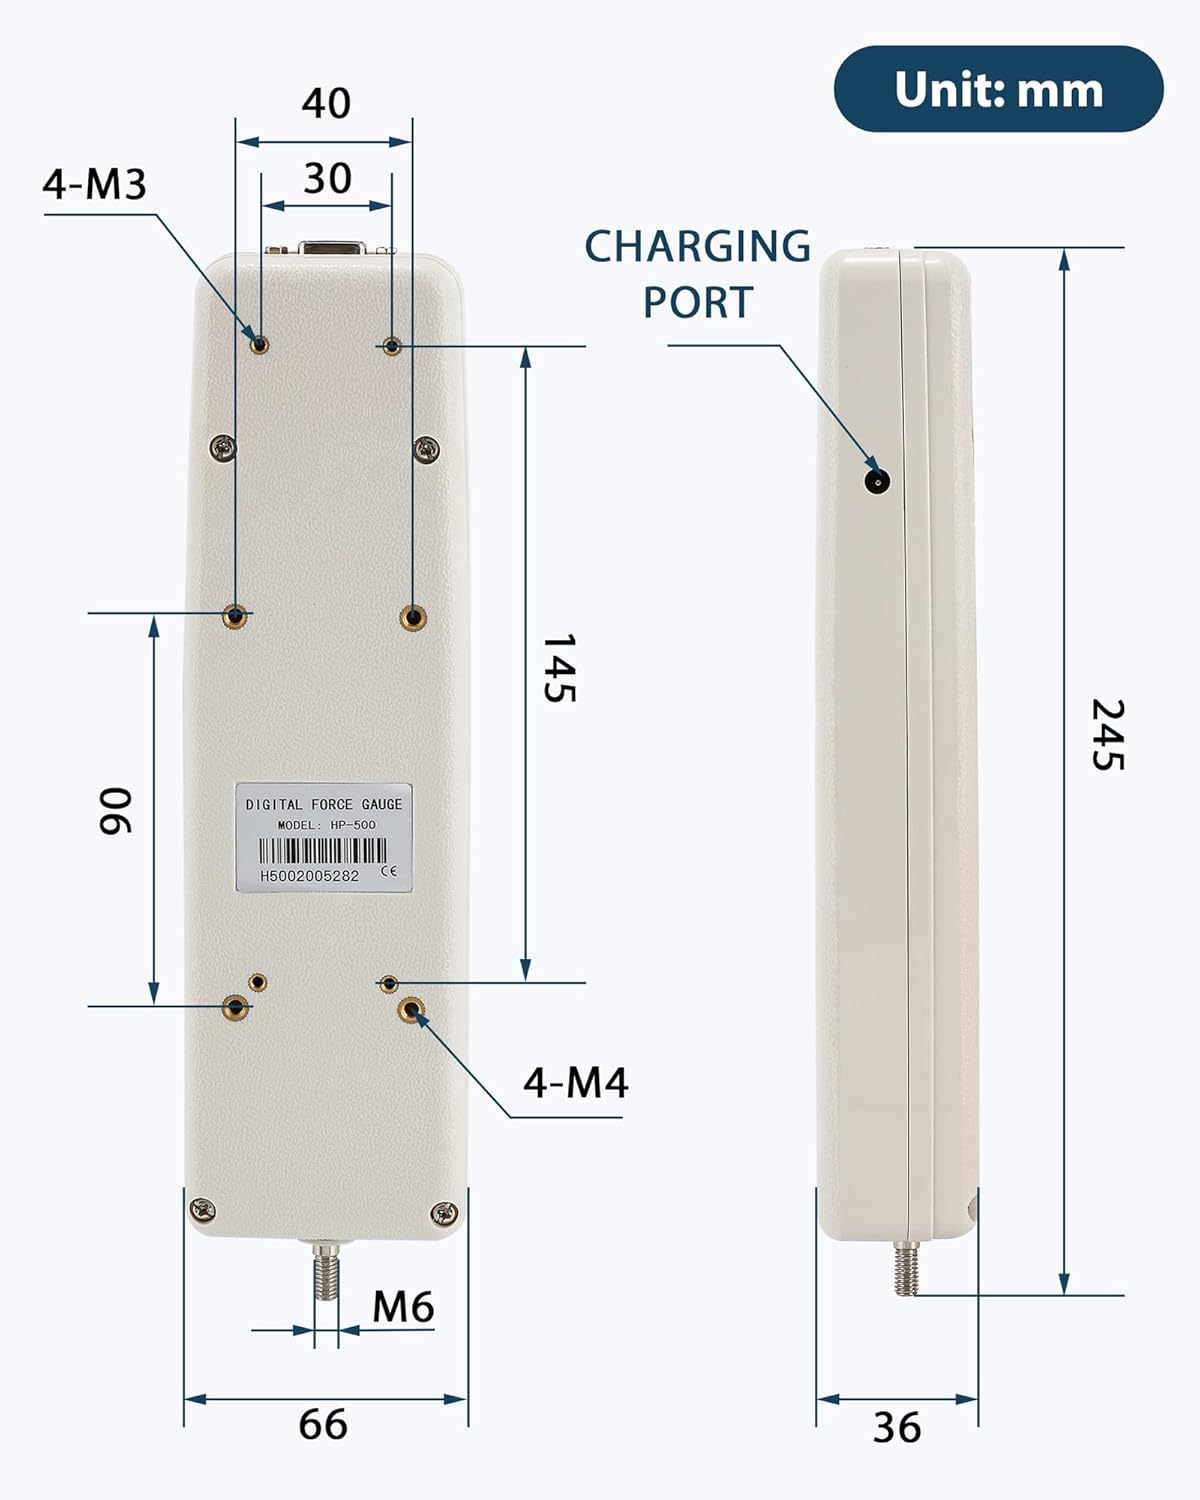
Image: Technical drawing showing the dimensions of the force gauge in millimeters, including the charging port and mounting points.
7. Garanzia e supporto
For technical assistance, software inquiries, or information regarding product warranty, please refer to the 'AFTER-SALES SERVICE CARD' included with your Mxmoonfree HP-500N Digital Force Gauge. You may also contact Mxmoonfree customer service directly for support.