1. Introduzione
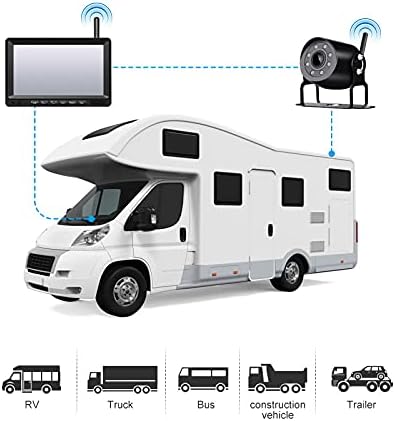
This manual provides detailed instructions for the installation, operation, and maintenance of your OBEST Wireless Reversing Camera System. This system is designed to enhance safety and convenience when maneuvering large vehicles such as trucks, trailers, RVs, and buses. It features a 7-inch IPS high-definition monitor and a waterproof infrared night vision camera, operating on a 12V-36V power supply.
Per garantire il corretto funzionamento del prodotto e prevenire danni, leggere attentamente il presente manuale prima di utilizzarlo.
2. Contenuto della confezione
Verifica che tutti gli articoli elencati di seguito siano inclusi nel tuo pacchetto:
- Monitor IPS da 7 pollici
- Telecamera di backup
- U-shaped Display Stand
- Staffa di montaggio del monitor
- Caricabatterie per auto
- Parasole per monitor
- Manuale dell'utente (questo documento)
- Cavi di alimentazione
- Antenne (per monitor e telecamera)
- Installation Kit (screws, tools)

3. Specifiche
| Caratteristica | Specificazione |
|---|---|
| Alimentazione elettrica | DC 12V a 36V |
| Frequenza senza fili | 2.4 GHz (2403-2480 MHz) |
| wireless Range | Fino a 300 metri (spazio aperto) |
| Ritardo video | <200 millisecondi |
| Temperatura di esercizio | -20 ℃ a 80 ℃ |
| Sensore di immagine della fotocamera | CMOS da 1/3 pollici |
| Classificazione impermeabile della fotocamera | Grado di protezione IP69K |
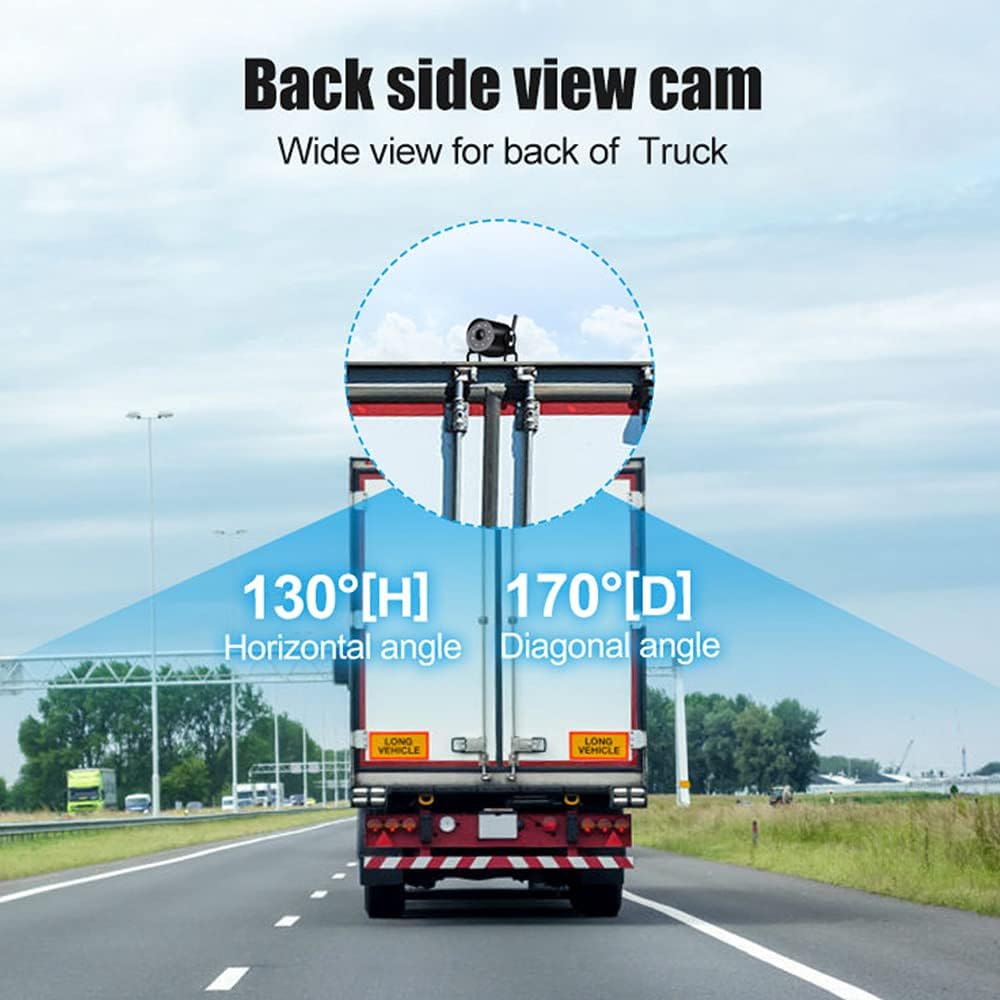
| Telecamera View Angolo | 127° (Horizontal) * 170° (Diagonal) |
| Pixel della fotocamera | 1000TVL |
| Dimensioni dello schermo LCD | 7 pollici |
| Risoluzione del monitor | 1024 (H) * 600 (V) |
| Rapporto di contrasto | 500:1 |
| Luminosità | 500 cd/m² |
| Tempo di risposta | 25 millisecondi |
| Monitorare il consumo energetico | <500mA |
| Tipo di installazione | Senza fili |
| Codice UPC | 769771167564 |
4. Configurazione e installazione
The OBEST Wireless Reversing Camera System is designed for straightforward installation without the need for complex wiring between the camera and the monitor.
4.1 Installazione della telecamera
- Montare la fotocamera: Choose a suitable location at the rear of your vehicle, typically near the license plate or on the bumper, ensuring a clear view. Use the provided screws and brackets to securely mount the camera.
- Connetti alimentazione: Connect the camera's power cable to your vehicle's taillight circuit. This allows the camera to receive power when the vehicle is in reverse or when the lights are on, depending on your wiring choice. Ensure the connection is secure and waterproof. The camera supports 12V-36V power input.
- Collegare l'antenna: Screw the antenna onto the camera's designated port.
4.2 Installazione del monitor
- Montare il monitor: The monitor comes with two different mounting options: a U-shaped display stand and a monitor mount bracket. Choose the one that best suits your vehicle's dashboard or windshield. Securely attach the chosen mount to the monitor and then to your desired location in the vehicle, ensuring it does not obstruct your view durante la guida.
- Collegare l'antenna: Screw the antenna onto the monitor's designated port.
- Connetti alimentazione: Plug the monitor's car charger into your vehicle's cigarette lighter socket.

4.3 Abbinamento (se necessario)
The camera and monitor are typically pre-paired at the factory. If no signal is received, you may need to re-pair them:
- Assicurarsi che sia la telecamera sia il monitor siano accesi.
- On the monitor, press and hold the 'Pairing Button' (often labeled 'SEL' or with a pairing icon) for a few seconds until the pairing indicator appears.
- The monitor will search for the camera. Once connected, the camera's video feed will appear on the screen.
5. Istruzioni per l'uso
Familiarize yourself with the monitor's controls for optimal use.
5.1 Monitorare i controlli
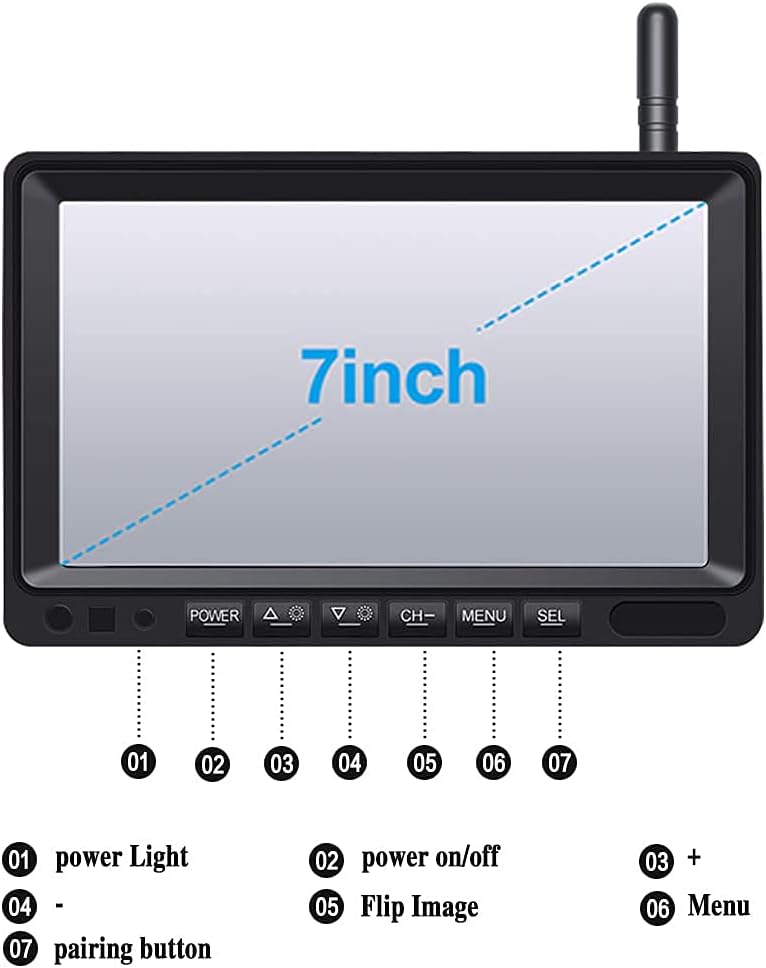
- 1. Spia di alimentazione: Indica lo stato dell'alimentazione.
- 2. Accensione/spegnimento: Premere per accendere o spegnere il monitor.
- 3. + (Plus) Button: Utilizzato per incrementareasinvalori g o navigazione nei menu.
- 4. - (Minus) Button: Utilizzato per decretareasinvalori g o navigazione nei menu.
- 5. Flip Image: Press to rotate or mirror the camera image (e.g., normal view, specchio view).
- 6. Pulsante Menu: Accede al menu delle impostazioni del monitor.
- 7. SEL (Select/Pairing) Button: Used to confirm selections in the menu or initiate pairing mode.
5.2 Adeguamento delle linee guida per il parcheggio
The monitor displays adjustable parking guidelines to assist with reversing.
- While the camera feed is active, press and hold the SEL pulsante.
- When the guidelines begin to flash, use the + or - buttons to adjust their position or width.
- Premere SEL again to save the adjustments and exit the adjustment mode.

5.3 Night Vision and Wide Angle
The camera features infrared LEDs for clear night vision up to 15 meters in low-light conditions. Its wide 170° diagonal viewing angle helps eliminate blind spots.
6. Manutenzione
Una corretta manutenzione garantisce la longevità e le prestazioni ottimali del sistema di telecamere per la retromarcia.
- Pulizia: Pulire regolarmente l'obiettivo della fotocamera e lo schermo del monitor con un panno morbido eamp panno. Evitare detergenti abrasivi che potrebbero graffiare le superfici.
- Fotocamera impermeabile: The camera has an IP69K waterproof rating, designed to withstand harsh weather conditions. However, avoid directing high-pressure water jets directly at the camera for extended periods.
- Connessioni via cavo: Periodically check all cable connections for tightness and signs of wear or corrosion.
- antenne: Ensure antennas are securely attached and not damaged to maintain optimal wireless signal strength.

7. Risoluzione Dei Problemi
If you encounter issues with your OBEST Wireless Reversing Camera System, refer to the following common problems and solutions:
| Problema | Possibile causa | Soluzione |
|---|---|---|
| Nessun segnale sul monitor |
|
|
| L'immagine non è chiara o è distorta |
|
|
| Il monitor non si accende |
|
|
8. Informazioni sulla sicurezza
- Always ensure the monitor is mounted in a location that does not obstruct your view della strada o interferire con i comandi del veicolo.
- The reversing camera system is an aid and should not replace careful observation and traditional mirror checks. Always check your surroundings manually before reversing.
- Ensure all wiring is correctly installed and insulated to prevent short circuits or electrical hazards.
- Non tentare di smontare o modificare il prodotto. Ciò potrebbe invalidare la garanzia e causare danni.
- Utilizzare il sistema entro il volume specificatotage range (DC 12V-36V) to prevent damage.
9. Garanzia e supporto
OBEST products are designed for reliability and performance. If you have any questions or require assistance with your product, please contact OBEST customer support.
We are committed to providing a satisfactory response within 24 hours for any product-related inquiries.