
1. Introduzione
This manual provides essential instructions for the safe and efficient operation, installation, maintenance, and troubleshooting of your Euhomy Commercial Ice Maker. Please read this manual thoroughly before using the appliance and retain it for future reference.
The Euhomy Commercial Ice Maker is designed to produce up to 84 pounds of ice per 24 hours, with an ice storage capacity of 8.8 pounds. It is suitable for various settings including homes, small businesses, bars, and parties.
2. Istruzioni di sicurezza
- Assicurarsi che la macchina del ghiaccio sia collegata a una presa di corrente con messa a terra e con la tensione corretta.tage (115 Volt).
- Non utilizzare l'apparecchio con un cavo o una spina danneggiati. In caso di danni, contattare personale di assistenza qualificato.
- Mantenere le aperture di ventilazione libere da ostruzioni.
- Non conservare sostanze esplosive, come bombolette spray con propellente infiammabile, in questo apparecchio.
- Questo apparecchio non è destinato all'uso da parte di persone (bambini compresi) con ridotte capacità fisiche, sensoriali o mentali, o prive di esperienza e conoscenza, a meno che non siano supervisionate o abbiano ricevuto istruzioni riguardanti l'uso dell'apparecchio da una persona responsabile della loro sicurezza.
- Scollegare sempre la macchina del ghiaccio prima di pulirla o di effettuare qualsiasi intervento di manutenzione.
- Non immergere l'apparecchio, il cavo o la spina in acqua o altri liquidi.
- Per la produzione del ghiaccio utilizzare solo acqua potabile.
3. Configurazione e installazione
Before first use, ensure the ice maker is placed on a stable, level surface away from direct sunlight and heat sources. Allow at least 4 inches of space around the unit for proper ventilation.
3.1 Collegamento alimentazione idrica
Your Euhomy ice maker supports two methods for water supply: manual addition or direct connection to a water inlet pipe.

Figura 3.1: Illustration of the two water supply methods for the ice maker. Water can be added manually from the top or connected via a water inlet pipe at the rear.
For direct water inlet pipe connection, follow these steps:

Figura 3.2: Detailed steps for connecting the water inlet pipe. This involves removing a plug, inserting the pipe, and securing it with a blue ring.
- Remove Blue Ring and Plug: Locate the water inlet port at the back of the machine. Carefully remove the blue retaining ring and the plug.
- Inserisci tubo: Insert the water inlet pipe firmly into the port.
- Secure Blue Ring: Push the blue retaining ring back into place to secure the pipe connection.
3.2 Dimensioni del prodotto
Ensure adequate space for the ice maker. The dimensions are approximately 13.4 inches (D) x 13.6 inches (W) x 24 inches (H).

Figura 3.3: Sopraview of the ice maker's dimensions and included accessories like the ice scoop and water hoses.
3.3 piedini regolabili
The ice maker is equipped with adjustable feet to ensure stability on uneven surfaces.

Figura 3.4: Adjustable foot for leveling the appliance.
4. Istruzioni per l'uso
4.1 Pannello di controllo Sopraview
La macchina per il ghiaccio è dotata di un pannello di controllo LCD intuitivo per un facile utilizzo.

Figura 4.1: LCD Control Panel with indicators and buttons.
- LEGGERO: Activates the internal light.
- TIMER: Imposta un timer per il funzionamento.
- PULITO: Initiates the self-cleaning program.
- ACCESO/SPENTO: Accende o spegne l'unità.
- +/- Pulsanti: Used for adjusting settings, such as ice thickness or timer duration.
Indicator Symbols:
- Flashing Snowflake: Indicates the de-icing process is active.
- Rotating Fan: Indicates the self-cleaning program is running.
- Full Ice Bucket: Indicates the ice storage bin is full, and the machine has stopped ice production.
To switch between water tank supply and faucet connection, press the ON/OFF button for 5 seconds.
4.2 Produzione di ghiaccio
The ice maker produces 32 ice cubes per cycle and has an automatic overflow feature to prevent overfilling.

Figura 4.2: Ice production capacity and automatic overflow mechanism.
The machine is designed for high efficiency and low noise operation.

Figura 4.3: Ice maker in a kitchen environment, demonstrating its quiet operation.
4.3 Ice Cube Characteristics
The ice maker produces cube-type ice that is easy to break and crystal clear. An average cycle produces 32 ice cubes in approximately 13 minutes.
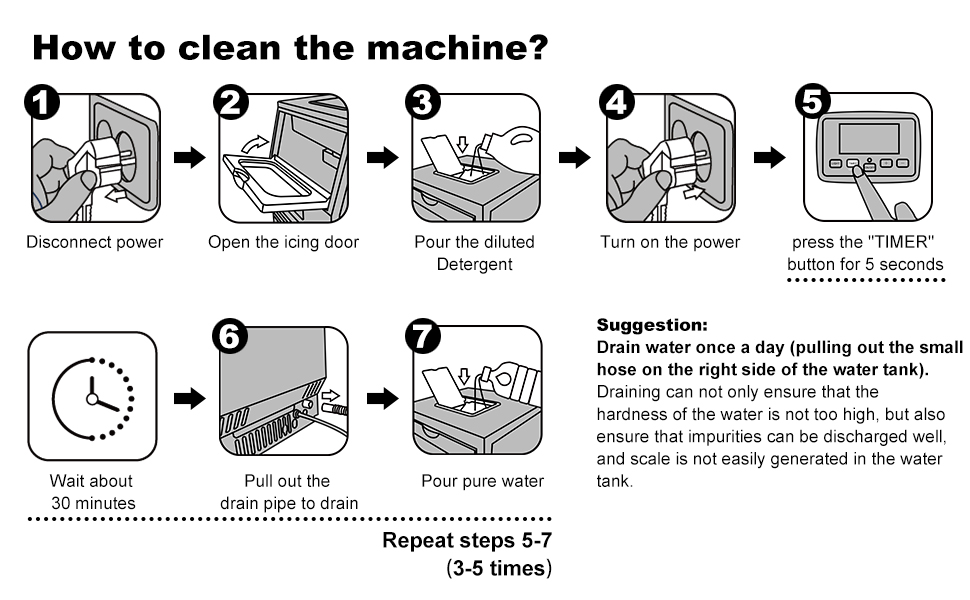
Figura 4.4: Features of the ice cubes and production process.
4.4 Curved Flip Cover Design
The ice maker features a curved flip cover for easy access to the ice bin.

Figura 4.5: Curved flip cover for convenient access.
4.5 Nano Blue Light
The interior of the ice maker is equipped with a Nano Blue Light.

Figura 4.6: Interior with Nano Blue Light.
5. Manutenzione
Regular cleaning and maintenance are crucial for the longevity and optimal performance of your ice maker.
5.1 Procedura di pulizia

Figura 5.1: Step-by-step guide for cleaning the ice maker.
- Scollegare l'alimentazione: Scollegare la macchina del ghiaccio dalla presa di corrente.
- Open Icing Door: Open the front door to access the ice-making components.
- Pour Diluted Detergent: Pour a diluted cleaning solution (e.g., food-grade citric acid solution) into the water tank.
- Accendere l'alimentazione: Plug the ice maker back in.
- Avviare la pulizia: Press the "TIMER" button for 5 seconds to start the self-cleaning cycle.
- Aspettare: Allow the cleaning cycle to run for approximately 30 minutes.
- Scolare: Pull out the drain pipe located on the right side of the water tank to drain the cleaning solution.
Suggerimento: Drain water once a day by pulling out the small hose on the right side of the water tank. Regular draining helps prevent the buildup of impurities and scale, ensuring optimal ice quality and machine performance. After draining, pour pure water into the tank and repeat steps 5-7 (3-5 times) to thoroughly rinse the system.
6. Risoluzione Dei Problemi
If you encounter issues with your ice maker, refer to the following common troubleshooting steps:
| Problema | Possibile causa | Soluzione |
|---|---|---|
| La macchina del ghiaccio non produce ghiaccio | No water supply; Water pump malfunction; Refrigerant leak; Ambient temperature too high. | Check water connection/fill water tank; Contact customer support; Ensure proper ventilation. |
| I cubetti di ghiaccio sono troppo piccoli o morbidi | Water temperature too high; Ambient temperature too high; Insufficient water flow. | Use colder water; Ensure proper ventilation; Check water supply. |
| La macchina è rumorosa | Unità non a livello; ventola ostruita; normali rumori di funzionamento. | Adjust leveling feet; Clear obstructions from fan; Some noise is normal during operation. |
| "Ice Full" indicator is on, but bin is not full | Sensore del ghiaccio ostruito o sporco. | Pulire il sensore del ghiaccio. |
| Perdita d'acqua | Loose water connections; Damaged drain pipe. | Tighten all water connections; Inspect and replace drain pipe if damaged. |
If the problem persists after attempting these solutions, please contact Euhomy customer support.
7. Specifiche
| Caratteristica | Specificazione |
|---|---|
| Marca | EUHOMY |
| Nome del modello | Ice Maker commerciale |
| Dimensioni del prodotto (P x L x A) | 13.4" x 13.6" x 24" |
| Capacità di produzione di ghiaccio | 84 lbs / 24 Hours |
| Capacità di conservazione del ghiaccio | 8.8 libbre |
| Voltage | 115 Volt |
| Refrigerante | R134a |
| Tipo di materiale | Acciaio inossidabile |
| ASIN | B0912YPBL1 |
8. Garanzia e supporto
For warranty information and customer support, please refer to the documentation included with your product or visit the official Euhomy brand store.

Figura 8.1: Customer Support Icon.
Visitare il Negozio EUHOMY per ulteriori informazioni.