
1. Introduzione
This manual provides detailed instructions for the assembly, operation, and maintenance of your Montech X3 Mesh White ATX Mid-Tower PC Gaming Case. Designed for optimal airflow and visual appeal, this case offers a robust foundation for your gaming system. Please read these instructions carefully before beginning installation.
2. Caratteristiche principali
- Design ad alto flusso d'aria: Equipped with three 140mm fixed RGB fans in the front, two 120mm fixed RGB fans on top, and one 120mm fixed RGB fan in the rear for efficient cooling.
- Vetro temperato panoramico: Features full tempered glass front and side panels to showcase your internal components and RGB lighting.
- Side Swivel Panel: The unique side swivel tempered glass side panel design allows for easy access and improved safety with a zero drill-hole construction.
- Illuminazione RGB integrata: All six pre-installed fans feature fixed RGB lighting, controllable via a dedicated LED button on the I/O panel. Note: Lighting is fixed, not addressable.
3. Specifiche
| Categoria | Dettaglio |
|---|---|
| Nome del modello | X3 Mesh White |
| Compatibilità della scheda madre | ATX / Micro ATX / Mini ITX |
| Tipo di caso | Mid Tower |
| Materiale | Vetro temperato |
| Alloggiamenti unità | 2.5" x 2 / 3.5" x 2 (or 2.5" x 2) |
| Supporto ventola (anteriore) | 120mm x 3 or 140mm x 3 |
| Supporto ventola (posteriore) | 120mm x 1 |
| Supporto per ventola (in alto) | 120mm x 2 |
| Ventole preinstallate | Front: 140mm x 3 (Fixed RGB), Rear: 120mm x 1 (Fixed RGB), Top: 120mm x 2 (Fixed RGB) |
| Autorizzazione VGA | 305mm |
| Altezza del dispositivo di raffreddamento della CPU | 160mm |
| Montaggio dell'alimentatore | Montaggio inferiore |
| Metodo di raffreddamento | Aria, Acqua |
| Peso dell'articolo | 13.8 libbre |
| Dimensioni del prodotto (LxWxH) | 14.57 x 8.27 x 18.9 pollici |
4. Configurazione e installazione
4.1 Internal Layout and Component Support
The Montech X3 Mesh case is designed to accommodate various components, providing sufficient internal space for a clean build.
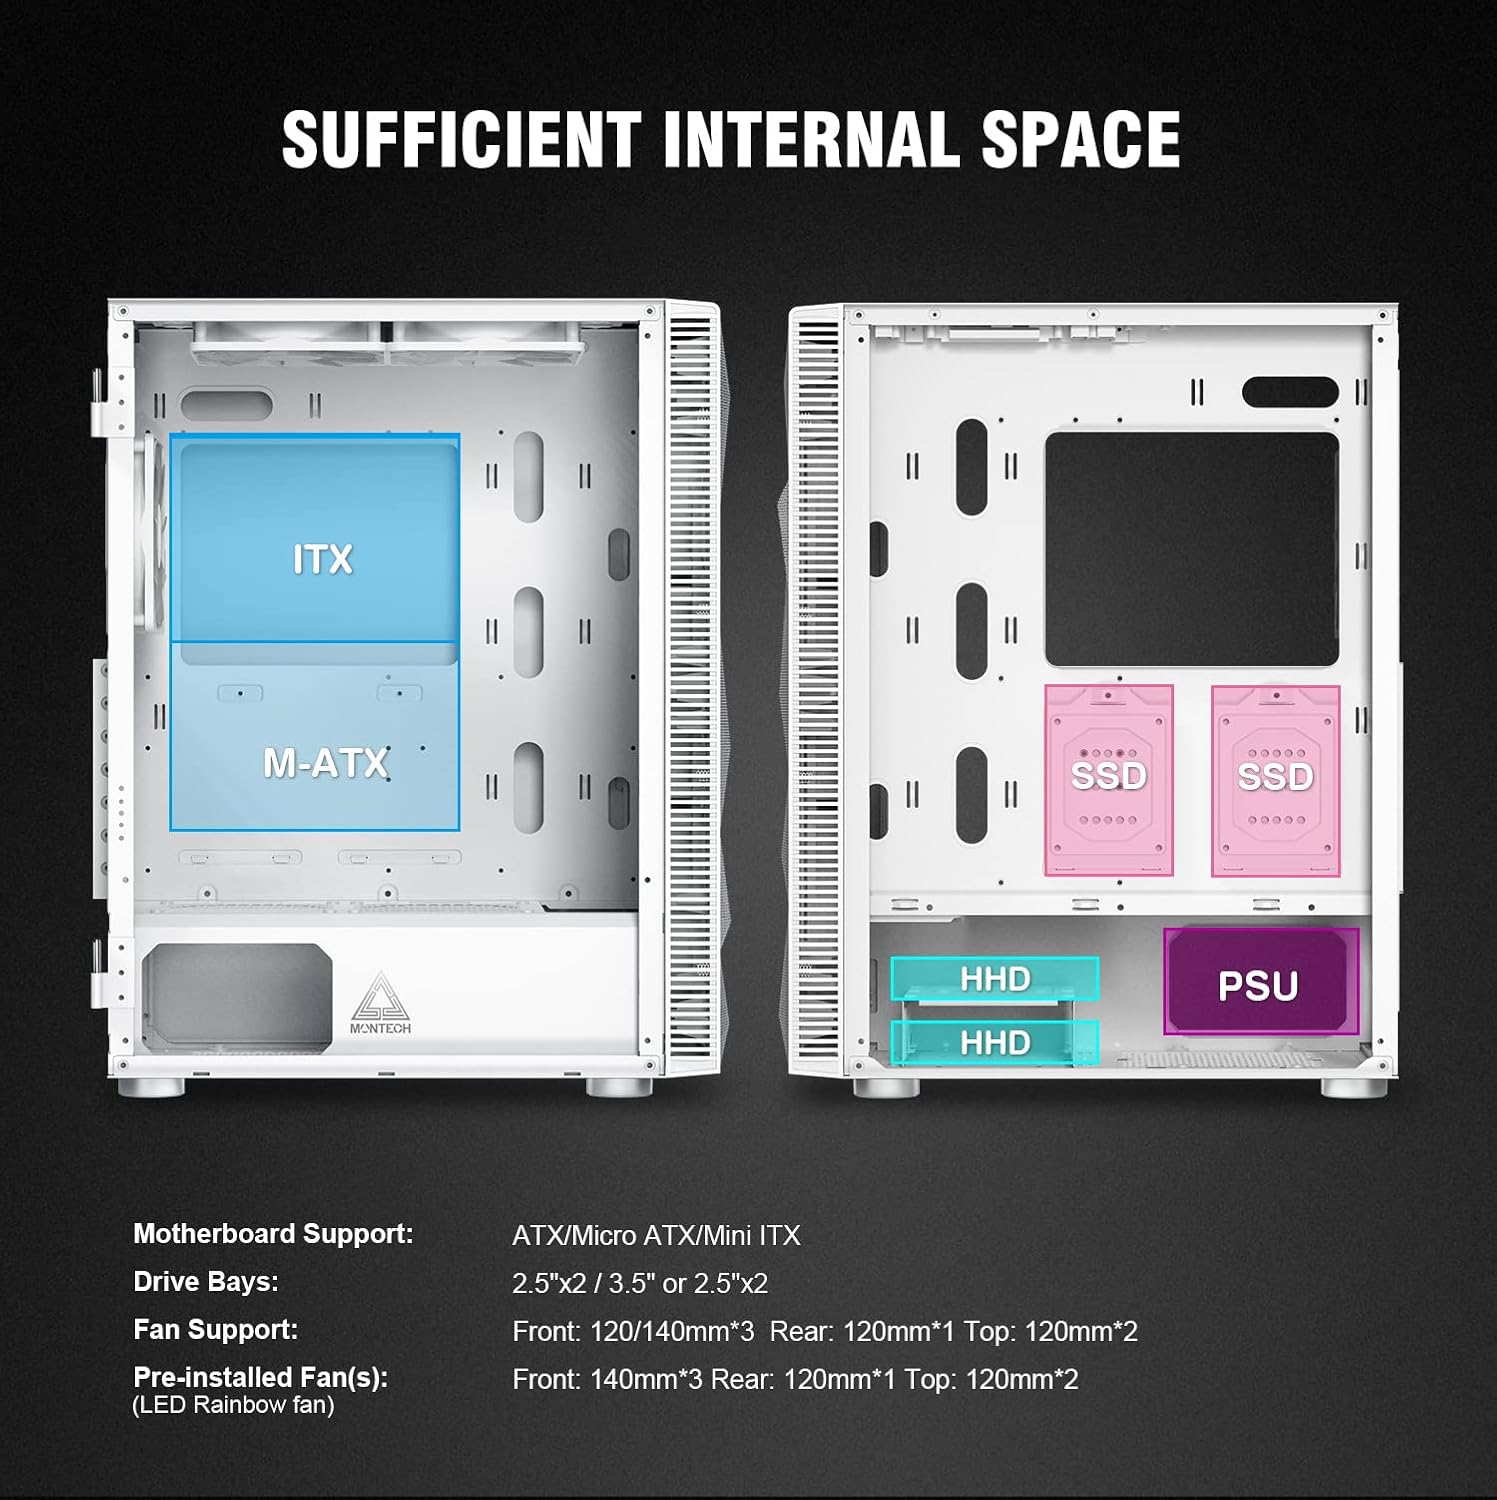
Figure 1: Diagram illustrating motherboard support (ATX, M-ATX, ITX), drive bays for SSDs and HDDs, and power supply unit (PSU) placement.
4.2 Installazione della scheda madre
The case supports ATX, Micro ATX, and Mini ITX motherboards. Ensure the correct standoffs are in place for your motherboard size before securing it.
4.3 Installazione dell'unità
The case includes dedicated bays for storage devices:
- Two 2.5-inch drive bays (for SSDs).
- Two 3.5-inch drive bays (for HDDs), which can also accommodate 2.5-inch drives.
4.4 Installazione dell'unità di alimentazione (PSU).
The PSU mounts at the bottom of the case. Ensure proper cable routing for a tidy build.
4.5 Fan Configuration and Airflow
The Montech X3 Mesh is designed for high airflow to keep components cool. It comes with six fixed RGB fans pre-installed:
- Front: Three 140mm fans (intake)
- Top: Two 120mm fans (exhaust)
- Rear: One 120mm fan (exhaust)
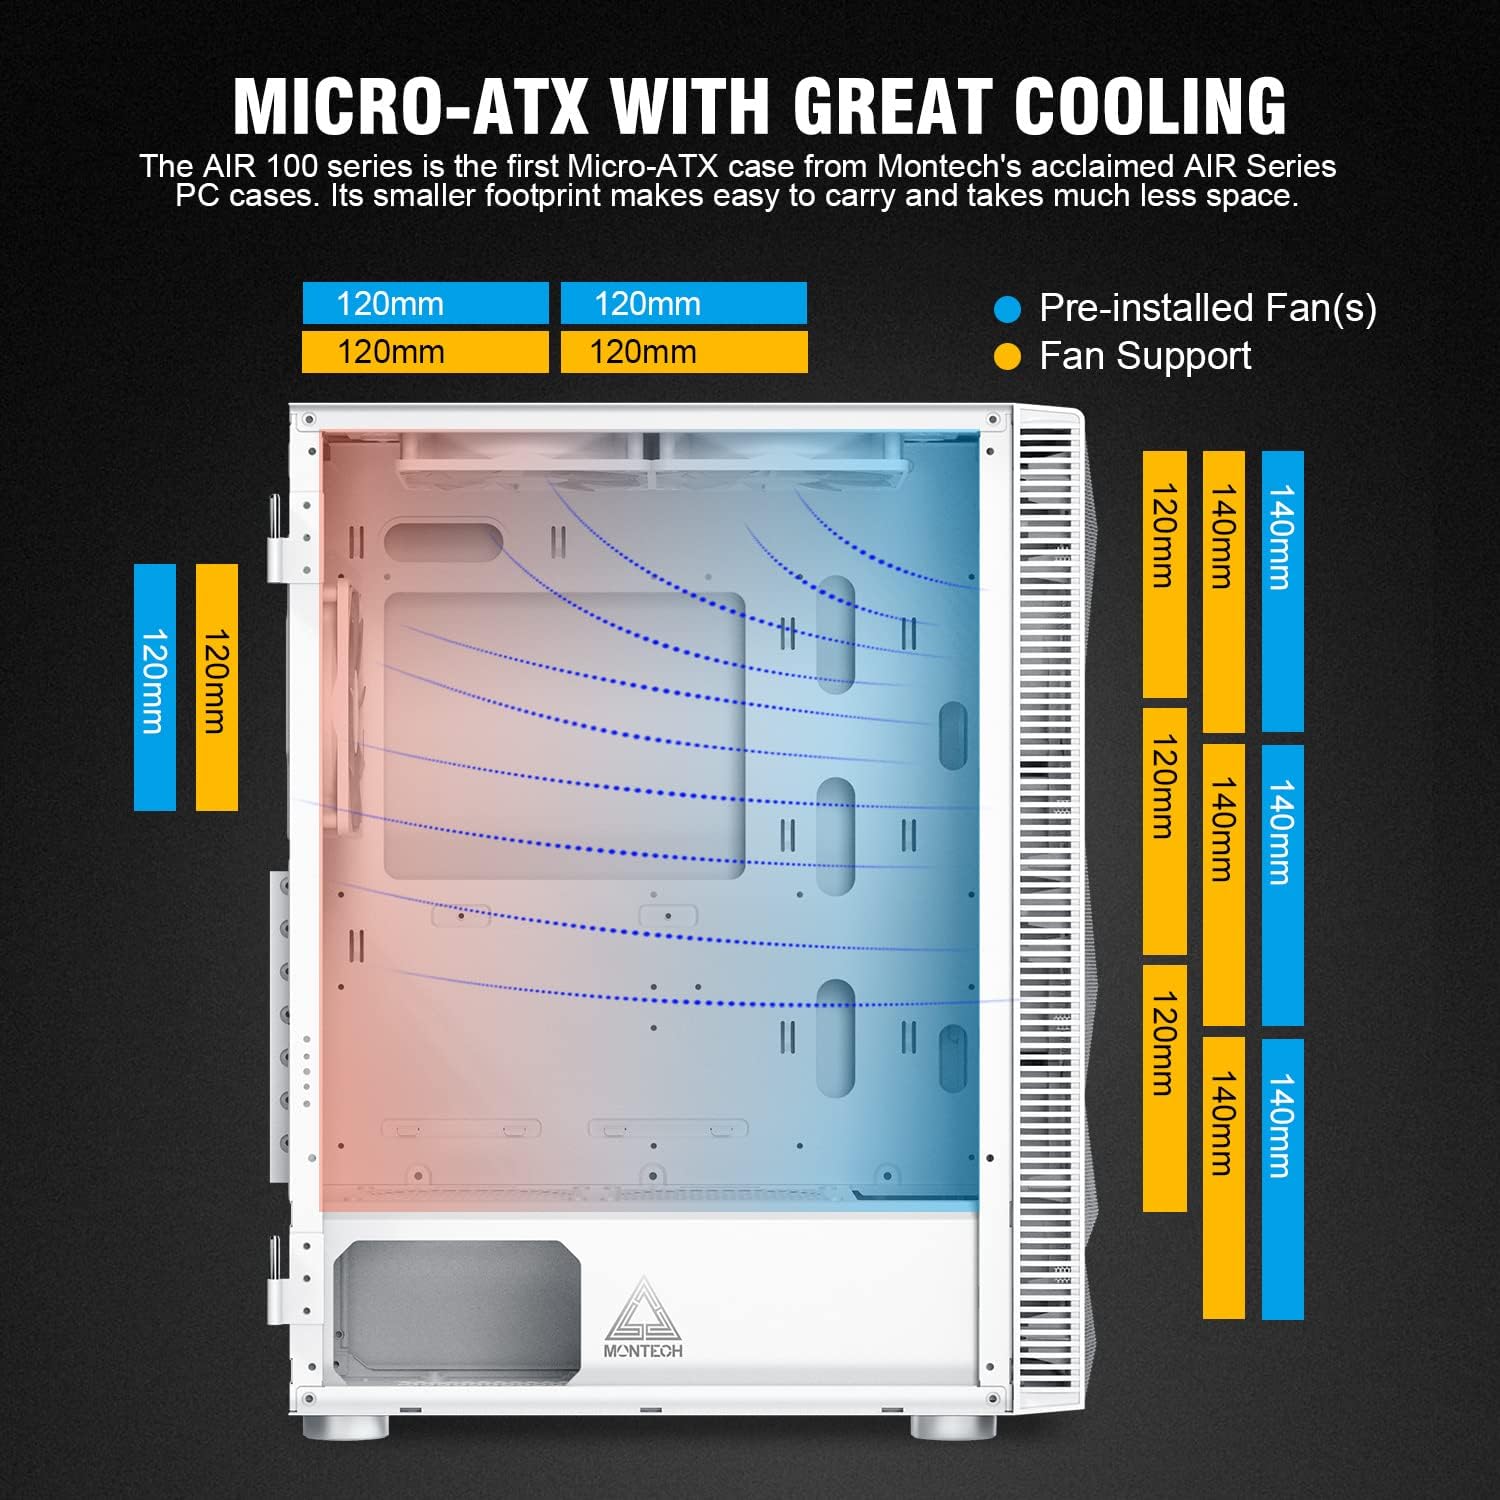
Figure 2: Illustration of optimal airflow paths within the case, with cool air entering from the front and bottom, and hot air exiting from the top and rear.
4.6 Gestione dei cavi
The case provides various cutouts and space behind the motherboard tray for effective cable management, contributing to a cleaner aesthetic and improved airflow.
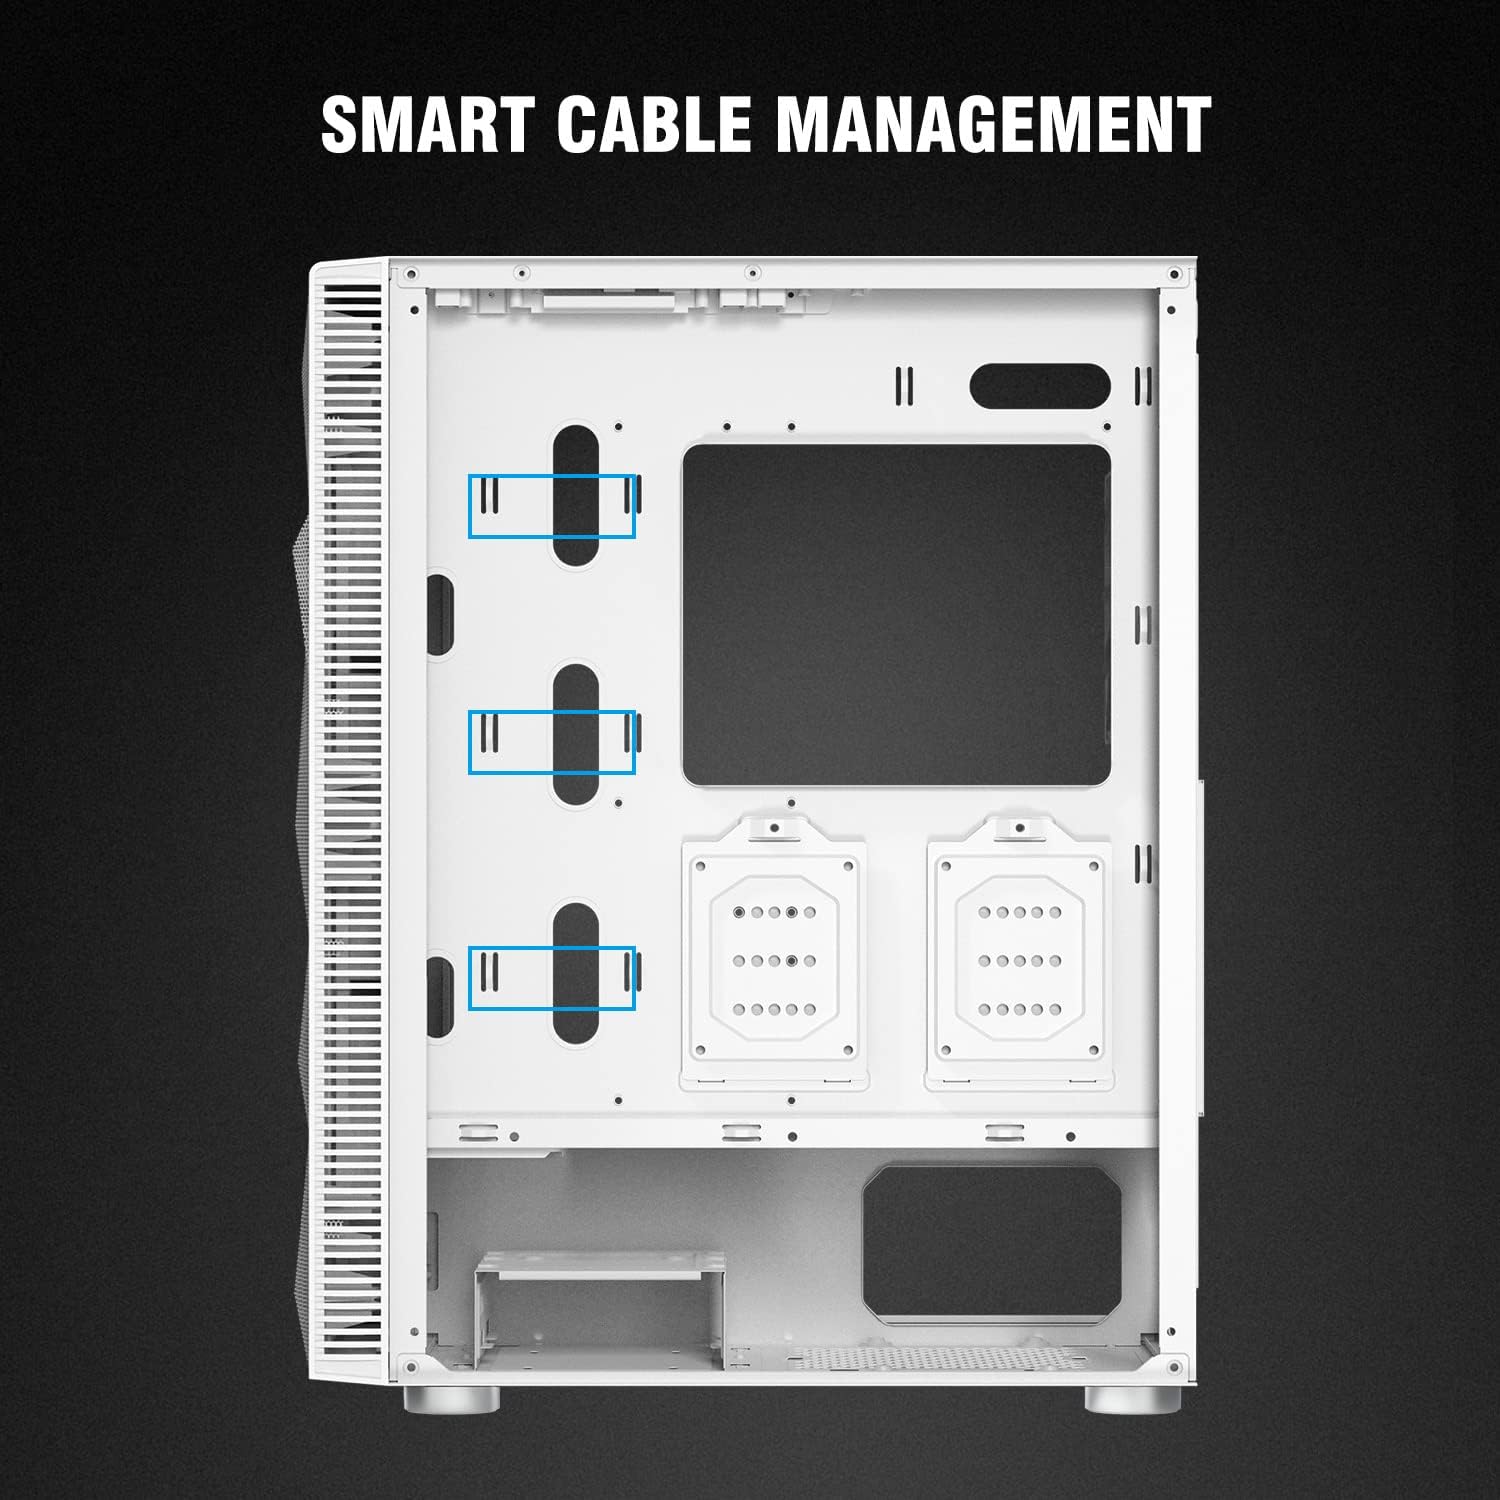
Figura 3: Interno posteriore view highlighting cable routing options and tie-down points for organized wiring.
5. Istruzioni per l'uso
5.1 Pannello I/O frontale
Il pannello I/O superiore fornisce un comodo accesso alle porte e ai controlli essenziali:

Figura 4: dettagliata view of the top I/O panel, indicating the Power button, HD Audio jacks, two USB 2.0 ports, Reset button, two USB 3.0 ports, and the LED control button.
- Pulsante di accensione: Per accendere/spegnere il sistema.
- Jack audio HD: Porte separate per microfono e cuffie.
- Porte USB 2.0 (x2): Per collegare le periferiche.
- Pulsante di reset: Per riavviare il sistema.
- Porte USB 3.0 (x2): Per il trasferimento dati ad alta velocità.
- Pulsante LED: Press to cycle through or turn off the fixed RGB lighting effects of the pre-installed fans.
6. Manutenzione
6.1 Pulizia dei filtri antipolvere
The Montech X3 Mesh includes removable magnetic dust filters on the top and bottom (for the PSU intake) to prevent dust buildup. Regularly remove and clean these filters to maintain optimal airflow and system performance.

Figure 5: Underside of the case, highlighting the removable dust filter for the power supply intake.
6.2 Cleaning Interior and Exterior
Use a soft, dry cloth to clean the exterior surfaces. For the interior, use compressed air to remove dust from components and fan blades. When cleaning the tempered glass panels, use a glass cleaner and a microfiber cloth to avoid streaks.
7. Risoluzione Dei Problemi
7.1 Rumore della ventola
If you experience excessive fan noise, consider the following:
- Ensure all fan screws are tightened securely.
- Clean dust from fan blades and filters, as accumulation can increase noise.
- Verify that no cables are obstructing fan rotation.
- While the pre-installed fans provide good airflow, they are fixed RGB and may not offer advanced speed control. For quieter operation, consider replacing them with aftermarket PWM-controlled fans.
7.2 Cable Management Challenges
Some users may find the space for cable routing behind the motherboard tray to be adequate but potentially tight for very thick cable bundles. Utilize the provided tie-down points and Velcro straps to organize cables effectively. Plan your cable runs before installing all components.
7.3 Power Supply Cable Length
Depending on your power supply unit and motherboard layout, some CPU power cables might be taut when routed to the top-left of the motherboard. Ensure your PSU cables are long enough or consider using cable extensions if necessary to avoid strain on connectors.
8. Garanzia e supporto
For warranty information, technical support, or further assistance, please refer to the official Montech webo contattare direttamente il servizio clienti. Conservare la prova d'acquisto per eventuali reclami in garanzia.