
1. Informazioni importanti sulla sicurezza
Read all safety warnings and instructions before operating this product.
- Always wear eye protection and other appropriate safety gear when using this string trimmer.
- Be aware of potential flying debris and keep bystanders at a safe distance.
- Do not operate the trimmer in enclosed areas or near flammable materials.
- Ensure the battery is fully charged before use and properly secured in the tool.
- Inspect the trimmer line and head for damage before each use. Replace if necessary.
- Keep hands and feet away from the cutting line when the trimmer is operating.
2. Componenti del prodotto
The Makita GRU01M1 string trimmer kit includes the main trimmer unit, a 40V max XGT 4.0Ah battery, and a charger. Key components are detailed below.
2.1. Overall Trimmer View

Image: The complete Makita GRU01M1 string trimmer, showcasing its long shaft, D-ring handle, motor housing, and trimmer head.
2.2. Batteria e caricabatteria

Image: Makita 40V max XGT 4.0Ah Lithium-Ion battery.
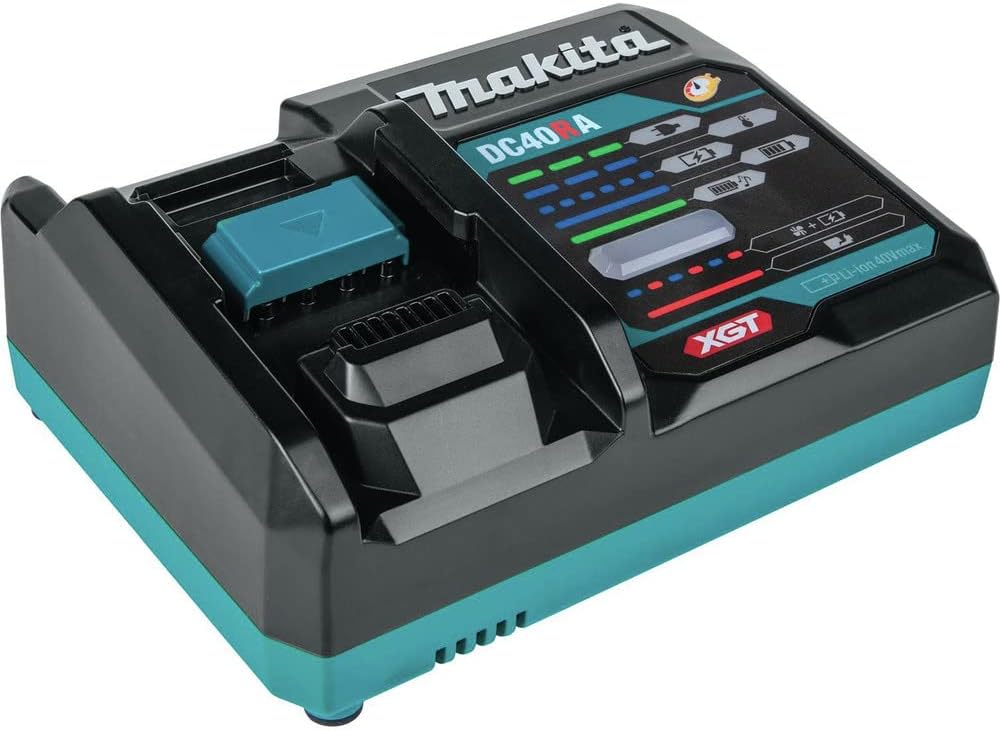
Image: Makita DC40A XGT Rapid Charger for 40V max batteries.
2.3. Trimmer Head and Guard

Immagine: in alto view of the Rapid Load Bump and Feed Trimmer Head.

Immagine: In basso view of the trimmer head, showing the line exit points and the guard.
2.4. Control Panel and Handle

Image: Close-up of the trimmer's control panel, featuring power, speed mode (1/2/3), automatic torque drive (A), and reverse rotation buttons.

Image: The battery compartment with a protective metal bar, designed to shield the battery from impacts.
3. Installazione e montaggio
3.1. Fissaggio della maniglia
The D-ring handle is attached to the shaft using two screws. Ensure it is securely fastened for comfortable and safe operation. The handle position can be adjusted along the shaft to suit user preference.
3.2. Installazione della batteria
Insert the 40V max XGT battery into the battery compartment until it clicks into place. Ensure the battery is fully seated and the protective metal bar is in position to guard the battery.
4. Istruzioni per l'uso
4.1. Modalità di accensione/spegnimento e velocità
To power on the trimmer, press the power button on the control panel. The trimmer will start in the last used speed mode (1, 2, or 3). Press the speed mode button to cycle through low (1), medium (2), and high (3) speeds. For automatic speed adjustment based on load, press and hold the 'A' button to activate Automatic Torque Drive Technology (ADT) mode. In ADT mode, the trimmer will adjust its speed to optimize performance and battery life.
4.2. Funzione di rotazione inversa
If the trimmer line becomes tangled with grass or debris, a reverse rotation function can be used to clear it. With the trimmer powered on, briefly press the reverse button (often indicated by a circular arrow) to temporarily reverse the direction of the trimmer head. This function operates at low speed regardless of the selected forward speed mode. The trimmer will automatically stop after a short period in reverse mode.
4.3. Tecniche di rifinitura
Hold the trimmer firmly with both hands. Maintain a comfortable stance and keep the trimmer head parallel to the ground for even cutting. Use a sweeping motion to cut grass and weeds. Avoid hitting hard objects like rocks, fences, or concrete to prevent damage to the trimmer line and head.
Video: This video demonstrates the process of replacing the trimmer line and explains the various control functions of the Makita GRU01M1 string trimmer, including power modes, reverse function, and safety features.
5. Manutenzione
5.1. Sostituzione del filo del decespugliatore
The Makita GRU01M1 features a Rapid Load Bump and Feed Trimmer Head, allowing for quick line replacement. To replace the line:
- Ensure the trimmer is powered off and the battery is removed.
- Align the arrows on the trimmer head with the 'LINE IN' indicators.
- Feed the new trimmer line through one hole and out the opposite hole until an equal length extends from both sides.
- Rotate the trimmer head knob in the direction indicated by the arrow to wind the line into the head. Continue until only the desired length of line remains exposed.
5.2. Pulizia e conservazione
Dopo ogni utilizzo, pulire la testina e la protezione del tagliabordi per rimuovere erba tagliata e detriti. Utilizzare un adamp cloth; do not use harsh chemicals. Store the trimmer in a dry, secure location, out of reach of children. Remove the battery during storage.
6. Risoluzione Dei Problemi
| Problema | Possibile causa | Soluzione |
|---|---|---|
| Il rifinitore non si avvia | Battery not charged or improperly installed; Power button not pressed; Safety lever not engaged. | Charge battery and ensure proper installation; Press power button; Engage safety lever before pulling trigger. |
| Trimmer line does not feed | Line tangled or jammed; Insufficient line in spool; Incorrect line diameter. | Clear tangles, use reverse function; Reload spool with new line; Use recommended line diameter. |
| Prestazioni di taglio ridotte | Dull or short trimmer line; Low battery charge; Operating in too low a speed mode for conditions. | Advance or replace trimmer line; Recharge battery; Select a higher speed mode or ADT mode. |
| Il trimmer si ferma durante il funzionamento | Overload protection activated (thick grass); Battery overheating or low charge. | Reduce load, allow trimmer to cool; Check battery charge and temperature. |
7. Specifiche
| Caratteristica | Dettaglio |
|---|---|
| Marca | Makita |
| Numero di modello | GRU01M1 |
| Fonte di alimentazione | Battery Powered (40V max XGT Lithium-Ion) |
| Larghezza di taglio | 15 pollici |
| Impostazioni di velocità | 3 (3,500, 5,300, 6,500 RPM) + Automatic Torque Drive Technology (ADT) |
| Tipo di motore | Brushless Outer Rotor Motor |
| Batteria inclusa | 1 Lithium-Ion battery (4.0Ah) |
| Resistenza alle intemperie | IPX4-rated, Extreme Protection Technology (XPT™) |
| Codice UPC | 088381740036 |
8. Garanzia e supporto
8.1. Garanzia del produttore
The Makita GRU01M1 40V max XGT® Brushless Cordless 15" String Trimmer Kit comes with a Garanzia limitata di 3 anno on the tool, battery, and charger. Please refer to the official Makita warranty documentation for full terms and conditions.
8.2. Assistenza clienti
For technical assistance, replacement parts, or warranty claims, please contact Makita customer support through their official website or authorized service centers. Keep your proof of purchase for all warranty-related inquiries.