
1. Introduzione
This manual provides detailed instructions for the setup, operation, maintenance, and troubleshooting of your Focusrite Scarlett 8i6 3rd Gen USB Audio Interface Studio Bundle. This comprehensive package is designed to provide a complete solution for professional-grade audio recording and production, combining a high-quality audio interface with essential studio accessories.
Per garantire prestazioni ottimali e longevità del prodotto, leggere attentamente il presente manuale prima di utilizzarlo.
2. Prodotto finitoview
The Focusrite Scarlett 8i6 3rd Gen Studio Bundle includes the following components:
- Focusrite Scarlett 8i6 3rd Gen USB Audio Interface: An 8-in/6-out USB audio and MIDI interface.
- Mackie CR3-X Studio Monitors: A pair of active studio monitors for accurate sound reproduction.
- Microfono a condensatore: For vocal and instrument recording.
- Acoustic Foam Panels: For room sound treatment.
- Cuffie: Per il monitoraggio dell'audio.
- cavi: Necessary cables for connectivity.
- Production Software Bundle: A suite of software tools for recording, mixing, and production.

Davanti view of the Scarlett 8i6 3rd Gen audio interface, showing inputs, gain controls, and monitor knob.
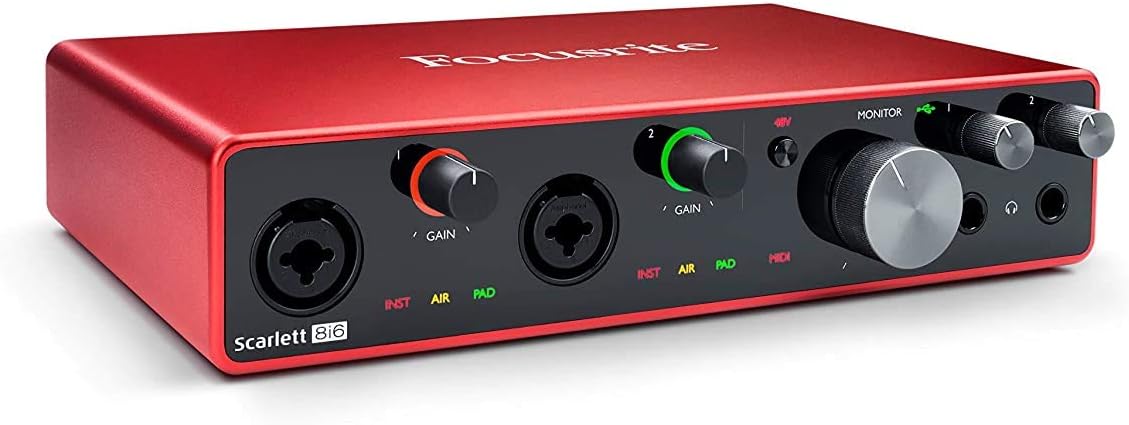
Angolato view of the Scarlett 8i6 3rd Gen, highlighting its compact design and front panel controls.

Posteriore view of the Scarlett 8i6 3rd Gen, displaying line inputs/outputs, MIDI I/O, S/PDIF, and USB connection.

The condenser microphone with its shock mount, designed for clear audio capture.

A visual representation of the various software and plugins included with the Scarlett 8i6 bundle.

The Focusrite Hitmaker Expansion, a collection of studio-grade plugins and virtual instruments.

Screenshots of Ableton Live Lite and Pro Tools First, two digital audio workstations included in the bundle.

Sonnox Toolbox plugins, offering advanced audio widening and thickening effects.
3. Impostazione
3.1. Scarlett 8i6 Audio Interface
- Installazione del driver: Before connecting the Scarlett 8i6 to your computer, visit the official Focusrite webposto (focusrite.com/downloads) to download and install the latest drivers for your operating system (Windows or macOS).
- Connessione al computer: Use the provided USB cable to connect the Scarlett 8i6 to an available USB port on your computer.
- Collegamento elettrico: Connect the included power adapter to the Scarlett 8i6 and then to a power outlet. The interface requires external power for operation.
3.2. Mackie CR3-X Studio Monitors
- Posizionamento: Position the monitors on a stable surface, equidistant from your listening position, forming an equilateral triangle. Ensure the tweeters are at ear level.
- Connect to Interface: Use appropriate cables (e.g., TRS to RCA or TRS to TRS, depending on your monitor inputs) to connect the main outputs of the Scarlett 8i6 (Line Outputs 1-2) to the inputs of the Mackie CR3-X monitors.
- Collegamento elettrico: Connect the power cable to the active monitor and plug it into a power outlet. The passive monitor connects to the active monitor via speaker wire.
3.3. Microfono a condensatore
- Montaggio: Secure the microphone in its shock mount and attach it to a microphone stand.
- Connect to Interface: Use an XLR cable to connect the microphone to one of the combo inputs (Input 1 or 2) on the front of the Scarlett 8i6.
- Potenza fantasma: Condenser microphones require 48V phantom power. Press the '48V' button on the Scarlett 8i6 to activate it for the connected input.
3.4. Cuffie
- Connect your headphones to one of the headphone outputs on the front of the Scarlett 8i6.
3.5. Acoustic Foam Panels
- Strategically place the acoustic foam panels on walls at primary reflection points (e.g., behind monitors, side walls, ceiling) to reduce unwanted echoes and improve sound clarity.
3.6. Installazione del software
- Register your Scarlett 8i6 on the Focusrite website to gain access to the included software bundle, which typically includes Ableton Live Lite, Pro Tools First Focusrite Creative Pack, Softube’s Time and Tone Bundle, Focusrite’s Red Plug-in Suite, and XLN Audio’s Addictive Keys. Follow the instructions provided during registration to download and install these applications.
4. Istruzioni per l'uso
4.1. Registrazione di base
- Seleziona ingresso: Ensure your microphone or instrument is connected to an input on the Scarlett 8i6.
- Imposta guadagno: Adjust the corresponding 'GAIN' knob for your input. The gain halo around the knob will illuminate green for a healthy signal, amber for approaching clipping, and red for clipping. Aim for a strong green signal without hitting red.
- INST/PAD: If connecting a guitar or bass directly, press the 'INST' button for instrument-level input. If the signal is too hot even with gain at minimum, press 'PAD' to attenuate the input.
- AIR Mode: Press the 'AIR' button to engage Focusrite's classic ISA 110 preamp emulation, adding brightness and openness to your recordings.
- Configurazione DAW: Open your Digital Audio Workstation (DAW) software (e.g., Ableton Live Lite, Pro Tools First). Go to your DAW's audio settings/preferences and select the Scarlett 8i6 as your audio input and output device.
- Monitoraggio: Use the 'MONITOR' knob on the Scarlett 8i6 to control the overall output level to your studio monitors. Use the dedicated headphone volume knobs for headphone monitoring.
4.2. Riproduzione
- Ensure your studio monitors are powered on and connected.
- Adjust the 'MONITOR' knob on the Scarlett 8i6 to control the playback volume through your monitors.
- Adjust the headphone volume knobs for private listening.
4.3. Connettività MIDI
- Connect MIDI devices (e.g., MIDI keyboard, drum machine) to the 'MIDI IN' and 'MIDI OUT' ports on the rear of the Scarlett 8i6 using standard 5-pin DIN MIDI cables.
- Your DAW should automatically recognize the Scarlett 8i6's MIDI ports, allowing you to send and receive MIDI data.
5. Manutenzione
- Pulizia: Use a soft, dry cloth to clean the exterior of the Scarlett 8i6 and monitors. Avoid using liquid cleaners or abrasive materials.
- Aggiornamenti software: Regularly check the Focusrite website for driver and firmware updates for your Scarlett 8i6 to ensure compatibility and optimal performance.
- Gestione dei cavi: Mantenere i cavi in ordine e liberi da pieghe o piegature eccessive per evitare danni e garantire connessioni affidabili.
- Magazzinaggio: When not in use for extended periods, store the equipment in a clean, dry environment away from extreme temperatures and direct sunlight.
6. Risoluzione Dei Problemi
6.1. No Sound/Audio Issues
- Controllare le connessioni: Ensure all cables (USB, power, monitor, microphone, headphones) are securely connected.
- Livelli di guadagno: Verify that input gain knobs are set appropriately and not at minimum.
- Potenza fantasma: Se si utilizza un microfono a condensatore, assicurarsi che l'alimentazione phantom a 48 V sia attivata.
- Monitorare il volume: Check the 'MONITOR' knob on the Scarlett 8i6 and the volume controls on your Mackie CR3-X monitors.
- Impostazioni DAW: Confirm that the Scarlett 8i6 is selected as the input and output device in your DAW's audio preferences. Check track routing and arming for recording.
- Impostazioni audio del computer: Ensure your computer's system sound output is set to the Scarlett 8i6.
6.2. Distortion or Clipping
- Ridurre il guadagno: If the gain halo turns red, reduce the input 'GAIN' knob.
- Use PAD: For very loud sources, engage the 'PAD' button on the input.
- Check Software Levels: Ensure levels within your DAW are not clipping.
6.3. Problemi di connettività (USB)
- Cavo USB: Prova un cavo USB diverso o una porta USB diversa sul tuo computer.
- Autisti: Reinstall the latest drivers from the Focusrite websito.
- Ricomincia: Restart your computer and the Scarlett 8i6.
6.4. Software Not Recognizing Interface
- Ensure drivers are correctly installed and up to date.
- Verify the Scarlett 8i6 is powered on and connected via USB.
- Check your DAW's audio device settings.
7. Specifiche
| Caratteristica | Specificazione |
|---|---|
| Marca | Messa a fuoco |
| Modello | Scarlett 8i6 3rd Gen |
| Tecnologia di connettività | USB |
| Numero di canali | 8 (inputs) / 6 (outputs) |
| S . massimoampla tariffa | 192KHz |
| Dispositivi compatibili | Personal computer |
| Sistema operativo | Windows, macOS |
| Software supportato | Ableton Live Lite, Pro Tools First Focusrite Creative Pack, Softube’s Time and Tone Bundle, Focusrite’s Red Plug-in Suite, XLN Audio’s Addictive Keys |
| Ingresso audio | USB |
8. Informazioni sulla garanzia
Focusrite products typically come with a manufacturer's warranty. Please refer to the warranty card included with your product or visit the official Focusrite websito per informazioni dettagliate su termini, condizioni e procedure di registrazione della garanzia. Conservare la prova d'acquisto per eventuali reclami in garanzia.
9. Informazioni di supporto
For further assistance, technical support, or to access FAQs and additional resources, please visit the official Focusrite support websito:
Puoi anche trovare le informazioni di contatto per il servizio clienti sul loro websito se hai bisogno di assistenza diretta.