
Kadimendium V01A
Manuale utente multimetro digitale ANENG V01A
Model: V01A | Brand: Kadimendium
1. Introduzione
This user manual provides detailed instructions for the safe and effective operation of the ANENG V01A Auto Range True RMS Digital Multimeter. This ultra-portable multi-tester is designed for measuring AC/DC current, voltage, resistance, and for continuity testing. Its intelligent measurement capabilities allow for automatic identification and display of measurement data, making it user-friendly for various electrical tasks.
2. Informazioni sulla sicurezza
Please read all safety warnings and operating instructions carefully before using this multimeter. Failure to follow these instructions may result in electric shock, fire, or serious injury.
- Prima di collegare i puntali di prova a un circuito, assicurarsi sempre che il multimetro sia nella modalità di misurazione corretta.
- Non superare i valori massimi di input specificati per ciascun intervallo di misurazione.
- Prestare estrema attenzione quando si lavora con il voltagsuperiori a 30 V CA RMS, 42 V di picco o 60 V CC. Questi voltagrappresentano un rischio di scossa elettrica.
- Inspect test leads for damage before each use. Do not use if insulation is damaged or if the metal is exposed.
- Non utilizzare il multimetro se appare danneggiato o non funziona correttamente.
- Per garantire letture accurate, sostituire immediatamente le batterie quando compare l'indicatore di batteria scarica.
- Durante il test, tenere le mani e le dita dietro le barriere della sonda.
- This device is designed for indoor use and should not be exposed to rain or moisture.

Image: A warning sign with multilingual text emphasizing the importance of reading product instructions carefully before use.
3. Contenuto della confezione
Verifica che tutti gli articoli elencati di seguito siano inclusi nel pacco. Se alcuni articoli risultano mancanti o danneggiati, contatta l'assistenza clienti.
- 1 x ANENG V01A Digital Multimeter (Battery not included)
- 2 sonde di prova (rosse e nere)
- 1 x Manuale utente

Image: The ANENG V01A Digital Multimeter, its test probes, and the user manual, displayed alongside its product packaging.
4. Prodotto finitoview
Familiarize yourself with the components of your ANENG V01A Digital Multimeter.

Immagine: Un fronte chiaro view of the ANENG V01A Digital Multimeter, showcasing its display, buttons, and input jacks, accompanied by its red and black test leads.

Immagine: Un fronte diretto view of the ANENG V01A Digital Multimeter, highlighting its display and control panel.

Image: The ANENG V01A Digital Multimeter shown with its integrated kickstand extended, allowing for angled viewsu una superficie piana.
Componenti chiave:
- Schermo LCD: Mostra le letture delle misurazioni, le unità e gli indicatori di funzione.
- Pulsanti funzione:
- Pulsante NCV: Attiva il volume senza contattotage rilevamento.
- Pulsante H/*: Data Hold function (short press) and Backlight/Flashlight activation (long press).
- Pulsante di accensione: Turns the multimeter On/Off.
- Jack di ingresso:
- Presa COM (nera): Terminale comune per tutte le misurazioni. Collegare qui il puntale di prova nero.
- VΩmA Jack (Red): Input per Voltage, Resistance, and milliampere Current measurements. Connect the red test lead here.
- 10A Fused Jack (Red): Input for high current (up to 10A) measurements. Connect the red test lead here for 10A measurements.
- Sonde di prova: Red and black leads for connecting to circuits.
5. Impostazione
5.1 Installazione della batteria
The ANENG V01A Multimeter requires 2 x AAA batteries (not included) for operation.
- Assicurarsi che il multimetro sia spento.
- Individuare il coperchio del vano batteria sul retro del multimetro.
- Utilizzare un cacciavite per aprire il vano batteria.
- Inserire due batterie AAA, rispettando la polarità corretta (+ e -) come indicato all'interno del vano.
- Riposizionare il coperchio del vano batteria e fissarlo con la vite.
5.2 Collegamento dei puntali di prova
Always connect the black test lead to the COM jack. Connect the red test lead to the appropriate input jack based on the measurement you intend to perform.
- Per voltage, Resistance, Continuity, and milliampere Current (mA) measurements: Connect the red test lead to the VΩmA cricco.
- For high current (up to 10A) measurements: Connect the red test lead to the 10A Fused cricco.

Image: The ANENG V01A Digital Multimeter with its red and black test leads properly connected to the input jacks, ready for use.
6. Istruzioni per l'uso
6.1 Accensione/spegnimento e portata automatica
Premere il tasto Energia button to turn the multimeter on. The V01A features an auto-range function, meaning it automatically recognizes and displays the measurement data without requiring manual range selection. To turn off the multimeter, press the Energia button again. The device also has an Auto Power Off feature to conserve battery life.

Image: The ANENG V01A Digital Multimeter with its display showing a reading, emphasizing its auto-ranging capability for convenient measurement.
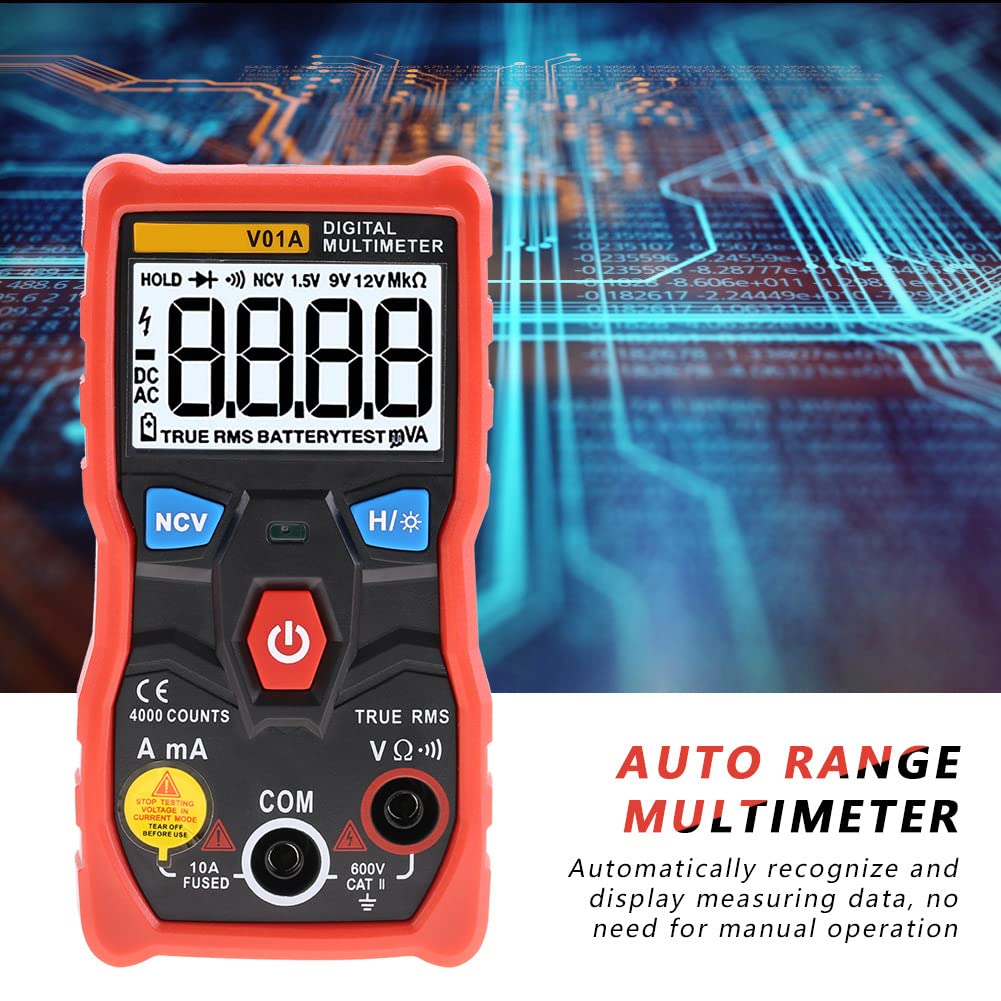
Immagine: un primo piano view of the ANENG V01A Digital Multimeter's display, highlighting the "AUTO RANGE MULTIMETER" text and indicating its automatic measurement recognition.
6.2 Funzioni di misura
6.2.1 Volume CCtage Misurazione
Connect the red test lead to the VΩmA jack and the black test lead to the COM jack. Connect the probes across the DC voltage sorgente. Il multimetro rileverà e visualizzerà automaticamente la tensione CCtage.

Image: A user's hands holding the multimeter probes to measure components on a circuit board, demonstrating a typical voltage or resistance measurement scenario.
6.2.2 Volume ACtage Misurazione
Connect the red test lead to the VΩmA jack and the black test lead to the COM jack. Connect the probes across the AC voltage sorgente. Il multimetro rileverà e visualizzerà automaticamente la tensione CAtage (vero valore efficace).
6.2.3 DC/AC Current Measurement (mA/A)
Attenzione: To measure current, the multimeter must be connected in series with the circuit. Never connect the multimeter in parallel with a voltage source when in current mode, as this can damage the device or blow the fuse.
- Per milliampere (mA) current: Connect the red test lead to the VΩmA jack and the black test lead to the COM jack.
- Per ampere (A) current (up to 10A): Connect the red test lead to the 10A Fused jack and the black test lead to the COM jack.
Break the circuit and connect the multimeter in series. The multimeter will automatically detect and display the current.
6.2.4 Misurazione della resistenza
Connect the red test lead to the VΩmA jack and the black test lead to the COM jack. Ensure the circuit or component is de-energized before measuring resistance. Connect the probes across the component. The multimeter will automatically detect and display the resistance in Ohms (Ω), kilo-Ohms (kΩ), or Mega-Ohms (MΩ).
6.2.5 Prova di continuità
Connect the red test lead to the VΩmA jack and the black test lead to the COM jack. Ensure the circuit is de-energized. Touch the probes to the two points you want to test for continuity. If there is continuity (low resistance), the multimeter will emit an audible beep.
6.2.6 Senza contatto voltage (NCV) Rilevamento
Premere il tasto VNC button. Hold the top part of the multimeter near an AC voltage source (e.g., a live wire or outlet). The multimeter will indicate the presence of AC voltage through an audible beep and/or visual indicator on the display, without direct contact.
6.2.7 Test della batteria (1.5 V, 9 V, 12 V)
The multimeter can test common battery voltages. Connect the red test lead to the VΩmA jack and the black test lead to the COM jack. Connect the probes to the positive and negative terminals of the battery. The multimeter will display the battery voltage.

Image: A user's hands holding the multimeter probes to test the voltage of a 9V battery, demonstrating the battery test function.
6.3 Funzioni speciali
- Conservazione dei dati (H): Premere brevemente il tasto H/* pulsante per congelare la lettura corrente sul display. Premere di nuovo per rilasciare.
- Backlight/Flashlight (*): Premere a lungo il tasto H/* button to turn on the display backlight and the integrated flashlight. Long press again to turn them off. This is useful for working in dimly lit environments.
- Spegnimento automatico: Il multimetro si spegnerà automaticamente dopo un periodo di inattività per preservare la durata della batteria.
- Indicazione di batteria scarica: A battery icon will appear on the display when the battery voltage è basso, il che indica che le batterie devono essere sostituite.
7. Manutenzione
7.1 Pulizia
Pulisci la custodia con l'adamp panno e detergente delicato. Non utilizzare abrasivi o solventi. Mantenere i jack di ingresso liberi da polvere e detriti.
7.2 Sostituzione della batteria
When the low battery indicator appears on the display, replace the batteries as described in Section 5.1. Always use 2 x AAA batteries.
7.3 Conservazione
If the multimeter is not used for a long period, remove the batteries to prevent leakage and damage to the device. Store the multimeter in a cool, dry place, away from direct sunlight and extreme temperatures.
8. Risoluzione Dei Problemi
Se riscontri problemi con il tuo multimetro, consulta la tabella seguente per i problemi più comuni e le relative soluzioni.
| Problema | Possibile causa | Soluzione |
|---|---|---|
| Il multimetro non si accende. | Batterie scariche o installate in modo errato. | Controllare la polarità delle batterie o sostituirle. |
| Nessuna lettura o "OL" visualizzato. | Open circuit, out of range, or incorrect function/lead connection. | Check circuit continuity, ensure measurement is within range, verify test lead connections for the selected function. |
| Letture imprecise. | Batteria scarica, interferenze ambientali o cavi di prova danneggiati. | Replace batteries, move away from strong electromagnetic fields, inspect and replace damaged test leads. |
| Il test di continuità non emette alcun segnale acustico. | Circuito aperto o alta resistenza. | Ensure good contact with the circuit; the circuit may not be continuous. |
9. Specifiche
| Parametro | Valore |
|---|---|
| Marca | ANENG (Kadimendium) |
| Modello | V01A |
| Display | 4000 conteggi |
| Volume DCtage Gamma | 4.000 V, 40.00 V, 400.0 V, 600 V. |
| Volume ACtage Gamma | 4.000V, 40.00V, 400.0V, 600V (True RMS) |
| Gamma di corrente CA | 999.9 mA, 9.999 A |
| Intervallo di corrente CC | 999.9 mA, 9.999 A |
| Intervallo di resistenza | 4.000kΩ, 40.00kΩ, 400.0kΩ, 4.000MΩ, 40.00MΩ |
| Risposta in frequenza CA | Da 40 Hz a 1 kHz |
| Test di continuità | SÌ |
| NCV (Volume senza contattotage) | SÌ |
| Auto Range | SÌ |
| Vero RMS | SÌ |
| Conservazione dei dati | SÌ |
| Retroilluminazione | SÌ |
| Torcia elettrica | SÌ |
| Spegnimento automatico | SÌ |
| Indicazione di batteria scarica | SÌ |
| Materiale | ABS, PVC |
| Sampla tariffa | 3SP |
| Ambiente operativo | 0~40℃, <75%RH |
| Ambiente di archiviazione | -20~60℃, <80%UR |
| Alimentazione elettrica | 2 batterie AAA (NON incluse) |
| Dimensioni | 12 x 6 x 2.8 cm / 4.7 x 2.4 x 1.1 pollici |
| Peso (circa) | 199 g / 7.0 once |
10. Garanzia e supporto
This product comes with a standard manufacturer's warranty. For specific warranty terms and conditions, please refer to the warranty card included with your purchase or contact the seller directly. If you have any questions, require technical assistance, or need to report an issue, please contact Kadimendium customer support through your purchase platform. We are committed to providing timely assistance and ensuring your satisfaction.
Ask a question about this manual
Ask about setup, troubleshooting, compatibility, parts, safety, or missing instructions. Manuals+ will review the question and use this page’s manual context to help answer it.