
PowMr ML2440
Manuale utente del regolatore di carica solare MPPT PowMr 40A
Modello: ML2440
1. Introduzione
This manual provides essential information for the safe and efficient operation of your PowMr 40A MPPT Solar Charge Controller, model ML2440. Please read this manual thoroughly before installation and use to ensure optimal performance and longevity of the product.
2. Istruzioni di sicurezza
- Assicurarsi che tutti i cavi siano collegati e fissati correttamente per evitare cortocircuiti o danni.
- Always connect the battery to the charge controller first, then the solar panels, and finally the load. Disconnect in the reverse order.
- Non tentare di riparare o modificare il controller autonomamente. Contattare personale qualificato per l'assistenza.
- Installare il controller in un'area ben ventilata, lontano da materiali infiammabili e dalla luce solare diretta.
- Indossare adeguati dispositivi di protezione individuale (DPI) quando si lavora con impianti elettrici.
- Assicurare il volume del sistematage matches the controller's specifications (12V/24V auto-detection).
3. Prodotto finitoview
The PowMr 40A MPPT Solar Charge Controller is designed to efficiently manage power from your solar panels to charge various battery types, including Lithium, Sealed, Gel, and Flooded batteries. It features Maximum Power Point Tracking (MPPT) technology for optimized solar energy harvesting, automatic 12V/24V system voltage detection, and a clear LCD display for monitoring system status.
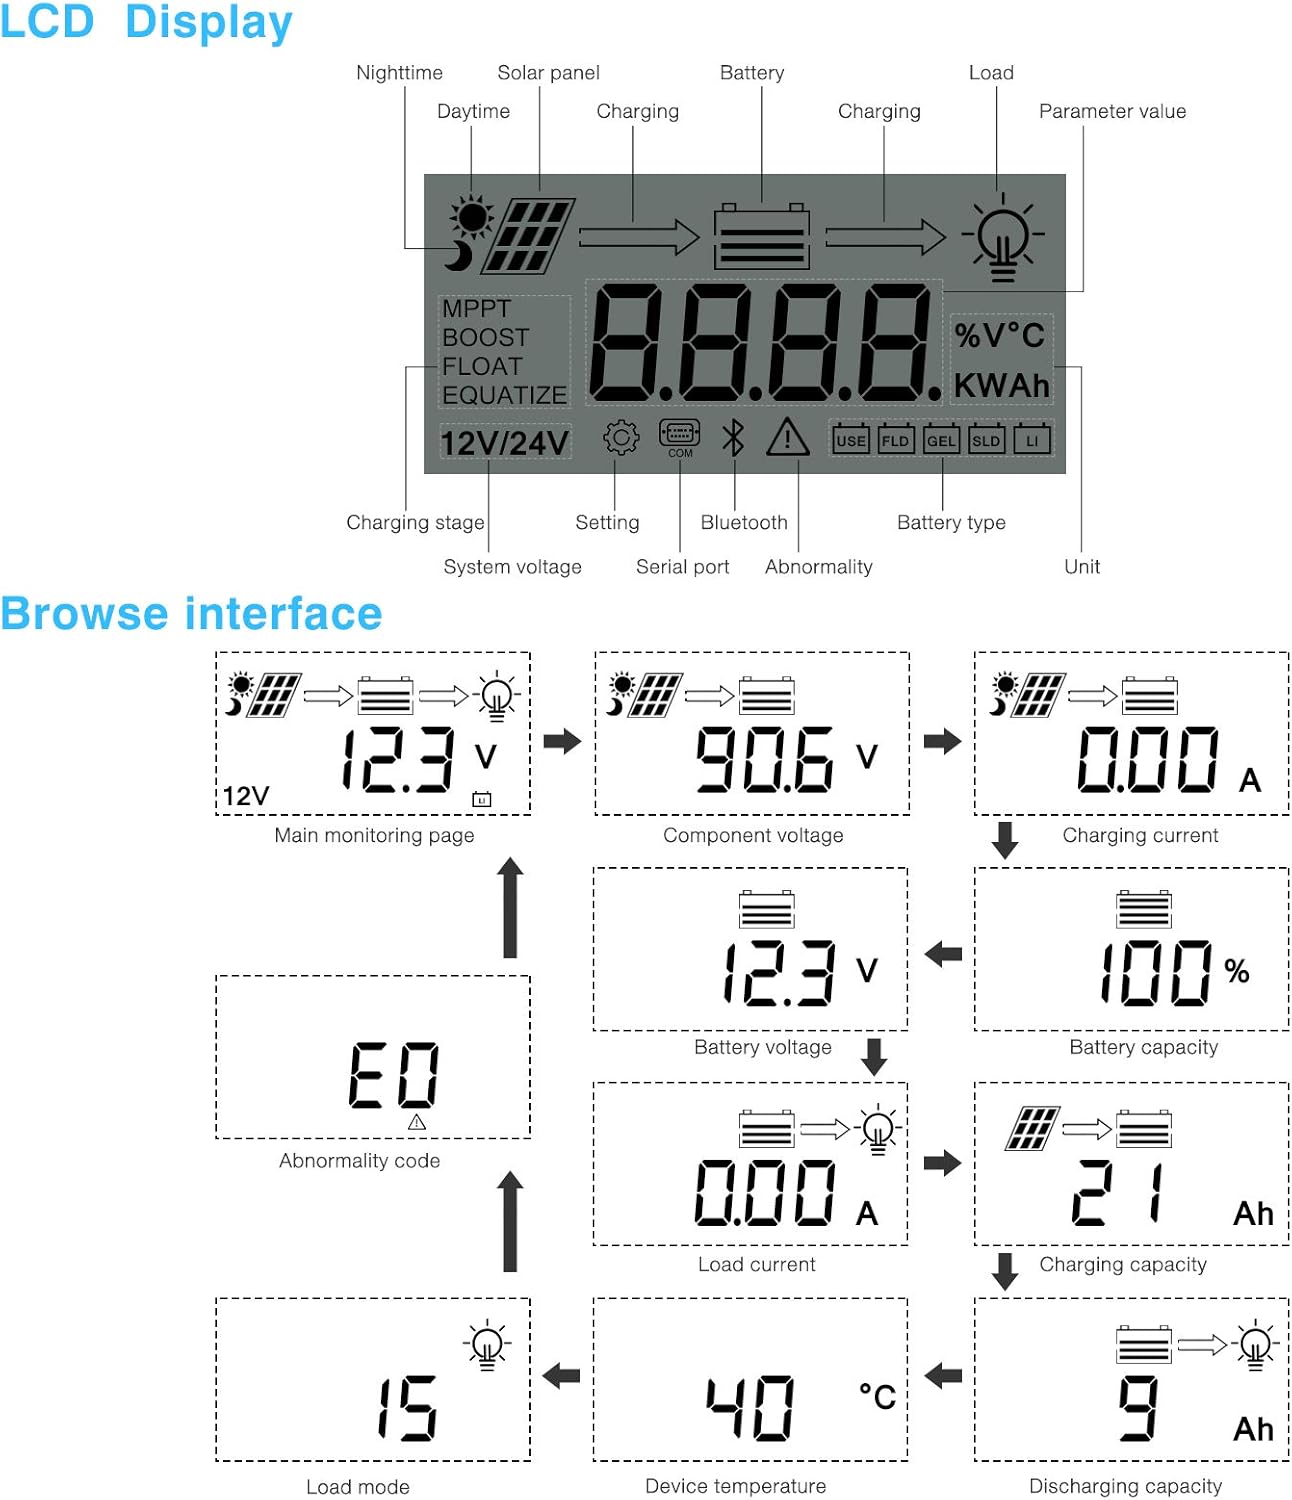
Figura 3.1: Davanti view del regolatore di carica solare PowMr 40A MPPT.
This image shows the main unit of the PowMr 40A MPPT Solar Charge Controller, highlighting its compact design and integrated LCD screen.
The controller supports a maximum solar input voltage of 100V and a maximum input power of 1100W for a 24V system (550W for 12V). It also includes temperature compensation for accurate charging across varying environmental conditions.

Figura 3.2: Temperature compensation feature.
This image illustrates the temperature compensation capability of the controller, ensuring optimal battery charging performance in both hot and cold environments.
4. Installazione e cablaggio
Una corretta installazione è fondamentale per il funzionamento sicuro ed efficiente del regolatore di carica solare. Seguire attentamente questi passaggi.
4.1 Schema elettrico

Figura 4.1: Wiring diagram for the PowMr MPPT Solar Charge Controller.
This diagram illustrates the correct connection order for the battery, solar panels, DC load, and optional inverter. A temperature sensor is also shown.
4.2 Fasi di connessione
- Collegare prima la batteria: Connect the battery to the charge controller's battery terminals. Ensure correct polarity. The controller will auto-detect 12V or 24V system voltage.
- Collegare i pannelli solari: Connect the solar panels to the PV input terminals. Ensure correct polarity. The controller will begin charging if sufficient sunlight is available.
- Collegamento del carico CC (facoltativo): Se si utilizza un carico CC direttamente dal controller, collegarlo ai terminali del carico.
- Collegamento dell'inverter (facoltativo): If using an inverter, connect it to the battery terminals (not directly to the load terminals of the controller).
- Collegare il sensore di temperatura: For accurate temperature compensation, connect the provided temperature sensor to the designated port on the controller and place the sensor near the battery.
Ordine di disconnessione: To disconnect the system, always follow the reverse order: Disconnect load, then solar panels, then battery.
5. Istruzioni per l'uso
This section details how to monitor and configure your charge controller using its integrated LCD display and the optional Bluetooth mobile application.
5.1 Display LCD finitoview

Figura 5.1: LCD Display and Browse Interface.
This image shows the various icons and parameters displayed on the LCD screen, along with the navigation flow through different monitoring pages.
The LCD provides real-time information about your solar system. Key indicators include:
- Ricarica Stage: MPPT, Boost, Float, Equalize.
- Volume di sistematage: 12V/24V auto-detected.
- Tipo di batteria: Icons for Lithium (Li), Sealed (SLD), Gel (GEL), Flooded (FLD).
- Indicatori di stato: Solar panel activity, battery charging, load status, abnormality.
- Valore del parametro: Visualizza voltage, current, capacity, temperature, etc.
Use the buttons below the LCD to navigate through different screens to view parameters such as main monitoring page, component voltage, corrente di carica, volume della batteriatage, battery capacity, load current, charging capacity, device temperature, discharging capacity, abnormality codes, and load mode.
5.2 Bluetooth Mobile Application
The controller supports an optional Bluetooth module (BT-1) for remote monitoring and parameter adjustment via a mobile application (available for Apple iOS and Android devices). The Bluetooth module connects to the RS232 port on the controller.

Figura 5.2: Controller with optional Bluetooth module.
This image displays the PowMr MPPT Solar Charge Controller alongside its optional BT-1 Bluetooth communication module and connecting cable.

Figura 5.3: BT-1 Bluetooth module.
Un dettagliato view of the BT-1 Bluetooth module, which enables wireless communication with the solar charge controller for remote monitoring and settings adjustments.

Figura 5.4: Bluetooth Mobile Interface Display.
This image shows various screens from the mobile application, including real-time monitoring, data records, energy records, and parameter settings.
L'applicazione mobile consente di:
- Monitor real-time system data (voltage, current, power, temperature).
- View historical data and energy records.
- Adjust various charging parameters and battery settings.
- Ripristina le impostazioni predefinite di fabbrica.
6. Manutenzione
Regular maintenance ensures the longevity and optimal performance of your charge controller.
- Pulizia: Pulisci periodicamente l'esterno del controller con un panno asciutto per rimuovere polvere e detriti. Assicurati che le aperture di ventilazione siano libere.
- Connessioni: Annually check all wiring connections for tightness and corrosion. Loose connections can cause overheating and poor performance.
- Ambiente: Assicurarsi che l'ambiente di installazione rimanga entro l'intervallo di temperatura operativa specificato e sia privo di umidità o polvere eccessive.
7. Risoluzione Dei Problemi
This section provides guidance for common issues. Refer to the LCD display for abnormality codes.
- Nessun display/Nessuna alimentazione:
- Controllare i collegamenti della batteria e assicurarsi che la batteria sia carica.tage si trova all'interno del campo operativo.
- Verify that the battery fuse (if installed) is intact.
- Nessuna ricarica:
- Assicurarsi che i pannelli solari siano collegati correttamente e ricevano sufficiente luce solare.
- Controllare il volume del pannello solaretage e corrente.
- Verify that the battery is not fully charged or in a protection state.
- Carico non funzionante:
- Check load connections and ensure the load current does not exceed the controller's rating.
- Verificare che la batteria voltage è al di sopra del volume bassotage disconnect (LVD) setting.
- Check for any abnormality codes on the LCD related to load output.
- Abnormality Codes (e.g., "E0"):
- Refer to the specific abnormality code displayed on the LCD. Consult the full product manual or manufacturer's support for detailed explanations and solutions for each code.
8. Specifiche
Technical specifications for the PowMr 40A MPPT Solar Charge Controller (Model ML2440).

Figura 8.1: Product Specifications Table.
This table provides detailed technical parameters for the ML2420, ML2430, and ML2440 models. The ML2440 column is relevant for this 40A controller.
| Parametro | Value (ML2440) |
|---|---|
| Modello | ML2440 |
| Volume di sistematage | Auto 12V / 24V |
| Perdita a vuoto | da 0.7 W a 1.2 W |
| Volume della batteriatage | da 9 a 35 V |
| massimo ingresso solare voltage | 100 V (25°C), 90 V (-25°C) |
| massimo punto di alimentazione volumetage gamma | Volume della batteriatage +2V a 75V |
| Corrente di carica nominale | 40A |
| Corrente di carico nominale | 20A |
| massimo capacità di carico capacitivo | 10000 uF |
| massimo potenza assorbita impianto fotovoltaico | 550W/ 12V, 1100W/ 24V |
| Efficienza di conversione | ≤ 98% |
| Efficienza di inseguimento MPPT | > 99% |
| Fattore di compensazione della temperatura | -3.0mv/ °C/ 2V (default) |
| Temperatura di esercizio | da -35°C a +45°C |
| Grado di protezione | Grado di protezione IP32 |
| Peso | 2 kg |
| Metodo di comunicazione | RS232 |
| Altitudine | ≤ 3000 metri |
| Dimensioni del prodotto | 238*173*72.5 millimetri |
9. Garanzia e supporto
For warranty information, please refer to the documentation included with your product packaging or visit the official PowMr website. If you encounter any issues not covered in this manual or require further assistance, please contact PowMr customer support.
PowMr Official Websito: Visita il negozio PowMr su Amazon
Ask a question about this manual
Ask about setup, troubleshooting, compatibility, parts, safety, or missing instructions. Manuals+ will review the question and use this page’s manual context to help answer it.