
1. Introduzione
This manual provides essential instructions for the installation, operation, and maintenance of your Hikvision 8MP AcuSense WDR Mini Bullet Network Camera, model DS-2CD2083G2-IU. Please read this manual thoroughly before using the product and retain it for future reference.
Prodotto finitoview
The Hikvision DS-2CD2083G2-IU is a high-performance 8-megapixel (4K) network camera designed for advanced surveillance. It features AcuSense technology for accurate human and vehicle target classification, Wide Dynamic Range (WDR) for clear imaging against strong backlight, and a fixed 2.8mm lens for a wide field of view. Its IP67 rating ensures robust outdoor performance, and the integrated microphone allows for audio monitoring.
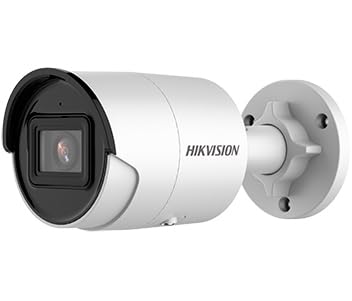
Figure 1: Hikvision 8MP AcuSense WDR Mini Bullet Network Camera (DS-2CD2083G2-IU)
This image displays the Hikvision 8MP AcuSense WDR Mini Bullet Network Camera, highlighting its compact bullet-style design suitable for various installation environments.
Caratteristiche principali
- 8 Megapixel (4K) Resolution: Delivers high-quality, detailed video.
- Tecnologia AcuSense: Reduces false alarms by accurately classifying human and vehicle targets.
- Ampia gamma dinamica (WDR): Ensures clear images even in scenes with strong contrast.
- Fixed 2.8mm Lens: Fornisce un'ampia viewangolo di ing.
- Illuminazione a infrarossi (IR): Night vision up to 40 meters.
- Grado di protezione dalle intemperie IP67: Adatto all'uso esterno in diverse condizioni atmosferiche.
- Microfono incorporato: Enables audio monitoring.
- Lettore di schede integrato: Supports local storage (microSD card not included).
2. Informazioni sulla sicurezza
Per evitare lesioni o danni al prodotto, osservare le seguenti precauzioni di sicurezza:
- Ensure the power supply meets the camera's requirements (6.5 Watts).
- Non esporre la fotocamera a temperature estreme, umidità o ambienti corrosivi.
- Avoid pointing the lens directly at strong light sources, as this may damage the sensor.
- L'installazione deve essere eseguita da personale qualificato in conformità con le normative elettriche locali.
- Utilizzare solo accessori specificati dal produttore.
- Pulisci l'obiettivo della fotocamera con un panno morbido e asciutto. Evita prodotti chimici aggressivi.
3. Configurazione e installazione
3.1 Disimballaggio
Carefully unpack the camera and check for any signs of damage. Ensure all components are present. (Typical components include: camera unit, mounting template, screws, waterproof connector, quick start guide).
3.2 Installazione fisica
The camera is designed for ceiling mounting. Select a suitable location that provides the desired field of view and is within reach of network and power cables. Due to its IP67 rating, it is suitable for outdoor environments.
- Use the provided mounting template to mark drill holes on the ceiling.
- Drill the necessary holes and insert wall plugs if required.
- Fissare la base della telecamera alla superficie di montaggio utilizzando le viti in dotazione.
- Regola l'angolazione della telecamera per una copertura ottimale.
3.3 Connessione di rete e alimentazione
This is an IP network camera. It requires a network connection and power. Power over Ethernet (PoE) is typically supported, simplifying installation by delivering both power and data over a single Ethernet cable. If PoE is not used, a separate 12V DC power adapter (not included) will be required.
- Connect an Ethernet cable from your network switch/router to the camera's RJ45 port. Use the waterproof connector for outdoor installations.
- Se non si utilizza PoE, collegare un adattatore di alimentazione da 12 V CC all'ingresso di alimentazione della telecamera.
- Once connected, the camera will power on. Allow a few minutes for it to boot up.
3.4 Configurazione iniziale
Accedi alla fotocamera web interfaccia tramite a web browser using its default IP address (refer to the quick start guide or use Hikvision's SADP tool to discover the IP address). You will be prompted to set a strong password for security. Follow the on-screen instructions to configure network settings, date/time, and other basic parameters.
4. Istruzioni per l'uso
4.1 Vivere View e Registrazione
Dopo la configurazione iniziale, puoi view the live feed from the camera through its web interface, a Network Video Recorder (NVR), or Hikvision's client software (e.g., iVMS-4200) or mobile app (Hik-Connect). Configure recording schedules and methods (continuous, motion-triggered) via the camera's settings or NVR.
4.2 AcuSense Smart Features
The AcuSense technology allows the camera to distinguish between humans, vehicles, and other moving objects, significantly reducing false alarms caused by animals, rain, or falling leaves. Configure these detection rules in the camera's event settings to receive more accurate alerts.
- Rilevamento del movimento 2.0: Set up detection zones and sensitivity for human and vehicle events.
- Rilevamento delle intrusioni: Define virtual boundaries, and the camera will trigger an alarm if a human or vehicle crosses them.
- Rilevamento attraversamento linea: Similar to intrusion, but for a specific line.
4.3 Ampia gamma dinamica (WDR)
WDR compensates for extreme lighting conditions, such as strong backlight, to ensure that both bright and dark areas of the image are clearly visible. This feature is typically enabled by default but can be adjusted in the image settings.
4.4 Infrared (IR) Night Vision
The camera automatically switches to IR mode in low-light conditions, providing clear black-and-white video up to 40 meters. Ensure no obstructions block the IR LEDs for optimal night vision performance.
4.5 Monitoraggio audio
With its built-in microphone, the camera can capture audio from the surveillance area. Audio settings, including gain control, can be configured in the camera's web interface. Ensure local regulations regarding audio recording are followed.
5. Manutenzione
- Pulizia: Pulire regolarmente l'obiettivo e l'alloggiamento della fotocamera con un panno morbido eamp panno. Non usare detergenti abrasivi.
- Aggiornamenti del firmware: Controllare periodicamente il sito ufficiale Hikvision website for firmware updates. Keeping the firmware updated ensures optimal performance, new features, and security enhancements.
- Ispezione dei cavi: For outdoor installations, periodically inspect cables and connections for wear or damage, especially the waterproof connectors.
- Gestione password: Regularly change your camera's password to maintain security.
6. Risoluzione Dei Problemi
| Problema | Possibile causa | Soluzione |
|---|---|---|
| Nessuna immagine/fotocamera offline | No power, network cable disconnected, incorrect IP address. | Check power supply and network cable. Verify IP address using SADP tool. Restart camera. |
| Scarsa qualità dell'immagine | Dirty lens, incorrect focus (if adjustable), poor lighting, network bandwidth issues. | Clean the lens. Ensure adequate lighting. Check network connection speed. Adjust image settings (WDR, exposure). |
| Falsi allarmi da rilevamento del movimento | Sensitivity too high, environmental factors (trees, animals), AcuSense not configured. | Adjust motion detection sensitivity. Configure AcuSense human/vehicle detection. Adjust detection zones. |
| Impossibile accedere web interfaccia | Incorrect IP address, network connectivity issue, browser compatibility. | Verify IP address. Ensure camera and PC are on the same network segment. Try a different browser. |
Se il problema persiste dopo aver provato queste soluzioni, contattare l'assistenza tecnica Hikvision.
7. Specifiche
| Caratteristica | Dettaglio |
|---|---|
| Numero di modello | DS-2CD2083G2-UI |
| Sensore di immagine | CMOS |
| Risoluzione massima | 8 MP (4K) |
| Lente | Obiettivo fisso 2.8mm |
| Gamma IR | Fino a 40 metri |
| WDR | Supportato |
| Acusense | Human and Vehicle Target Classification |
| Audio | Microfono incorporato |
| Archiviazione locale | Integrated Card Reader (MicroSD slot) |
| Valutazione resistente alle intemperie | Grado di protezione IP67 |
| Consumo energetico | 6.5 Watt |
| Dimensioni (L x P x A) | 15 x 15 x 8 cm (circa) |
| Tipo di montaggio | Montaggio a soffitto |
| Tipo di avviso | Motion Only (configurable for human/vehicle) |
8. Garanzia e supporto
Hikvision products typically come with a limited manufacturer's warranty. Please refer to the warranty card included with your product or visit the official Hikvision websito per termini e condizioni di garanzia dettagliati specifici per la tua regione.
For technical support, firmware downloads, or further assistance, please visit the official Hikvision support portal or contact their customer service department. Ensure you have your product model number (DS-2CD2083G2-IU) and serial number ready when contacting support.
Hikvision ufficiale Websito: www.hikvision.com