
Introduzione
Grazie per l'acquistoasing the Tzumi 7796 GO Theater Wi-Fi LED Cinema Projector. This manual provides essential information for setting up, operating, and maintaining your projector. Please read it thoroughly before use to ensure proper functionality and to maximize your viewing experience. This projector is designed for versatile use, including home entertainment, outdoor movie nights, and business presentations, offering a portable solution with Wi-Fi and multiple connectivity options.
Informazioni importanti sulla sicurezza
- Non guardare direttamente nell'obiettivo del proiettore quando lamp è acceso.
- Assicurare una ventilazione adeguata attorno al proiettore per evitare il surriscaldamento. Non ostruire le aperture di ventilazione.
- Tenere il proiettore lontano dall'acqua o da altri liquidi.
- Utilizzare solo l'adattatore di alimentazione fornito con il proiettore.
- Non tentare di riparare il proiettore da soli. Per qualsiasi intervento di assistenza, rivolgersi a personale qualificato.
- Place the projector on a stable, level surface to prevent damage from falling.
- Scollegare il proiettore durante i temporali o quando non viene utilizzato per lunghi periodi.
Contenuto della confezione
Si prega di verificare che tutti gli articoli siano presenti:
- Tzumi 7796 GO Theater Wi-Fi LED Cinema Projector
- Telecomando
- Adattatore di alimentazione
- Manuale dell'utente (questo documento)
- Cavo AV (se incluso)
Prodotto finitoview
Davanti View

Immagine: Davanti view of the Tzumi 7796 projector. This image displays the main projection lens on the left side and ventilation grilles along the front and right side of the device. The overall casing è bianco.
Lato View con porte
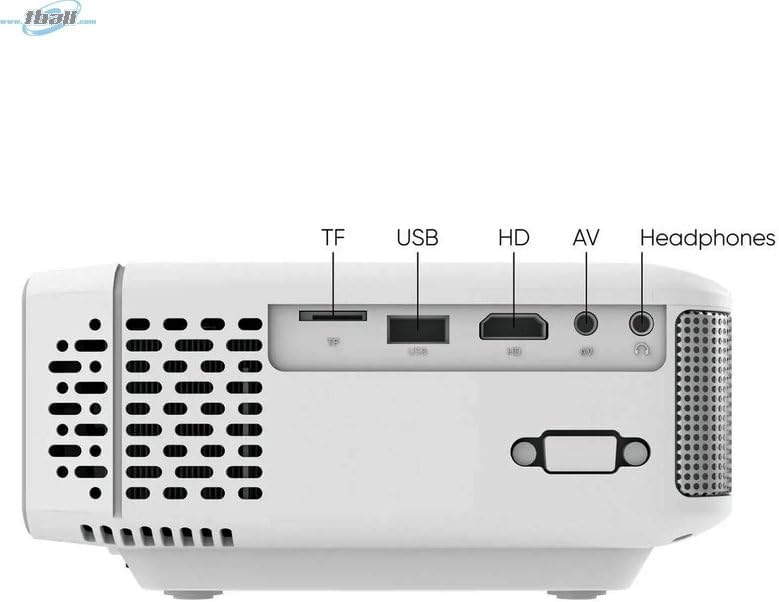
Immagine: Lato view of the Tzumi 7796 projector highlighting its various input ports. From left to right, these include a TF card slot, a USB port, an HD (HDMI) port, an AV input, and a headphone jack. This side also features ventilation grilles.
Superiore View con controlli

Immagine: Superiore view of the Tzumi 7796 projector. This image shows the manual focus and keystone correction dials located near the lens. The central control panel features directional buttons (Up, Down, Left, Right), Home, Option, Back, Power, and Enter buttons for navigation and control.
Posteriore View con ingresso di potenza

Immagine: Posteriore view of the Tzumi 7796 projector. This view primarily shows the power input socket on the left side and additional ventilation grilles on the right side.
Guida all'installazione
1. Posizionamento
Posizionare il proiettore su una superficie stabile e piana. Per una visione ottimale viewing, position the projector directly in front of your screen or wall. The ideal projection distance will vary based on the desired screen size. Ensure there is adequate space around the projector for ventilation.

Immagine: This image illustrates the versatility of the Tzumi 7796 projector, showing it being used in both an indoor home setting and an outdoor movie night environment. This highlights its suitability for various entertainment scenarios.
2. Collegamento elettrico
- Connect the power adapter to the projector's power input port (refer to "Rear View with Power Input" image).
- Collegare l'altra estremità dell'alimentatore a una presa a muro.
- La spia di alimentazione sul proiettore dovrebbe illuminarsi.
3. Collegamento dei dispositivi
Il proiettore supporta diverse sorgenti di input:
- HDMI: Connect your laptop, gaming console, or streaming device using an HDMI cable to the HD port.
- USB: Inserire un'unità flash USB nella porta USB per riprodurre i contenuti multimediali filedirettamente.
- AV: Use the provided AV cable to connect older devices like DVD players to the AV port.
- Carta TF: Insert a TF (MicroSD) card into the TF card slot to play media files.
- Wifi: For wireless screen mirroring or streaming, connect the projector to your Wi-Fi network (see "Operating Instructions - Wi-Fi Connectivity").
4. Regolazione della messa a fuoco e della distorsione trapezoidale
- Messa a fuoco: Ruotare il MESSA A FUOCO ring near the lens until the projected image is clear and sharp.
- Keystone: If the image appears trapezoidal (wider at the top or bottom), adjust the CHIAVE DI PIETRA correction dial until the image is rectangular.
Istruzioni per l'uso
Accensione/spegnimento
- Accensione: Premere il tasto Energia pulsante sul pannello di controllo del proiettore o sul telecomando.
- Spegni: Premere il tasto Energia button again. Confirm shutdown if prompted.
Selezione della sorgente di input
After powering on, the projector will display its main menu. To select an input source:
- Use the directional buttons on the projector or remote to navigate to the desired input (e.g., HDMI, USB, AV, TF Card, Wi-Fi).
- Premere il tasto Entrare pulsante per confermare la selezione.
Connettività Wi-Fi
To connect your projector to a Wi-Fi network for screen mirroring or online content:
- Dal menu principale, vai a Wifi or Impostazioni di rete opzione.
- Selezionare Configurazione Wi-Fi and choose your desired network from the list.
- Inserisci la password Wi-Fi utilizzando la tastiera sullo schermo e conferma.
- Once connected, you can use screen mirroring features (e.g., Miracast, AirPlay) or access built-in smart features if available.
Impostazioni audio
The projector features two built-in 3W speakers. You can also connect external audio devices:
- Altoparlanti incorporati: Audio will play automatically through the projector's speakers. Adjust volume using the remote or control panel.
- Headphones/External Speakers: Connect headphones or external speakers to the 3.5mm headphone jack on the side of the projector. This will typically mute the built-in speakers.
Manutenzione
Pulizia della lente
Per mantenere una qualità dell'immagine ottimale, tenere pulita la lente del proiettore.
- Utilizzare un panno morbido e privo di lanugine, specificamente progettato per lenti ottiche.
- Pulire delicatamente la lente con movimenti circolari.
- Avoid using abrasive cleaners or excessive pressure, which can scratch the lens.
Cura generale e conservazione
- Keep the projector in a cool, dry place when not in use.
- Protect the projector from dust and extreme temperatures.
- Do not expose the projector to direct sunlight for extended periods.
- Pulisci l'esterno casing con un morbido, damp stoffa. Evitare prodotti chimici aggressivi.
Risoluzione dei problemi
| Problema | Possibile causa | Soluzione |
|---|---|---|
| Nessuna immagine proiettata |
|
|
| L'immagine è sfocata |
|
|
| L'immagine è trapezoidale |
|
|
| Nessun suono |
|
|
| Problemi di connessione Wi-Fi |
|
|
Specifiche
- Modello: 7796
- Marca: Tsumi
- Risoluzione dello schermo: 1920 x 1080 (Full HD)
- Luminosità: 1600 lumen
- Tecnologia di connettività: HDMI, Wi-Fi, USB, AV, TF Card
- Caratteristica speciale: Portatile
- Utilizzi consigliati: Home entertainment, Outdoor movie nights, Business presentations
- Peso dell'articolo: 3 libbre
- Dimensioni della confezione: 11 x 9 x 5 pollici
- Altoparlanti incorporati: Due altoparlanti da 3 W
Garanzia e supporto
For warranty information and technical support, please refer to the documentation included with your purchase or visit the official Tzumi websito. Conservare la prova d'acquisto per eventuali reclami in garanzia.
Supporto online: Visit the Tzumi Store on Amazon