
1. Introduzione
Thank you for choosing the LiebeWH MH-020G Dual-Frequency Ultrasonic Cleaner. This device is designed for efficient and thorough cleaning of various items using ultrasonic waves, combined with heating and degassing functions. It is suitable for a wide range of applications, from delicate jewelry to industrial parts. Please read this manual carefully before operating the unit to ensure safe and optimal performance.
2. Istruzioni di sicurezza
AVVERTIMENTO!
- Always unplug the power source before filling or emptying the tank.
- Do not operate the heating function without water in the tank.
- Never leave the unit unattended while heating or in operation.
- Ensure the unit is powered off and the water has cooled to a normal temperature before draining the tank.
- Tenere l'unità lontano dalla portata dei bambini.
- Non immergere il corpo principale dell'aspirapolvere in acqua o altri liquidi.
- Utilizzare solo soluzioni detergenti appropriate. Evitare liquidi infiammabili o corrosivi.
- Se il cavo di alimentazione è danneggiato, deve essere sostituito dal produttore, da un suo agente di assistenza o da personale qualificato per evitare rischi.
3. Prodotto finitoview
The LiebeWH MH-020G Ultrasonic Cleaner features a durable SUS304 stainless steel tank, dual-frequency ultrasonic transducers, and an intuitive control panel for setting time, temperature, and special functions like degassing and turbo mode.

Figure 3.1: Main components of the LiebeWH MH-020G Ultrasonic Cleaner, including the unit, power cord, and cleaning basket.

Figure 3.2: The ultrasonic cleaner with its lid open, revealing the SUS304 stainless steel cleaning tank.

Figure 3.3: The included stainless steel cleaning basket, designed to hold items during the ultrasonic cleaning process.

Figure 3.4: The control panel with digital displays for temperature and time, and buttons for heating, degassing, sweep, turbo, and power.
Applicazioni
This ultrasonic cleaner is suitable for various applications, including:
- Parti hardware
- Componenti elettronici
- Auto parts
- Dental instruments
- Laboratory equipment
- Jewelry, watches, glasses
- Hospital cleaning rooms

Figura 3.5: Esamples of items that can be effectively cleaned using the ultrasonic cleaner.
4. Impostazione
- Disimballaggio: Estrarre con cautela il pulitore a ultrasuoni e tutti gli accessori dalla confezione. Verificare che non vi siano danni.
- Posizionamento: Posizionare l'unità su una superficie stabile, piana e asciutta. Assicurarsi che vi sia un'adeguata ventilazione attorno all'unità.
- Collegamento elettrico: Ensure the power switch on the back of the unit is in the OFF position. Connect the power cord to the unit and then to a grounded electrical outlet (EU Stekker).
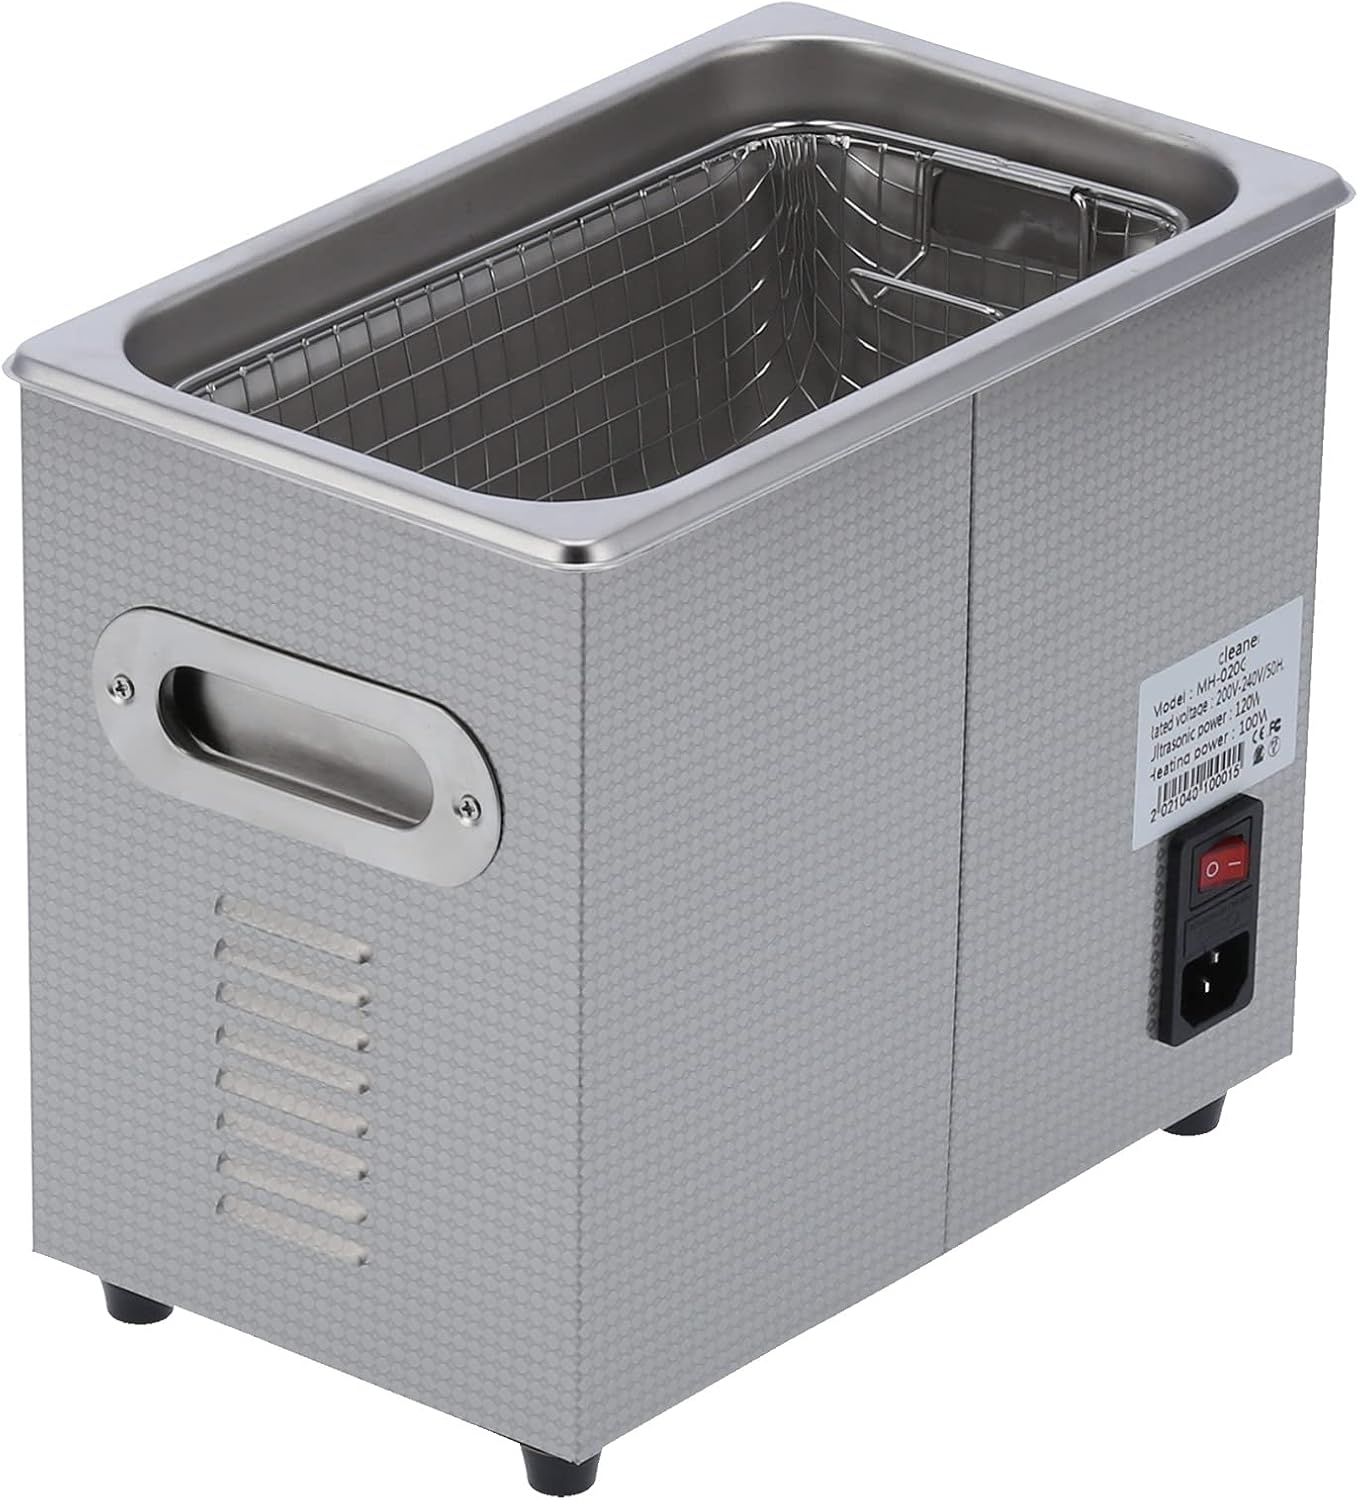
Figura 4.1: Posteriore view of the unit, highlighting the power input and main power switch.
5. Istruzioni per l'uso
Seguire questi passaggi per una pulizia efficace:
- Riempire il serbatoio: Open the lid and fill the stainless steel tank with water. For optimal performance, fill the tank approximately 2/3 full.
- Aggiungere la soluzione detergente (facoltativo): If required for your items, add an appropriate amount of cleaning detergent to the water. Stir the cleaning agent evenly to mix.
- Posiziona gli elementi: Carefully place the items to be cleaned into the cleaning basket, then lower the basket into the tank. Ensure items are fully submerged but not touching the bottom of the tank directly. For heavily soiled items, pre-soaking may improve results.
- Imposta tempo e temperatura:
- Accendere l'interruttore di alimentazione principale.
- Use the control panel to set the desired cleaning time (0-30 minutes) and heating temperature (0-80 ℃). If your model does not have a heating function, only set the time.
- Press the 'Heating' button to activate the heating function.
- Press the 'Degas' button to remove dissolved gases from the solution, which can improve cleaning efficiency.
- Press the 'Sweep' or 'Turbo' buttons for specialized cleaning modes if desired.
- Inizia la pulizia: Press the 'ON/OFF' button to start the ultrasonic cleaning process. The unit will operate for the set duration.
- Dopo la pulizia: Once the cleaning cycle is complete, turn off the unit. Wait for the water to cool down to a safe temperature if heating was used. Carefully remove the cleaning basket with the cleaned items.

Figure 5.1: The ultrasonic cleaner effectively cleaning delicate items such as glasses and a ring.
6. Manutenzione
Proper maintenance ensures the longevity and efficiency of your ultrasonic cleaner:
- Drain Wastewater: After each use, especially if using cleaning solutions, drain the wastewater from the tank.
- Pulisci il serbatoio: Wipe the inside of the tank with a dry, soft cloth. Do not use abrasive cleaners or steel wool.
- Pulizia esterna: Pulire l'esterno dell'unità con adamp panno. Non spruzzare acqua direttamente sull'unità.
- Magazzinaggio: Conservare l'unità in un luogo fresco e asciutto quando non in uso. Assicurarsi che il serbatoio sia completamente asciutto prima di riporlo.
- Ispezione regolare: Controllare periodicamente il cavo di alimentazione per eventuali segni di danneggiamento.
7. Risoluzione Dei Problemi
Se riscontri problemi con il tuo pulitore a ultrasuoni, fai riferimento ai seguenti problemi comuni e alle relative soluzioni:
- L'unità non si accende:
- Verificare che il cavo di alimentazione sia collegato saldamente sia all'unità sia alla presa elettrica.
- Assicurarsi che l'interruttore di alimentazione principale sul retro dell'unità sia in posizione "ON".
- Verify the electrical outlet is functioning correctly by plugging in another appliance.
- La funzione ultrasuoni non funziona:
- Ensure the tank is filled with water to the recommended level.
- Check if the cleaning time has been set and the 'ON/OFF' button has been pressed.
- Listen for a faint buzzing sound; ultrasonic waves are often not visible.
- Funzione di riscaldamento non funzionante:
- Ensure the tank is filled with water. The heating element requires water to operate safely.
- Verify the temperature setting is above 0 ℃ and the 'Heating' button is activated.
- Risultati di pulizia scadenti:
- Ensure items are properly submerged and not overcrowded.
- Consider using a suitable cleaning solution for the type of dirt and material.
- Increase cleaning time or temperature (if applicable).
- Try using the 'Degas' function before cleaning to improve cavitation.
Se i problemi persistono, contattare l'assistenza clienti.
8. Specifiche
Technical specifications for the LiebeWH MH-020G Ultrasonic Cleaner:
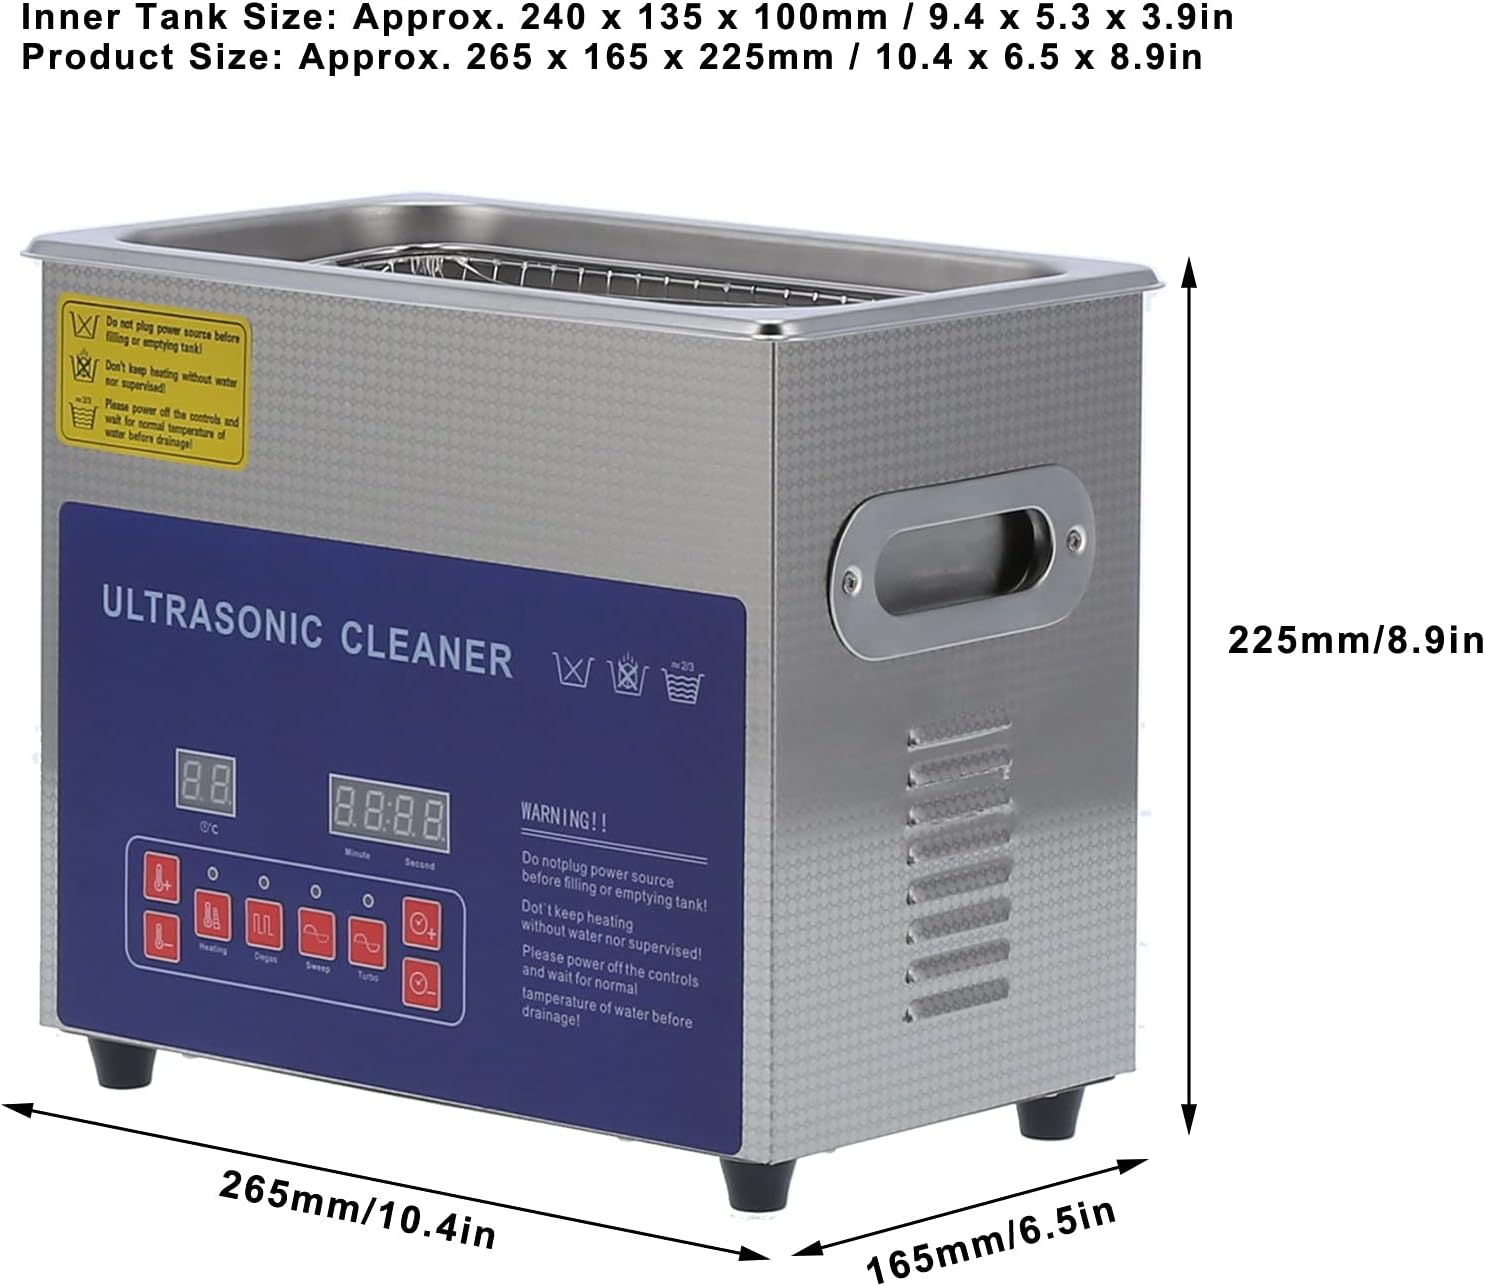
Figure 8.1: Product dimensions for the LiebeWH MH-020G Ultrasonic Cleaner.
| Caratteristica | Specificazione |
|---|---|
| Modello | MH-020G |
| Materiale | Acciaio inossidabile SUS304 |
| Capacità | 3 Liters (Actual capacity: 3L) |
| Potenza ultrasonica | 120W |
| Potenza di riscaldamento | 100W |
| Frequenza | Dual Frequency: 40 kHz / 33 kHz |
| Vibrating Heads | 2 |
| Intervallo di temperatura di riscaldamento | 0-80 ℃ |
| Cleaning Time Range | 0-30 minuti |
| Inner Tank Dimensions (L x W x H) | Circa 240 x 135 x 100 mm (9.4 x 5.3 x 3.9 pollici) |
| Dimensioni del prodotto (L x P x A) | Circa 265 x 165 x 225 mm (10.4 x 6.5 x 8.9 pollici) |
| Produttore | LiebeWH |
| Dimensioni del pacco | Dimensioni: 34 x 30 x 25 cm |
| Peso del pacco | 3.68 kg |
9. Garanzia e supporto
LiebeWH products are covered by a quality guarantee. For specific warranty details, please refer to the documentation provided with your purchase or contact your retailer. For technical support, troubleshooting assistance, or spare parts, please contact LiebeWH customer service through their official channels or your point of purchase.