1. Introduzione
The Keystone Energy Star 50-Pint Portable Dehumidifier is designed to efficiently remove excess moisture from the air, creating a more comfortable and healthier indoor environment. This unit is ideal for basements, garages, living rooms, and other extra-large rooms up to 4,500 square feet. Its advanced features, including a built-in pump for continuous draining, auto-shutoff, and an LED display, ensure convenient and reliable operation.

Figura 1.1: Fronte view del deumidificatore portatile Keystone da 50 pinte.
2. Informazioni sulla sicurezza
Leggere attentamente tutte le istruzioni di sicurezza prima di utilizzare il deumidificatore per evitare lesioni o danni. Conservare il presente manuale per riferimento futuro.
- Sicurezza elettrica: Always plug the unit into a direct, dedicated electrical outlet. Do not use extension cords or adapter plugs. Ensure the power cord is not pinched or damaged.
- Posizionamento: Position the dehumidifier vertically on a stable, level surface. Maintain at least 7.9 inches (20 cm) of clearance on all sides of the unit to ensure proper airflow and prevent overheating.
- Serbatoio dell'acqua: Do not drink the collected water. Always empty the water tank when the 'Full Bucket' indicator illuminates to prevent overflow.
- Manutenzione del filtro: Pulire regolarmente il filtro dell'aria per mantenere prestazioni e qualità dell'aria ottimali.
- Condizioni operative: Do not operate the unit in extremely cold temperatures (below 41°F / 5°C) as it may affect performance.
WARNING: This product contains chemicals known to the State of California to cause cancer and birth defects or other reproductive harm. For more information, please refer to the Proposition 65 warning in the included manual.
3. Prodotto finitoview
3.1 Caratteristiche principali
- Alta capacità: Rimuove fino a 50 pinte di umidità al giorno.
- Ampia copertura: Effective in areas up to 4,500 sq.ft.
- Efficienza energetica: Energy Star certified for reduced energy consumption.
- Scarico continuo: Features a built-in pump for continuous upward drainage, eliminating the need for manual emptying.
- Comandi intuitivi: Electronic controls with an LED display for easy setting adjustments.
- Caratteristiche di sicurezza: Auto-shutoff when the water tank is full and auto-restart after a power outage.
- Portabilità: Equipped with four omni-directional caster wheels for easy movement.
- Funzionamento silenzioso: Funziona con un basso livello di rumore di 55 dB.

Figure 3.1: The dehumidifier helps prevent excessive dampness, musty odors, and high humidity.
3.2 Componenti
- Unità deumidificatrice principale
- Removable Water Tank (1.8-gallon capacity)
- Filtro a rete lavabile
- Threaded Adaptor with Small Internal Drain Hose (for pump drainage)
- Manuale d'uso

Figure 3.2: Illustration of the removable water tank and built-in pump for continuous drainage.
3.3 Pannello di controllo
Il pannello di controllo si trova nella parte superiore dell'unità ed è dotato di un display LED e di vari pulsanti per il funzionamento.

Figure 3.3: Close-up of the control panel with LED display and function buttons.
- Pulsante di accensione: Accende/spegne l'unità.
- Pulsante Modalità: Cycles through Normal, Turbo, and Auto-Defrost settings.
- Pulsante Timer: Imposta il timer 24 ore per il funzionamento automatico.
- Pulsante velocità ventola: Regola la velocità della ventola (alta/bassa).
- Pulsanti di regolazione dell'umidità: Aumenta o diminuisce il livello di umidità desiderato.
- Avviso filtro: Si illumina quando è necessario pulire il filtro.
- Full Bucket Alert: Si illumina quando il serbatoio dell'acqua è pieno.
4. Impostazione
4.1 Disimballaggio e posizionamento
- Estrarre con cautela il deumidificatore dalla confezione.
- Place the unit upright on a firm, level floor.
- Ensure there is at least 7.9 inches (20 cm) of clear space around all sides of the unit for proper air circulation.
- Plug the power cord directly into a dedicated 120V AC, 60Hz grounded wall outlet. Do not use an extension cord.

Figure 4.1: Proper placement of the dehumidifier in a room, ensuring adequate clearance.
4.2 Continuous Drainage Setup (with Pump)
This model includes a built-in pump for continuous drainage, allowing you to drain water upwards or to a distant drain without manually emptying the bucket.
- Individuare l'uscita di scarico continuo sul retro dell'unità.
- Attach a standard garden hose (not included) to the threaded adaptor.
- Ensure the hose is securely connected and points towards the desired drain location.
- For optimal pump longevity, a gradual incline for the hose is recommended over a complete vertical incline, though some vertical lift is possible.
Video 4.1: This video demonstrates the unpacking and installation process, including how to set up the continuous drainage feature with the built-in pump.
5. Istruzioni per l'uso
5.1 Funzionamento di base
- Premere il tasto Energia button to turn the unit on. The LED display will show the current humidity level.
- Utilizzare il Regolazione dell'umidità buttons (up/down arrows) to set your desired humidity level (e.g., 45% for optimal comfort).
- The unit will automatically operate to reach and maintain the set humidity level.
5.2 Impostazioni della modalità
Premere il tasto Modalità button to cycle through the following settings:
- Normale: Funzionamento standard di deumidificazione.
- Turbo: Increases fan speed for faster moisture removal.
- Sbrinamento automatico: Automatically activates when frost builds up on the evaporator coils, ensuring efficient operation in cooler environments.
5.3 Funzione timer
Il timer da 24 ore consente di programmare l'accensione o lo spegnimento automatico dell'unità.
- To set the auto-off timer: With the unit running, press the Timer button and use the humidity adjustment arrows to select the desired number of hours (1-24) before the unit turns off.
- To set the auto-on timer: With the unit off, press the Timer button and use the humidity adjustment arrows to select the desired number of hours (1-24) before the unit turns on.
Video 5.1: This video highlights the LED display, 24-hour timer, and auto-shutoff features of the dehumidifier.
6. Manutenzione
Una manutenzione regolare garantisce la longevità e il funzionamento efficiente del deumidificatore.
6.1 Svuotamento del serbatoio dell'acqua
If not using the continuous drain option, the water tank will need to be emptied manually when it is full. The 'Full Bucket' indicator light will illuminate, and the unit will automatically shut off.
- Estrarre delicatamente il serbatoio dell'acqua dalla parte anteriore dell'unità.
- Trasportare con cautela il serbatoio in un lavandino o in uno scarico.
- Versare l'acqua raccolta.
- Rimettere il serbatoio dell'acqua vuoto nell'unità finché non scatta in posizione. L'unità riprenderà a funzionare.
6.2 Pulizia del filtro dell'aria
The 'Check Filter' alert will remind you to clean the mesh filter regularly (approximately every 250 hours of operation).
- Spegnere il deumidificatore e scollegarlo dalla presa di corrente.
- Rimuovere il filtro dell'aria dal retro dell'unità.
- Lavare il filtro con acqua calda e sapone.
- Risciacquare abbondantemente e lasciare asciugare completamente all'aria prima di reinserirlo.
- Once the filter is reinstalled, plug in the unit and press the 'Filter' button to reset the filter alert.
7. Risoluzione Dei Problemi
Se riscontri problemi con il tuo deumidificatore, fai riferimento ai seguenti problemi comuni e alle relative soluzioni:
| Problema | Possibile causa | Soluzione |
|---|---|---|
| L'unità non si accende | No power; Power cord unplugged; Water tank full or not properly seated. | Check power connection; Empty and re-seat water tank. |
| Nessuna acqua raccolta | Humidity level too low; Room temperature too low; Air filter clogged. | Adjust humidity setting; Ensure room temperature is above 41°F (5°C); Clean air filter. |
| L'unità funziona costantemente | Humidity setting too low; Room is too large; Continuous drain hose is kinked or blocked. | Increase humidity setting; Ensure unit is sized correctly for the room; Check continuous drain hose for obstructions. |
| Rumore forte durante il funzionamento | Unit not level; Air filter clogged; Obstruction in fan. | Posizionare l'unità su una superficie piana; pulire il filtro dell'aria; controllare e rimuovere eventuali ostruzioni. |
| 'Check Filter' light on | Il filtro dell'aria necessita di pulizia. | Clean the air filter and reset the filter alert. |
| 'Full Bucket' light on | Il serbatoio dell'acqua è pieno o non è posizionato correttamente. | Empty the water tank and re-seat it correctly. |
For further assistance, please refer to the complete troubleshooting section in the included user manual or contact Keystone customer support.
8. Specifiche
| Specificazione | Dettaglio |
|---|---|
| Marca | Chiave di volta |
| Nome del modello | Keystone Energy Star 50-Pint Portable Dehumidifier |
| Numero di modello | KSTAD506PE |
| Capacità di deumidificazione | 50 pinte al giorno |
| Copertura dell'area del pavimento | Fino a 4500 piedi quadrati |
| Volume del serbatoio dell'acqua | 1.8 galloni (7.2 quarti) |
| Dimensioni del prodotto (P x L x A) | 11.1"P x 15.43"L x 24.25"A |
| Peso dell'articolo | 42.1 libbre |
| Colore | Bianco |
| Materiale | Plastica |
| Cosatage | 720 watt |
| Numero di velocità | 2 |
| Caratteristiche speciali | Continuous Draining, Automatic Restart, Automatic Defrost, Quiet Operation, Automatic Shutoff |
| Usi consigliati | Residenziale |
| Codice UPC | 840148702455 |
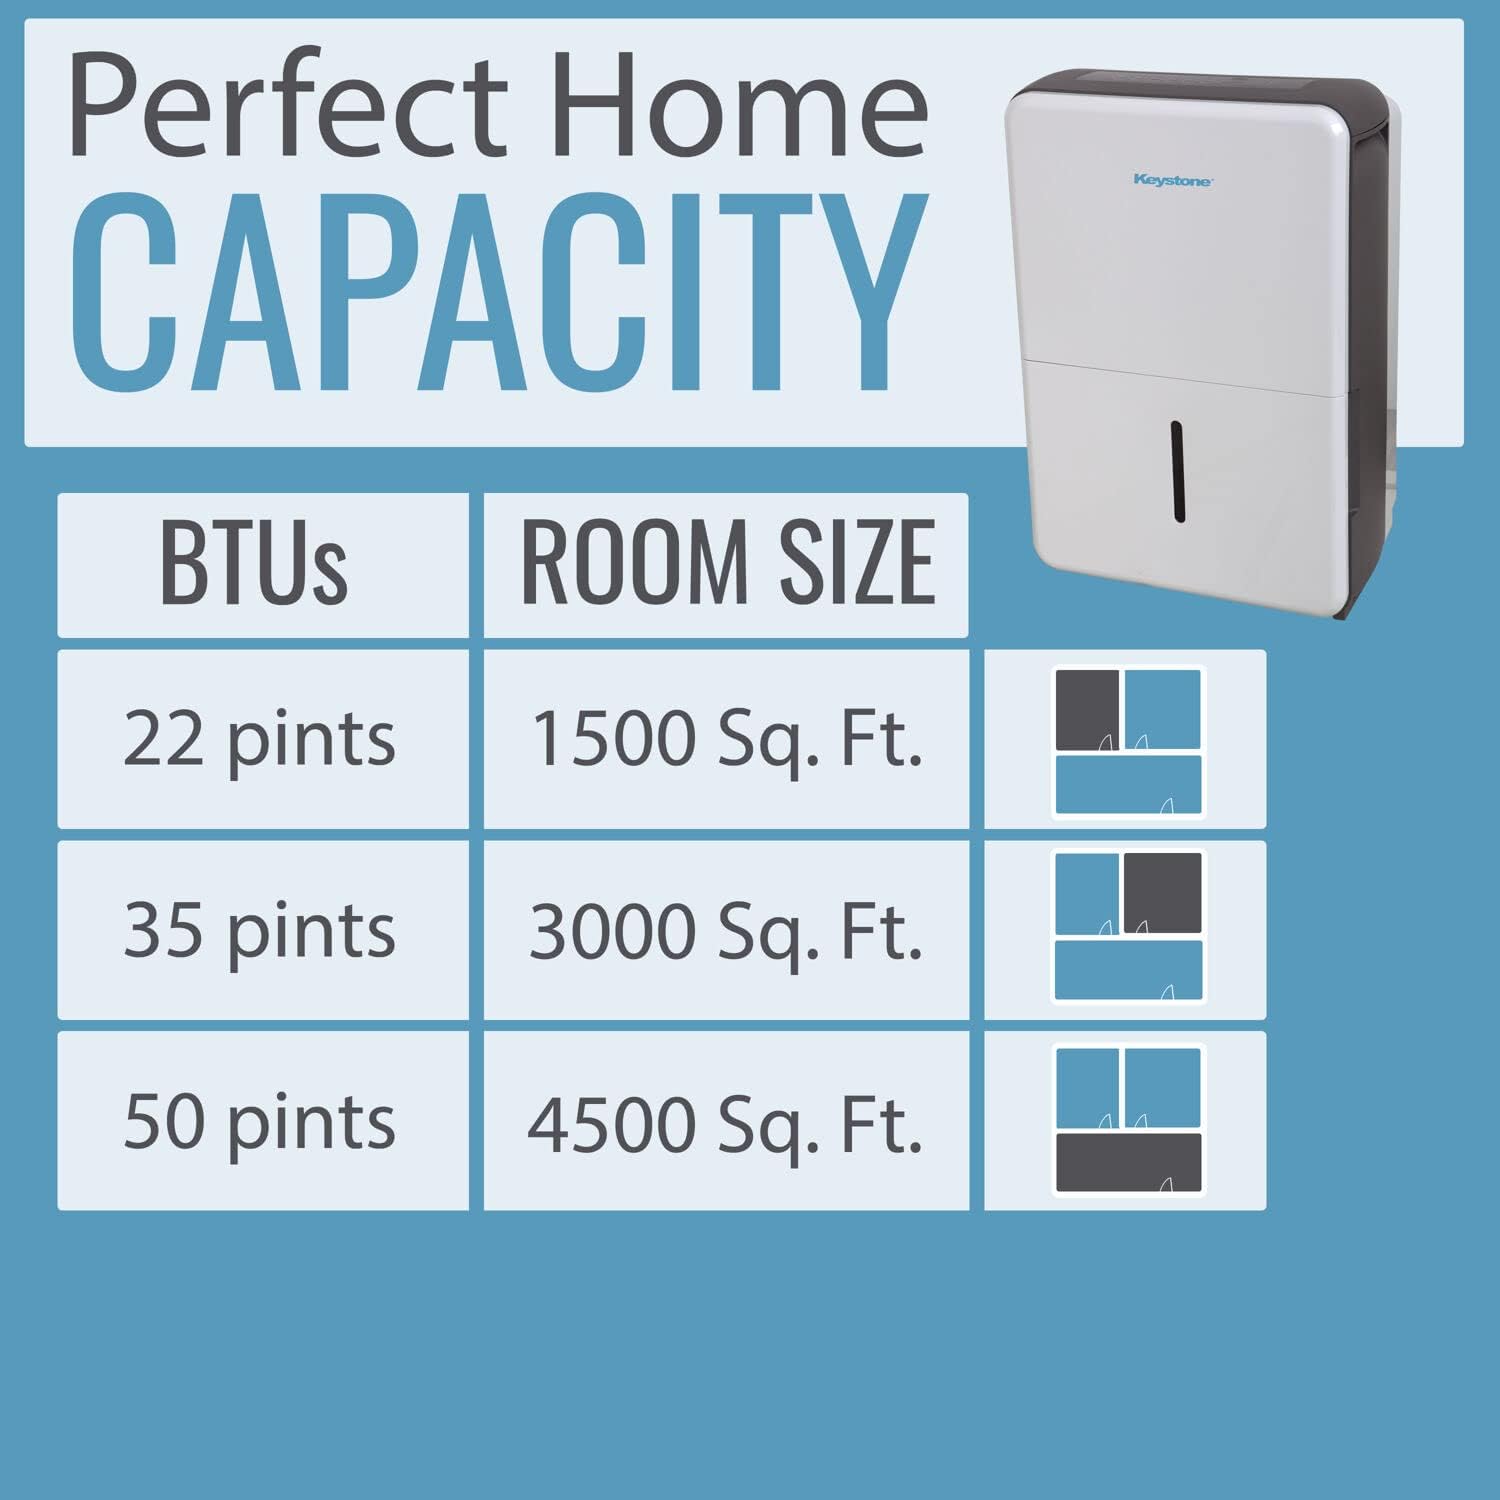
Figure 8.1: Dehumidification capacity based on room size.
9. Garanzia e supporto
Your Keystone dehumidifier comes with a manufacturer's warranty. For detailed information regarding warranty coverage, terms, and conditions, please refer to the warranty card included in your product packaging or the full user manual. For technical support, troubleshooting assistance, or to inquire about replacement parts, please contact Keystone customer service through the contact information provided in your manual or on the official Keystone websito.