
1. Introduzione
Grazie per l'acquistoasing the AIYIMA TUBE T9 Bluetooth 5.0 6K4 Tube Amplifier. This device combines a tube preamplifier with a digital power amplifier, offering multiple audio inputs including Bluetooth 5.0, USB, Coaxial, Optical, and RCA. It features a classic VU meter and tone controls for a personalized audio experience. This manual provides detailed instructions for setup, operation, and maintenance to ensure optimal performance and longevity of your amppiù vivace.
2. Informazioni sulla sicurezza
- Alimentazione elettrica: Use only the provided DC24V power adapter. Ensure the voltage is within the specified range (DC18V-30V).
- Ventilazione: Posizionare il amplifier in a well-ventilated area. Do not block ventilation openings.
- Umidità: Tenere il dispositivo lontano da acqua, umidità e umidità elevata.
- Calore: Evitare di posizionare il amplificatore vicino a fonti di calore o alla luce diretta del sole.
- Manipolazione dei tubi: Vacuum tubes can become hot during operation. Exercise caution when handling or replacing them. Allow the unit to cool down before touching the tubes.
- Pulizia: Scollegare l'alimentazione prima della pulizia. Utilizzare un panno morbido e asciutto. Non utilizzare detergenti liquidi o spray.
- Manutenzione: Non tentare di riparare questo prodotto da soli. Affidare qualsiasi intervento di assistenza a personale qualificato.
3. Contenuto della confezione
Si prega di controllare la confezione per verificare la presenza dei seguenti elementi:
- AIYIMA TUBE T9 Amplificatore x 1
- 6K4 Vacuum Tube x 2
- Antenna Bluetooth x 1
- Adattatore di alimentazione DC24V x 1
- Cavo PC-USB x 1
- Remote Control x 1 (AA batteries not included)
- Manuale utente x 1
- Scheda di garanzia x 1

Image: Contents included in the AIYIMA TUBE T9 amplifier package, showing the amplifier unit, two 6K4 tubes, a Bluetooth antenna, power adapter, USB cable, remote control, user manual, and warranty card.
4. Prodotto finitoview
4.1 Pannello frontale
The front panel features controls for power, input selection, volume, and tone, along with a classic VU meter and input indicators.
- Misuratore VU: Displays audio signal level in real-time.
- Indicatore di ingresso: LEDs indicate the currently selected input (Bluetooth, PC-USB, RCA, Coaxial, Optical).
- Manopola del volume/ingresso: Rotate to adjust volume. Press to cycle through input sources. Press and hold to power on/off.
- Controllo dei bassi: Regola l'uscita a bassa frequenza.
- Controllo degli acuti: Regola l'uscita ad alta frequenza.
- Ricevitore IR: Per comandi a distanza.

Immagine: dettagliata view of the AIYIMA TUBE T9 amplifier's front panel, showing the VU meter, input indicators, volume knob, bass and treble controls, and the two visible 6K4 vacuum tubes.
4.2 Pannello posteriore
The rear panel provides all necessary audio input and output connections.
- Porta antenna Bluetooth: Collegare l'antenna Bluetooth inclusa.
- Ingresso RCA (S/D): Per sorgenti audio analogiche.
- Ingresso coassiale: Per sorgenti audio digitali.
- Ingresso ottico: Per sorgenti audio digitali.
- Ingresso PC-USB: Per il collegamento a un computer come DAC USB.
- AUX Out (3.5mm): For connecting to an active subwoofer or another amppiù vivace.
- Uscita altoparlante (S/D): Connect passive speakers (3-8Ω).
- DC18-30V Power Input: Collegare l'adattatore di alimentazione.
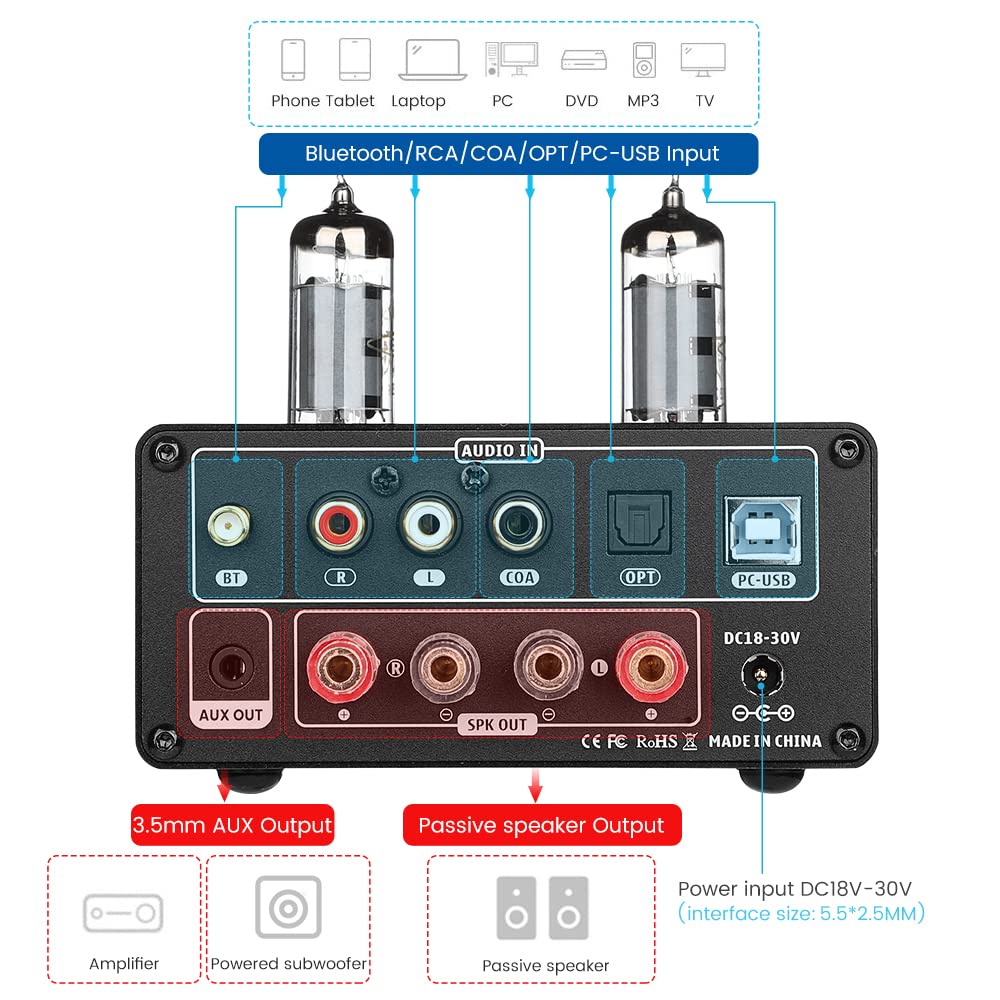
Immagine: Posteriore view of the AIYIMA TUBE T9 amplifier, highlighting the various input and output ports including Bluetooth, RCA, Coaxial, Optical, PC-USB, AUX Out, speaker terminals, and power input.
5. Impostazione
5.1 Installazione del tubo
- Carefully unpack the two 6K4 vacuum tubes.
- Align the pins of each tube with the corresponding holes on the amplifier's tube sockets.
- Gently push the tubes straight down into the sockets until they are firmly seated. Do not force them.
5.2 Collegamento degli altoparlanti
The TUBE T9 is designed for passive speakers with an impedance of 3-8Ω.
- Collega i tuoi altoparlanti passivi a Uscita altoparlante (SPK OUT) terminali sul pannello posteriore. Assicurarsi che la polarità sia corretta (+ con + e - con -).
- For a 2.1 channel system, connect an active subwoofer to the AUX Out (3.5mm) porta.
5.3 Collegamento delle sorgenti audio
Connect your desired audio sources to the corresponding input ports:
- Bluetooth: Screw the included Bluetooth antenna into the BT porta.
- PC-USB: Use the provided USB cable to connect your computer to the PC-USB porta.
- RCA: Connect analog audio devices (e.g., CD player, streamer) using RCA cables to the RCA (sinistra/destra) ingresso.
- Coassiale/Ottico: Connect digital audio devices (e.g., TV, game console) using Coaxial or Optical cables to the respective inputs.
Nota importante: Questo amplifier does not have a built-in phono preamplifier. Do not connect a vinyl record player directly to the RCA input without an external phono preamp, as this may result in very low volume or distorted sound.

Image: Diagrams illustrating various connection scenarios for the AIYIMA TUBE T9 amplifier, including connecting to passive speakers, an amplifier, and different audio sources like phones, tablets, laptops, PCs, DVDs, and TVs.

Image: A visual warning indicating that the AIYIMA TUBE T9 amplifier cannot be directly connected to a vinyl record player without an external phono preamppiù vivace.
5.4 Collegamento di alimentazione
- Assicurarsi che tutte le connessioni audio siano sicure.
- Connect the DC24V power adapter to the DC18-30V input port on the rear panel.
- Collegare l'adattatore di corrente a una presa a muro.
6. Istruzioni per l'uso
6.1 Accensione/spegnimento
Press and hold the main Volume/Input Knob on the front panel for approximately 1 second to power the amplifier on or off. The VU meter and tubes will illuminate upon power-on.
6.2 Selezione dell'ingresso
Short press the main Volume/Input Knob to cycle through the available input sources: Bluetooth, PC-USB, RCA, Coaxial, Optical. The corresponding LED indicator on the front panel will light up.
6.3 Controllo del volume
Ruota il principale Volume/Input Knob in senso orario per aumentare il volume e in senso antiorario per diminuirlo.
Controllo a 6.4 toni
Utilizzare il Basso E Acuto knobs on the front panel to adjust the low and high frequencies according to your preference. This allows for fine-tuning the sound profile.
6.5 Associazione Bluetooth
- Select the Bluetooth input using the Volume/Input Knob. The Bluetooth indicator will flash.
- Sul tuo dispositivo mobile (telefono, tablet, ecc.), attiva il Bluetooth e cerca i dispositivi disponibili.
- Select "AIYIMA TUBE T9" from the list of devices to pair.
- Once paired, the Bluetooth indicator will stop flashing and remain solid. You can now play audio from your device.

Image: A smartphone connected via Bluetooth 5.0 to the AIYIMA TUBE T9 amplifier, che dimostra lo streaming audio wireless.
6.6 Misuratore VU
The integrated VU meter provides a visual representation of the audio output level. Its warm light and dynamic movement add a retro aesthetic to your listening experience. The meter is designed to respond to various volume levels.

Immagine: un primo piano view of the illuminated VU meter on the AIYIMA TUBE T9 amplifier, showing its needle indicating audio levels.
7. Manutenzione
7.1 Sostituzione del tubo
The 6K4 vacuum tubes can be replaced to customize the sound or if they wear out. Compatible tube models include:
- Numero di serie: 6J1
- Numero di serie: 6J2
- GE5654
- Numero di serie: 6J3
- Numero di serie: 6J4
- Numero di serie: 6J5
- 6Ж1п (6Zh1p)
- 6AK5
To replace tubes:
- Spegnere il amplifier and disconnect it from the power outlet.
- Allow the tubes to cool completely (this may take several minutes).
- Gently pull the existing tubes straight up from their sockets.
- Insert the new compatible tubes, aligning the pins carefully, and push them straight down until seated firmly.
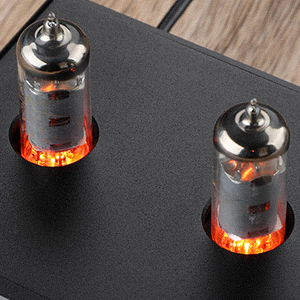
Immagine: un primo piano view of the two 6K4 vacuum tubes installed on the AIYIMA TUBE T9 amplifier, showing their glowing filaments during operation.
7.2 Pulizia
Pulisci il ampl'esterno del filtro con un panno morbido e asciutto. Non utilizzare detergenti abrasivi o solventi.
7.3 Ventilazione
Assicurare un adeguato flusso d'aria attorno al amplifier to prevent overheating. Do not place objects on top of the unit that could obstruct ventilation.
8. Risoluzione Dei Problemi
| Problema | Possibile causa | Soluzione |
|---|---|---|
| Nessuna uscita audio |
|
|
| Suono distorto |
|
|
| Problemi di connessione Bluetooth |
|
|
| Clicking sound after silence | Automatic hibernation mode engaging | IL amplifier may enter a hibernation state after a period of no audio signal, producing a soft click. This feature can be disabled using the remote control: press the M1 button on the remote to toggle the hibernation prompt on/off. |
| Il misuratore VU non si muove | Very low volume or specific audio characteristics | The VU meter is designed to respond to audio levels. Ensure the volume is sufficiently high for the meter to register movement. This issue has been addressed in updated models to work at various levels. |
9. Specifiche

Image: The AIYIMA TUBE T9 amplifier shown with its physical dimensions and a table summarizing its key specifications.
| Caratteristica | Specificazione |
|---|---|
| Numero di modello | TUBE T9 |
| Marca | AIYIMA |
| Interfacce di input | Bluetooth 5.0, PC-USB, RCA, Coaxial, Optical |
| Interfacce di uscita | Passive Speaker Output, 3.5mm AUX Out (for active subwoofer/amplificatore) |
| Potenza di uscita | 100W x 2 (at 4Ω load) |
| Impedenza dell'altoparlante | 3-8Ω |
| Risposta in frequenza | 20-20 kHz (± 1 dB) |
| Rapporto segnale/rumore (S/N) | ≥98 dB |
| Volume di lavorotage | DC18V-30V |
| Dimensioni (L x P x A) | 22 x 22 x 10 cm (circa 8.66 x 8.66 x 3.94 pollici) |
| Peso dell'articolo | 1 kg (circa 2.2 libbre) |
| Certificazioni | CE |
| Paese di origine | Cina |
10. Garanzia e supporto
10.1 Informazioni sulla garanzia
According to the product specifications, there is no explicit warranty provided for this product. Please refer to your retailer's return policy for any issues within the initial purchase period.
10.2 Assistenza clienti
For technical assistance or inquiries, please contact the seller or AIYIMA customer support through their official channels. Keep your purchase receipt or order details handy for any support requests.