
1. Introduzione
This Urmet 1098/858 IP 5M NVR Kit is a comprehensive video surveillance system designed to protect your property and ensure the safety of its occupants. The kit includes an 8-channel 4K PoE Network Video Recorder (NVR) and two 5-megapixel IP bullet cameras, enabling real-time monitoring and recording.
Utilizing IP technology, this system offers enhanced flexibility and versatility compared to traditional surveillance setups. Cameras can be installed in various locations, and the system supports remote monitoring from compatible devices.
Key features include 4K video resolution, a 5-meter night vision range, autofocus (AF) functionality for clear imaging, and H.265 video compression for efficient data storage and transmission. The kit also provides essential accessories such as junction boxes for tidy installation and a privacy sign.
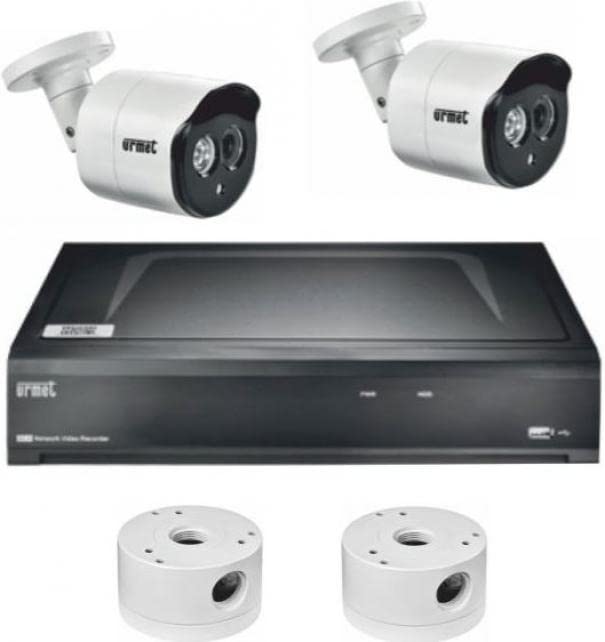
Figura 1: Urmet 1098/858 IP 5M NVR Kit components. This image displays the main components of the surveillance kit, including the NVR unit and two bullet-style IP cameras.
2. Informazioni sulla sicurezza
- Leggere attentamente tutte le istruzioni prima dell'installazione e del funzionamento.
- Garantire l'alimentazione voltage matches the specified requirements for the NVR.
- Do not expose the NVR or cameras to water, moisture, or extreme temperatures.
- Evitare di posizionare l'NVR in aree con scarsa ventilazione.
- Use only Urmet-approved accessories and power adapters.
- Installation should be performed by qualified personnel, especially for outdoor wiring.
- Scollegare l'alimentazione prima di effettuare qualsiasi operazione di manutenzione o pulizia.
- Observe local regulations regarding video surveillance and privacy.
3. Contenuto della confezione
Verifica che tutti gli articoli elencati di seguito siano presenti nel tuo pacco:
- 1x Urmet 1098/328P 4K 8-Channel H.265 PoE NVR
- 2x Urmet 1099/501A 5MP IP Bullet Cameras (2.7-13.5mm AF varifocal lens)
- 2x Urmet 3000/108 Small Size Junction Boxes
- 1x Urmet 3000/84 Privacy Sign
- 1x adattatore di alimentazione per NVR
- 1x mouse USB
- Hardware di montaggio (viti, tasselli)
- Guida rapida (questo documento funge da manuale completo)
4. Impostazione
4.1 Installazione NVR
- Posizionamento: Choose a secure, well-ventilated location for the NVR, away from direct sunlight, heat sources, and moisture.
- Connetti il monitor: Collegare un monitor alla porta di uscita HDMI o VGA dell'NVR.
- Connetti il mouse: Collegare il mouse USB in dotazione a una porta USB dell'NVR.
- Connessione di rete: Connect the NVR to your local network using an Ethernet cable. This is required for remote access and firmware updates.
- Accensione: Collegare l'adattatore di alimentazione all'NVR e poi a una presa di corrente. L'NVR si avvierà automaticamente.
4.2 Installazione della telecamera
- Posizione di montaggio: Select appropriate locations for the bullet cameras, considering the desired field of view and protection from environmental elements.
- Montaggio: Use the provided mounting hardware to securely attach the cameras to a wall or ceiling.
- Cablaggio: Connect each camera to one of the NVR's PoE (Power over Ethernet) ports using an Ethernet cable. The NVR will provide both power and data connectivity.
- Scatola di giunzione: For outdoor installations, use the Urmet 3000/108 junction boxes to protect cable connections from weather and tampering. Mount the junction box first, then route the camera cable through it.
- Adjusting Lens: The 1099/501A cameras feature a varifocal lens (2.7-13.5mm) with autofocus. After initial power-up, access the camera settings via the NVR interface to adjust the zoom and focus for optimal clarity.
4.3 Configurazione iniziale dell'NVR
- Primo avvio: Upon first power-up, the NVR will guide you through an initial setup wizard.
- Configurazione della password: Create a strong administrator password for the NVR. This is crucial for security.
- Impostazioni di rete: Configure network settings (DHCP or static IP). Ensure the NVR has internet access for remote viewing and updates.
- Data e ora: Imposta la data, l'ora e il fuso orario corretti.
- Inizializzazione del disco rigido: If a new hard drive is installed, the NVR will prompt you to initialize or format it for recording.
- Rilevamento della fotocamera: The NVR should automatically detect and add the connected PoE cameras. If not, refer to the troubleshooting section or manually add cameras via the NVR's camera management menu.
5. Operativo
5.1 Vivere View
After setup, the NVR will display the live video feeds from all connected cameras on the monitor. You can switch between single-camera view, griglia multi-camera view, and other display modes using the NVR's on-screen menu and mouse.
5.2 Registrazione
- Registrazione continua: The NVR is configured for continuous recording by default, capturing footage 24 ore su 24, 7 giorni su 7.
- Registrazione di rilevamento del movimento: You can configure specific cameras to record only when motion is detected. This saves storage space and makes reviewfootage more efficient. Set up motion detection zones and sensitivity in the NVR's recording settings.
- Registrazione programmata: Define specific time schedules for recording, combining continuous and motion-triggered modes as needed.
5.3 Riproduzione
per riview registrato footage:
- From the NVR's main menu, select "Playback."
- Choose the desired camera(s) and date.
- Use the timeline to navigate through recorded events. You can fast-forward, rewind, and pause playback.
- Export specific video clips to a USB drive if needed.
5.4 Monitoraggio remoto
The Urmet NVR supports remote viewing via a mobile application or PC software. Refer to the specific Urmet software documentation for detailed instructions on setting up remote access, which typically involves:
- Downloading the official Urmet app/software.
- Registering an account.
- Adding the NVR to your account using its serial number or QR code.
- Ensuring the NVR has a stable internet connection.
5.5 Impostazioni di sistema
The NVR's main menu provides access to various system settings, including:
- Impostazioni generali: Date/time, language, display resolution.
- Impostazioni di rete: IP address, port forwarding (if required for advanced setups).
- Gestione utenti: Create and manage user accounts with different access privileges.
- Gestione della memoria: Monitor hard drive status, configure overwrite settings.
- Gestione eventi: Configure alarms, notifications (e.g., email alerts for motion detection).
6. Manutenzione
6.1 Pulizia
- Telecamere: Periodically clean the camera lenses with a soft, dry cloth to remove dust, dirt, or water spots that may impair image quality. Do not use harsh chemicals.
- NVR: Keep the NVR unit free of dust. Use a soft brush or compressed air to clean ventilation openings to prevent overheating.
6.2 Aggiornamenti firmware
Urmet may release firmware updates to improve system performance, add features, or address security vulnerabilities. It is recommended to check for and apply updates periodically:
- Access the NVR's system settings and look for a "Firmware Update" or "System Upgrade" option.
- Ensure the NVR has a stable internet connection during the update process.
- Follow the on-screen instructions carefully. Do not power off the NVR during an update.
6.3 Gestione dell'archiviazione
Regularly check the status of the hard drive(s) in the NVR via the storage management settings. Ensure there is sufficient space for recording, and verify that the overwrite function is enabled if you wish for older footage to be automatically deleted to make space for new recordings.
7. Risoluzione Dei Problemi
| Problema | Possibile causa | Soluzione |
|---|---|---|
| Nessun segnale video sul monitor |
|
|
| Le telecamere non visualizzano video |
|
|
| L'accesso remoto non funziona |
|
|
| Scarsa qualità dell'immagine / immagine sfocata |
|
|
8. Specifiche
| Caratteristica | Dettaglio |
|---|---|
| Marca | Urmet |
| Numero di modello | 1098/858 |
| Produttore | URMET |
| Tecnologia di connettività | Cablato (PoE) |
| Risoluzione di acquisizione video | 4K |
| Caratteristiche speciali | H.265, AF (Autofocus), Remote Monitoring |
| Numero di canali | 8 |
| Capacità di archiviazione | 2 TB (Internal HDD) |
| Dispositivi compatibili | Telecamere IP |
| Tipo di fotocamera | Bullet (Front) |
| Gamma di visione notturna | 5 metri |
| Frequenza dei fotogrammi | 25 fotogrammi al secondo |
| Modalità di registrazione | Continuo |
| Interfaccia Hardware | Etereo |
| Tipo di lente | Varifocal (2.7-13.5mm on cameras) |
| Supported Video Input | VGA, HDMI |
| Formato del segnale | Digitale |
| Tecnologia dei sensori ottici | CMOS with Starlight |
| Peso dell'articolo | 7.2 chilogrammi |
| Paese di origine | Italia |
9. Garanzia e supporto
This Urmet product is covered by a standard manufacturer's warranty. The specific terms and duration of the warranty may vary by region and retailer. Please retain your proof of purchase for warranty claims.
For technical assistance, troubleshooting beyond this manual, or warranty inquiries, please contact Urmet customer support through their official websito o le informazioni di contatto fornite con l'acquisto.