1. Introduzione
This manual provides detailed instructions for the installation, operation, and maintenance of your Nilight 3/4 Inch Round LED Clearance Lights. These lights are designed to enhance visibility and safety for various vehicles including trucks, RVs, cars, buses, trailers, vans, caravans, and boats. Please read this manual thoroughly before installation and use.
2. Caratteristiche del prodotto
- Mini Size, Bright Light: Each 3/4-inch mini side marker light contains 3 SMD LEDs, providing 60 lumens of bright light with a 100,000-hour lifetime.
- Surface Mount & 2-Wire Design: Lights come with a rubber grommet for surface mounting, requiring a 3/4-inch hole. Features 9-inch 2-wire leads: black for ground/negative and blue for positive.
- Massima durabilità: Constructed with a waterproof PC lens, rubber cover sealed light, and potting glue sealed wire, ensuring super durability and an IP68 waterproof rating.
- Ampia applicazione: Universally compatible with 12V DC systems for trailers, buses, vans, caravans, boats, lorries, and pickup trucks. Can function as clearance, side marker, or turn signal lights.
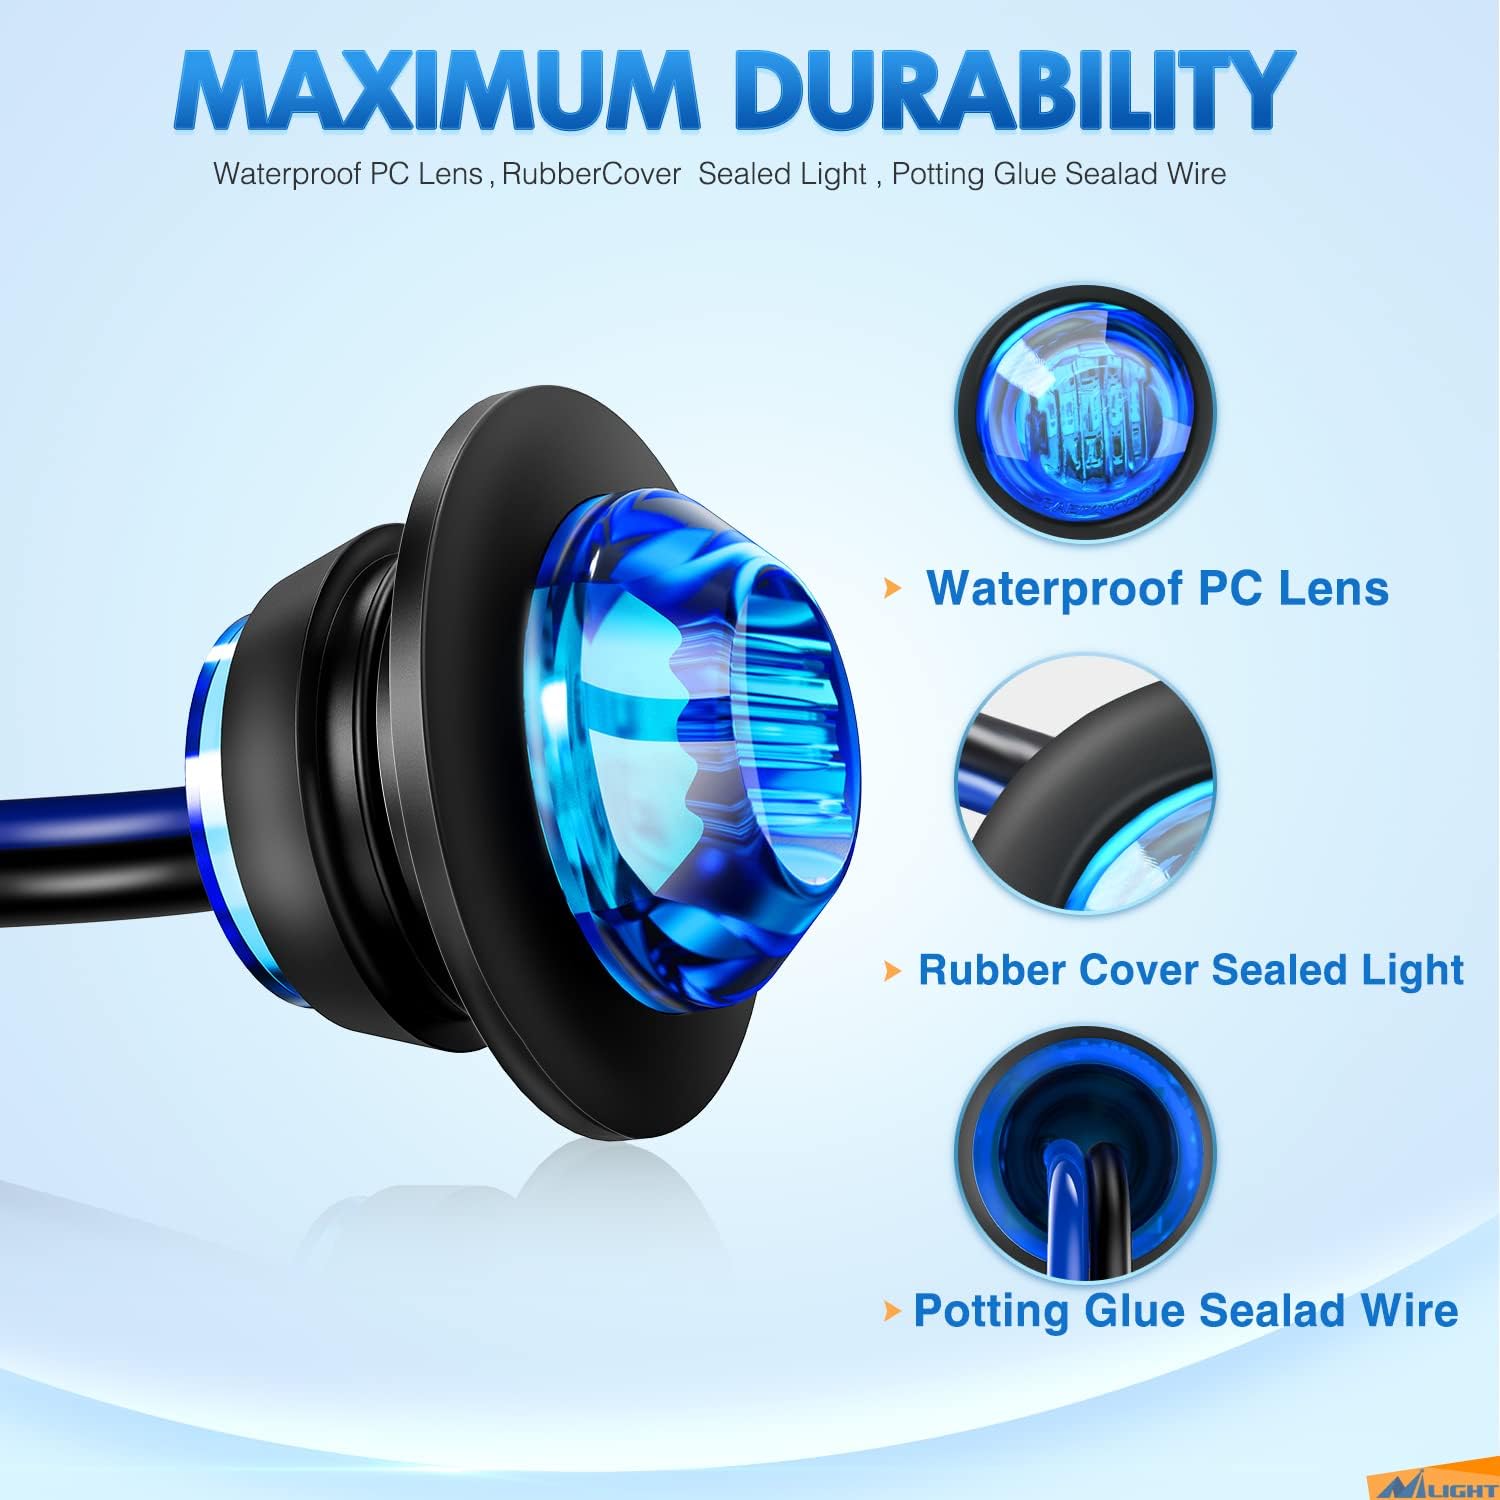
Figure 2.1: Maximum Durability features including waterproof PC lens, rubber cover, and sealed wiring.

Figure 2.2: The light's waterproof design, suitable for various environments.

Figure 2.3: High brightness output from the 3 SMD LEDs.
3. Contenuto della confezione
- 10 x LED Clearance Light (Blue)
4. Specifiche
| Marca | Niluce |
| Numero di modello | B09K572FC2 |
| Colore | Blu |
| Tipo di sorgente luminosa | GUIDATO |
| Voltage | 12 Volt |
| Cosatage | 15 watt |
| Materiale della lente | Policarbonato |
| Grado di impermeabilità | Grado di protezione IP68 |
| Tipo di servizio del veicolo | Truck, Trailer, Caravan, Bus, Boat |

Figure 4.1: Product dimensions for the 3/4 Inch Round LED Clearance Light.
5. Guida all'installazione
Follow these steps for proper installation of your Nilight LED Clearance Lights:
- Preparare la superficie di montaggio: Choose a suitable flat surface on your vehicle. Ensure there is enough space behind the mounting point for wiring.
- Forare il foro: Using a drill bit, create a circular hole with a diameter of approximately 0.8 inches (20mm) for the light's grommet.
- Insert the Rubber Grommet: Press the provided rubber grommet firmly into the drilled hole until it is securely seated.
- Insert the LED Light: Push the LED light into the center of the rubber grommet until it snaps into place.
- Collegamento del cablaggio: Connect the wires according to the wiring instructions below.
Istruzioni di cablaggio
The Nilight LED Clearance Light features a 2-wire design:
- Filo nero: Connect to the negative (-) terminal or ground.
- Filo blu: Connect to the positive (+) terminal (12V DC).

Figure 5.1: Wiring diagram for the LED Clearance Light.

Figure 5.2: Step-by-step visual installation guide.
Video 5.1: An official Nilight video demonstrating the features, size, wiring, and installation process of the 3/4 Inch Blue Round LED Clearance Light.
6. Funzionamento
Once properly installed and wired, the Nilight 3/4 Inch Round LED Clearance Lights will illuminate when power is supplied to the positive wire. These lights can function as:
- Luci di ingombro: To indicate the overall width and height of the vehicle.
- Luci di posizione laterali: To indicate the presence and length of the vehicle from the side.
- Luci di direzione: Depending on wiring configuration, they can be integrated into a turn signal system.
Ensure all connections are secure to prevent intermittent operation.

Figure 6.1: Various applications of the LED lights on different vehicles.
7. Manutenzione
These LED lights require minimal maintenance. To ensure optimal performance and longevity:
- Pulizia regolare: Periodically clean the lens with a soft cloth and mild soap to remove dirt and debris that may obstruct light output. Avoid abrasive cleaners.
- Ispezionare il cablaggio: Occasionally check the wiring connections for any signs of corrosion, fraying, or loose connections. Secure or repair as needed.
- Controllare eventuali danni: Inspect the lights for any physical damage to the lens or housing. Replace damaged lights promptly to maintain safety and functionality.
8. Risoluzione Dei Problemi
| Problema | Possibile causa | Soluzione |
|---|---|---|
| La luce non si illumina | No power, incorrect wiring, faulty light. | Check power source (12V DC). Verify positive and negative wire connections. Test the light with a known good power source. |
| La luce è fioca o tremolante | Poor connection, insufficient voltage, cablaggio danneggiato. | Ensure all connections are secure and free of corrosion. Check vehicle's voltage output. Inspect wiring for damage and repair. |
| Acqua all'interno della lente | Improper installation, damaged grommet/seal. | Ensure the grommet is properly seated and the light is fully inserted. If damage is present, replace the light. |
9. Garanzia e supporto
Nilight fornisce un Garanzia di 2 anno for this product, covering manufacturing defects and malfunctions under normal use. For warranty claims, technical assistance, or any other inquiries, please contact Nilight customer support.
You can find more information and contact details by visiting the official Nilight store: Negozio Nilight su Amazon.