1. Introduzione
Thank you for choosing the ENGiNDOT 42SA Digital Keypad Home Safe. This manual provides essential information for the safe and efficient operation of your new security safe. Please read it thoroughly before installation and use, and retain it for future reference.

Image: The ENGiNDOT 42SA safe in a typical home setting.
Video: Un oltreview of the ENGiNDOT Safe Series, highlighting key features and design.
2. Informazioni sulla sicurezza
- Always keep the emergency keys in a secure location away from the safe and not inside the safe itself.
- Do not store the user manual or emergency keys inside the safe.
- Assicurarsi che la cassaforte sia montata saldamente per impedirne la rimozione non autorizzata.
- Sostituire tempestivamente le batterie quando appare l'indicatore di batteria scarica per evitare di rimanere bloccati.
- Evitare di esporre la cassaforte a temperature o umidità estreme.
3. Contenuto della confezione
Verificare che tutti gli articoli siano presenti nel pacco:
- 1.52 Cubic Feet Large Home Safe (1)
- Emergency Key (2)
- Mounting Accessories (4)
- Protective Pad (1)
- Manuale d'uso (1)

Image: All components included with the ENGiNDOT 42SA safe.
4. Prodotto finitoview
The ENGiNDOT 42SA safe is designed to protect your valuables with robust construction and a reliable digital locking system.

Immagine: Frontale view of the ENGiNDOT 42SA safe.
Caratteristiche principali:
- Robusta costruzione in acciaio: Features 2 round live-locking bolts, seamless forming construction, and pry-resistant concealed hinges for enhanced security.
- Capacità 1.52 piedi cubi: Spacious interior with a removable shelf for organizing documents, cash, jewelry, and other private items.
- Tastiera digitale: Programmable electronic keypad allows setting two separate codes (master and guest code, up to 8 digits).
- Accesso di emergenza: Includes two backup keys for emergency opening.
- Luci di segnalazione: Three instruction lights indicate different operational states.
- Warning Alarm System: Activates a loud audio alarm after three continuous incorrect PIN code entries, locking the keypad automatically.
- Modalità silenziosa: Option to silence keypad sounds for discreet operation.
- Capacità di montaggio: Pre-drilled mounting holes and hardware for floor and wall mounting.
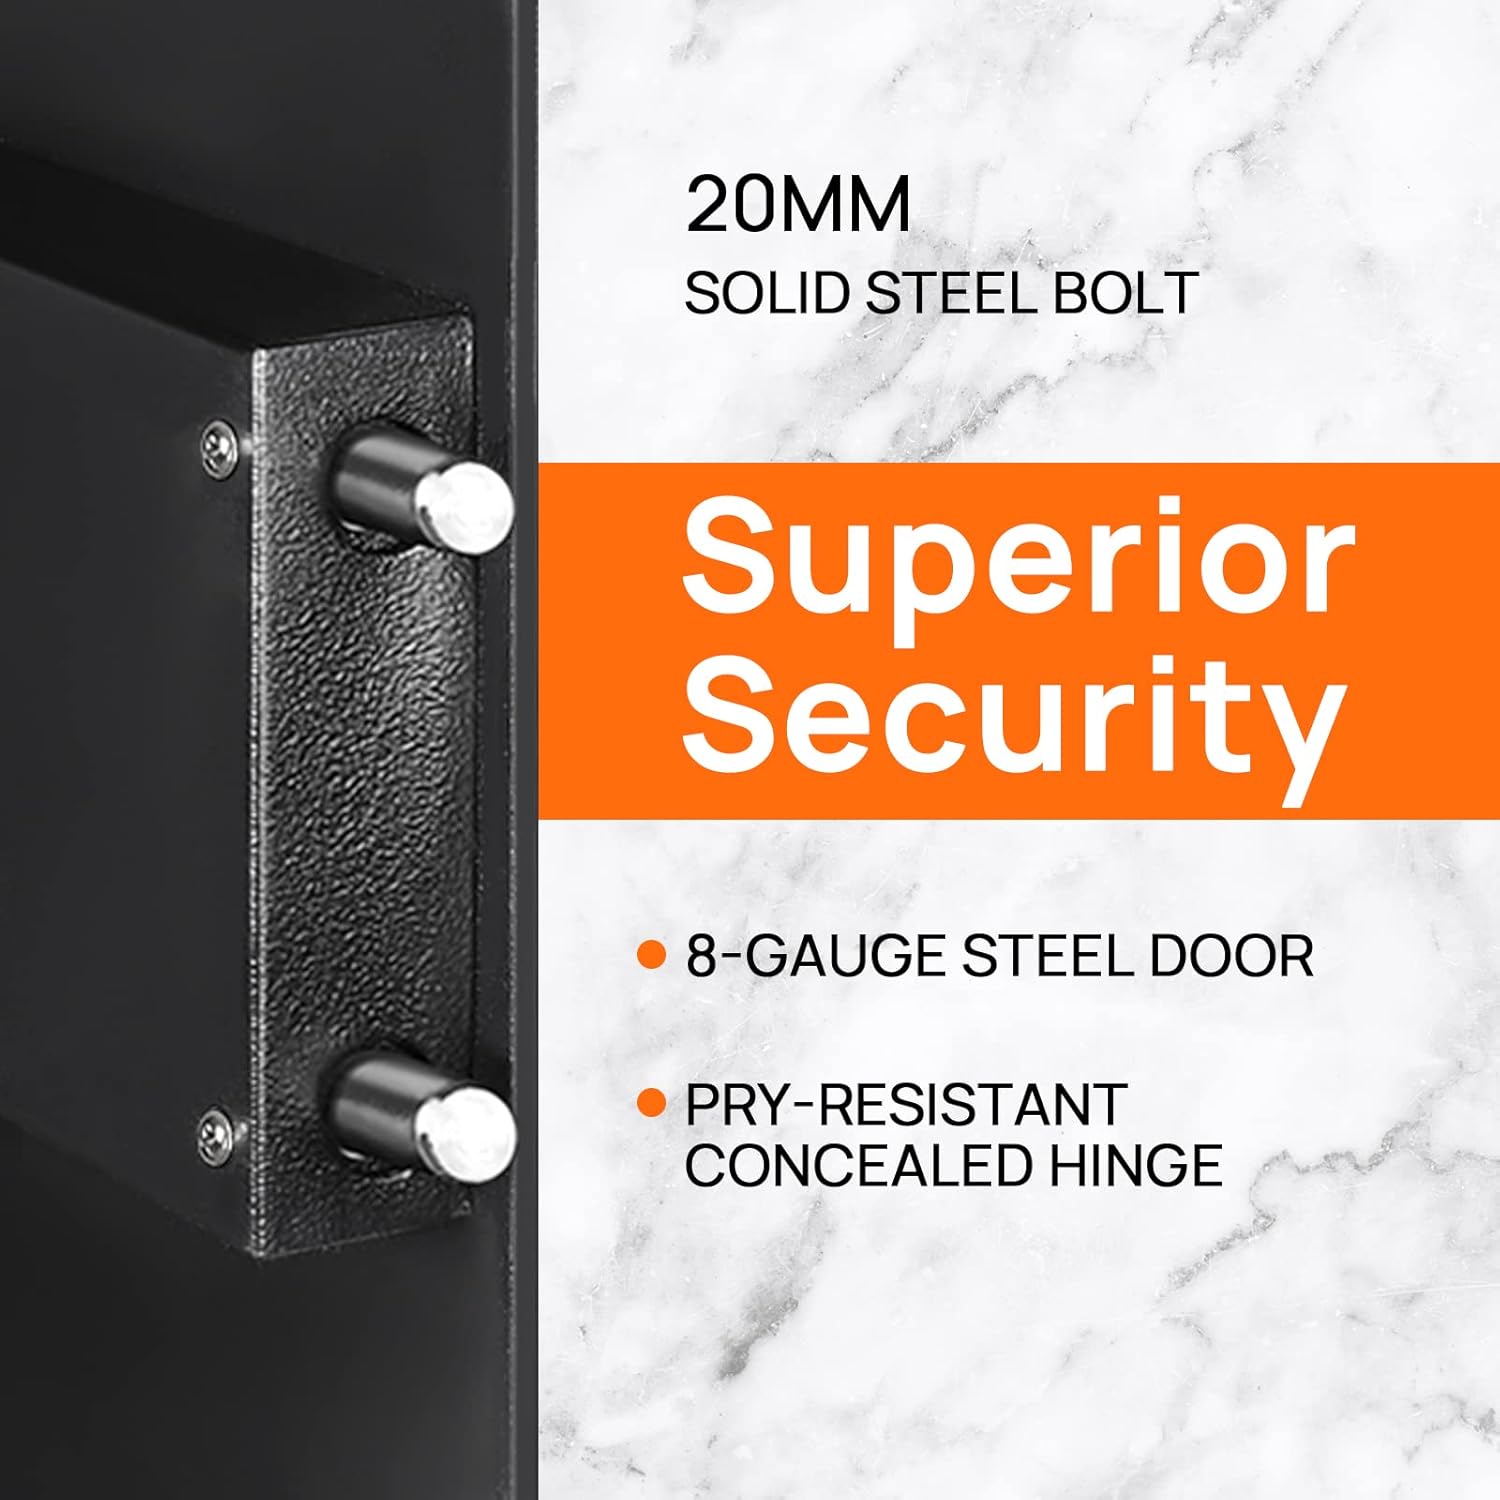
Image: Detail of the safe's solid steel bolts and security features.

Image: Interior of the safe with a removable shelf and exampgli articoli.
5. Impostazione
5.1 First Opening
Upon receiving your safe, you will need to open it using the emergency key for the first time to install batteries and set your personal codes.
- Locate the emergency keyhole, usually concealed behind the keypad cover or a small panel.
- Inserire una delle chiavi di emergenza fornite nella serratura.
- Turn the key counter-clockwise 90 degrees.
- While holding the key, turn the knob clockwise to open the safe door.
Video: Demonstrates the initial opening of the ENGiNDOT safe using the emergency key.
5.2 Installazione della batteria
The safe requires 4 AA batteries (not included) to power the digital keypad.
- Con lo sportello della cassaforte aperto, individuare il vano batteria sul lato interno dello sportello.
- Aprire il coperchio del vano batterie.
- Inserire 4 batterie AA, assicurandosi della corretta polarità (+/-).
- Chiudere il coperchio del vano batterie.
5.3 Montaggio della cassaforte
For added security, it is recommended to mount the safe to a floor or wall.
- Scegliere una posizione adatta per il montaggio.
- Use the pre-drilled holes on the back or bottom of the safe as a template to mark drilling points on the wall or floor.
- Praticare dei fori pilota utilizzando una punta da trapano adatta alla superficie di montaggio.
- Align the safe with the drilled holes and secure it using the provided mounting accessories.

Image: Instructions for wall mounting the safe.
6. Istruzioni per l'uso
6.1 Impostazione del codice master
The master code allows you to open the safe and is used for initial setup. It can be 3-8 digits long.
- Apri la porta della cassaforte.
- Press the reset button located on the inside of the door (often a small green button). The yellow indicator light on the keypad will turn on.
- Enter your desired new master code (3-8 digits).
- Press the '#' button to confirm. The yellow light will turn off, indicating the code is set.
Video: Step-by-step guide on how to set the master code for the safe.
6.2 Setting the Guest Code
A guest code can be set for temporary access. It can also be 3-8 digits long.
- Apri la porta della cassaforte.
- Press the '0' button twice. The yellow indicator light will turn on.
- Enter your desired new guest code (3-8 digits).
- Press the '#' button to confirm. The yellow light will turn off.
6.3 Apertura della cassaforte con un codice
- Enter your master or guest code on the keypad.
- The green indicator light will illuminate.
- Entro 5 secondi, ruotare la manopola in senso orario per aprire lo sportello della cassaforte.

Image: Visual guide for opening methods.
6.4 Impostazione della modalità silenziosa
You can enable or disable the keypad sound for discreet operation.
- To turn off the sound: Enter "*633" on the keypad.
- To turn on the sound: Enter "*66" on the keypad.
Video: Instructions on how to activate and deactivate the mute mode.
6.5 Warning Alarm System
The safe features an audible alarm system to deter unauthorized access.
- If an incorrect PIN code is entered three consecutive times, the security safe will activate a loud audio alarm.
- The digital keypad will automatically lock for a short period.
- To stop the alarm, use the emergency key to open the safe or remove the batteries to power cycle the unit.
7. Manutenzione
- Sostituzione della batteria: Replace all four AA batteries when the low battery indicator light illuminates. Always use new, high-quality alkaline batteries.
- Pulizia: Pulisci l'esterno della cassaforte con un panno morbido eamp panno. Evitare detergenti abrasivi o solventi che potrebbero danneggiare la finitura.
- Cura della tastiera: Keep the keypad clean and dry. Do not use excessive force when pressing buttons.
- Lubrificazione: The locking mechanism and hinges are factory-lubricated and generally do not require additional lubrication. If operation becomes stiff, consult customer support.
8. Risoluzione Dei Problemi
| Problema | Possibile causa | Soluzione |
|---|---|---|
| La cassaforte non si apre con il codice. | Incorrect code entered; batteries are low or dead; knob not turned within 5 seconds. | Re-enter code carefully; replace batteries; turn knob immediately after green light. Use emergency key if necessary. |
| La tastiera non risponde. | Dead batteries; keypad locked due to multiple incorrect entries. | Replace batteries; wait for the lockout period to expire (usually a few minutes) or use the emergency key. |
| L'allarme suona inaspettatamente. | Multiple incorrect code entries; safe was moved or tampered with (if motion sensor is active). | Enter correct code or use emergency key to disarm. Check for tampring. |
| La chiave di emergenza non funziona. | Key not fully inserted or turned correctly; lock mechanism jammed. | Ensure key is fully inserted and turned 90 degrees counter-clockwise. Apply gentle pressure while turning. Contact support if issue persists. |
9. Specifiche

Image: External dimensions of the ENGiNDOT 42SA safe.
| Caratteristica | Dettaglio |
|---|---|
| Modello | 42SA |
| Capacità | 1.52 piedi cubi |
| Dimensioni del prodotto (P x L x A) | 13" x 13.8" x 16.5" |
| Peso dell'articolo | 29 libbre |
| Tipo di blocco | Tastiera digitale elettronica |
| Materiale | Acciaio al carbonio |
| Fonte di alimentazione | 4 batterie AA (non incluse) |
| Tipo di montaggio | Montaggio a pavimento, montaggio a parete |
| Allarme | Udibile |
| Livello di resistenza all'acqua | Non resistente all'acqua |
10. Garanzia e supporto
ENGiNDOT products come with Worry-Free customer support. If you encounter any problems or have questions regarding your safe, please do not hesitate to contact us. We are committed to responding to your inquiries within 24 hours.
For assistance, please visit the official ENGiNDOT websito o fare riferimento alle informazioni di contatto fornite al momento dell'acquisto.