
1. Introduzione
Thank you for choosing the Hikvision AE-DN2016-F3 1080p HD In-Car IP Camera. This device is designed to provide reliable video recording of your journeys, enhancing driving safety and providing evidence in case of incidents. Featuring a 135° wide-angle lens, Full HD resolution, built-in Wi-Fi, and a G-sensor, this dashcam offers comprehensive surveillance for your vehicle.
Please read this manual carefully before operating the device to ensure proper use and optimal performance. Keep this manual for future reference.
2. Informazioni sulla sicurezza
To prevent injury to yourself or others, and to avoid damage to your device, please observe the following safety precautions:
- Non esporre il dispositivo a temperature estreme, alla luce solare diretta per periodi prolungati o a elevata umidità.
- Ensure the dashcam is installed securely and does not obstruct the driver's view o interferire con i dispositivi di sicurezza del veicolo (ad esempio, gli airbag).
- Use only the provided power adapter and cables. Using unauthorized accessories may damage the device and void the warranty.
- Non tentare di smontare, riparare o modificare il dispositivo autonomamente. Per qualsiasi riparazione, contattare il personale di assistenza autorizzato.
- Comply with all local laws and regulations regarding in-car camera usage and privacy.
- Tenere il dispositivo lontano dalla portata dei bambini.
3. Contenuto della confezione
Please check the package for the following items. If any item is missing or damaged, contact your retailer.
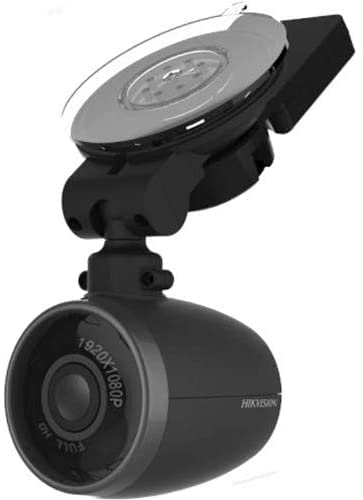
Image: Contents of the Hikvision AE-DN2016-F3 Dashcam package, showing the dashcam, power adapter, micro remote, power cable, quick connect window mount, and user manual.
- Dashcam: The main recording unit.
- Adattatore di alimentazione: For connecting the dashcam to your vehicle's power outlet.
- Micro Remote: A small remote control for specific functions.
- Cavo di alimentazione: USB cable for connecting the dashcam to the power adapter.
- Quick Connect Window Mount: For attaching the dashcam to the windshield.
- Manuale del proprietario: Questa guida alle istruzioni.
4. Installazione
4.1 Montaggio della Dashcam
- Scegli una posizione: Select a position on your front windshield that does not obstruct your view or interfere with the driver's side airbag. Typically, this is behind the rearview specchio.
- Pulisci il parabrezza: Ensure the chosen area on the windshield is clean and dry for optimal adhesion of the mount.
- Fissare il supporto: Secure the quick connect window mount to the cleaned area of the windshield. Press firmly to ensure it is properly adhered.
- Attach the Dashcam: Connect the dashcam to the quick connect window mount. The magnetic connection allows for easy attachment and detachment. Adjust the camera angle to ensure it captures the road ahead effectively (135° viewangolo di inclinazione).
4.2 Collegamento di alimentazione
- Connect one end of the power cable to the dashcam's power input port.
- Connect the other end of the power cable to the provided power adapter.
- Plug the power adapter into your vehicle's 12V power outlet (cigarette lighter socket).
- Route the power cable neatly along the windshield and dashboard edges to avoid obstruction and ensure safety.
4.3 Inserimento della scheda SD
The device supports up to a 128GB SD card for video recording. An SD card is required for recording functionality.
- Locate the SD card slot on the dashcam.
- Insert the SD card into the slot with the contacts facing the correct direction until it clicks into place.
- To remove, gently push the SD card until it pops out.
5. Funzionamento
5.1 Accensione/Spegnimento
The dashcam is designed for plug-and-play operation. Once connected to the vehicle's power supply and the engine is started, the dashcam will automatically power on and begin recording. When the engine is turned off, the dashcam will automatically save the current recording and power off.
5.2 Modalità di registrazione
- Registrazione continua: The dashcam continuously records video in a loop. When the SD card is full, the oldest fileverranno sovrascritti dalle nuove registrazioni.
- Registrazione di emergenza (G-Sensor): The built-in G-sensor detects sudden impacts or strong vibrations (e.g., during a collision). When triggered, the current video segment is automatically locked and saved to a protected folder, preventing it from being overwritten by continuous recording.
5.3 Connettività Wi-Fi
The dashcam features a built-in Wi-Fi module, allowing you to connect it to your smartphone via a dedicated app. This enables live view, video playback, downloading recordings, and adjusting settings.
- Download the official Hikvision dashcam app from your smartphone's app store (iOS/Android).
- Accendi la dashcam.
- On your smartphone, go to Wi-Fi settings and connect to the dashcam's Wi-Fi network (SSID and password can usually be found on the device or in the app's initial setup).
- Open the app to manage your dashcam.
5.4 Using the Micro Remote
The micro remote can be used to manually trigger an emergency recording or take a snapshot, depending on its configuration within the app. Refer to the app's instructions for specific remote functions.
6. Settings and App Usage
The Hikvision dashcam app provides a user-friendly interface to customize your dashcam's settings:
- Risoluzione video: Adjust recording quality (e.g., 1080p, 720p).
- Durata della registrazione in loop: Set the length of video segments (e.g., 1, 3, 5 minutes).
- Sensibilità del sensore G: Adjust the sensitivity of the G-sensor to prevent false triggers or ensure proper detection.
- Registrazione audio: Enable or disable the built-in microphone.
- Data/Ora Stamp: Ensure accurate date and time are displayed on recordings.
- Impostazioni Wi-Fi: Change Wi-Fi SSID and password if desired.
- Aggiornamenti del firmware: Check for and install the latest firmware for improved performance and features.
For detailed instructions on each setting, please refer to the in-app help section.
7. Manutenzione
- Pulizia: Use a soft, dry cloth to clean the camera lens and body. Do not use chemical cleaners or abrasive materials.
- Formattazione scheda SD: It is recommended to format the SD card regularly (e.g., once a month) using the dashcam's app to maintain optimal recording performance and prevent data corruption. Back up any important files prima della formattazione.
- Magazzinaggio: If storing the dashcam for an extended period, remove it from the vehicle and store it in a cool, dry place away from direct sunlight.
8. Risoluzione Dei Problemi
| Problema | Possibile soluzione |
|---|---|
| La dashcam non si accende. |
|
| Recording stops or fails. |
|
| Problemi di connessione Wi-Fi. |
|
| La qualità video è scarsa. |
|
9. Specifiche
| Caratteristica | Dettaglio |
|---|---|
| Modello | AE-DN2016-F3 |
| Risoluzione video | 1080p Full HD |
| Viewangolo di ing | Fino a 135° |
| Audio | Microfono e altoparlante integrati |
| Connettività | Built-in Wi-Fi Module, Wi-Fi AP Function |
| Sensore | Built-in G-Sensor Module |
| Magazzinaggio | Supports up to 128GB SD Card (for video recording) |
| Montaggio | Magnetic Connection between Camera and Bracket |
| Metodo di controllo | Tocca (tramite app) |
| Numero di parte | 3353 |
| ASIN | B09PC5RJT1 |
10. Garanzia e supporto
Hikvision products are designed for reliability and performance. This product comes with a standard manufacturer's warranty. For specific warranty terms and conditions, please refer to the warranty card included in your package or visit the official Hikvision websito.
If you encounter any issues or require technical assistance, please contact Hikvision customer support or your authorized dealer. Provide your product model number (AE-DN2016-F3) and purchase details when seeking support.
Risorse online: For the latest information, FAQs, and software updates, please visit the official Hikvision support websito.


