
1. Introduzione
The Makita DMR110N is a robust job site radio designed for demanding environments. It supports both DAB and DAB+ (Digital Audio Broadcasting) and traditional FM radio frequencies. This manual provides essential information for the safe and efficient operation, maintenance, and troubleshooting of your DMR110N radio.
Caratteristiche principali:
- DAB/DAB+ and FM digital tuner.
- Dual power source: AC adapter or Makita Li-ion batteries (7.2V, CXT, LXT series).
- Two powerful 76mm side speakers for rich stereo sound.
- Backlit LCD screen with 10 preset channels (5 DAB, 5 FM).
- AUX-IN jack for external audio devices.
- Micro USB port for software updates.
- IP64 rated for dust and rain resistance.
- Flexible antenna and elastomer bumpers for durability.
2. Informazioni sulla sicurezza
Quando si utilizzano apparecchi elettrici, osservare sempre le precauzioni di sicurezza di base per ridurre il rischio di incendi, scosse elettriche e lesioni personali.
- Do not expose the radio to excessive heat or direct sunlight for prolonged periods.
- Ensure the AC adapter is compatible with your local power supply.
- Only use genuine Makita Li-ion batteries (7.2V, CXT, LXT series).
- Batterie incompatibili: The DMR110N is non compatible with Makita G-Series, XGT, Ni-Cad, or Ni-MH batteries. Using incompatible batteries may cause damage to the radio and void the warranty.
- Keep the radio away from water and other liquids, despite its IP64 rating, to prevent damage.
- Non tentare di smontare o modificare la radio. Per qualsiasi intervento di assistenza, rivolgersi a personale qualificato.
3. Contenuto della confezione
Verificare che tutti gli articoli siano presenti nel pacco:
- 1 x Makita DMR110N Job Site Radio
- Adattatore di alimentazione 1 x
- Nota: le batterie e il caricabatterie non sono inclusi e devono essere acquistati separatamente.
4. Identificazione dei componenti
Familiarize yourself with the various parts of your Makita DMR110N radio.
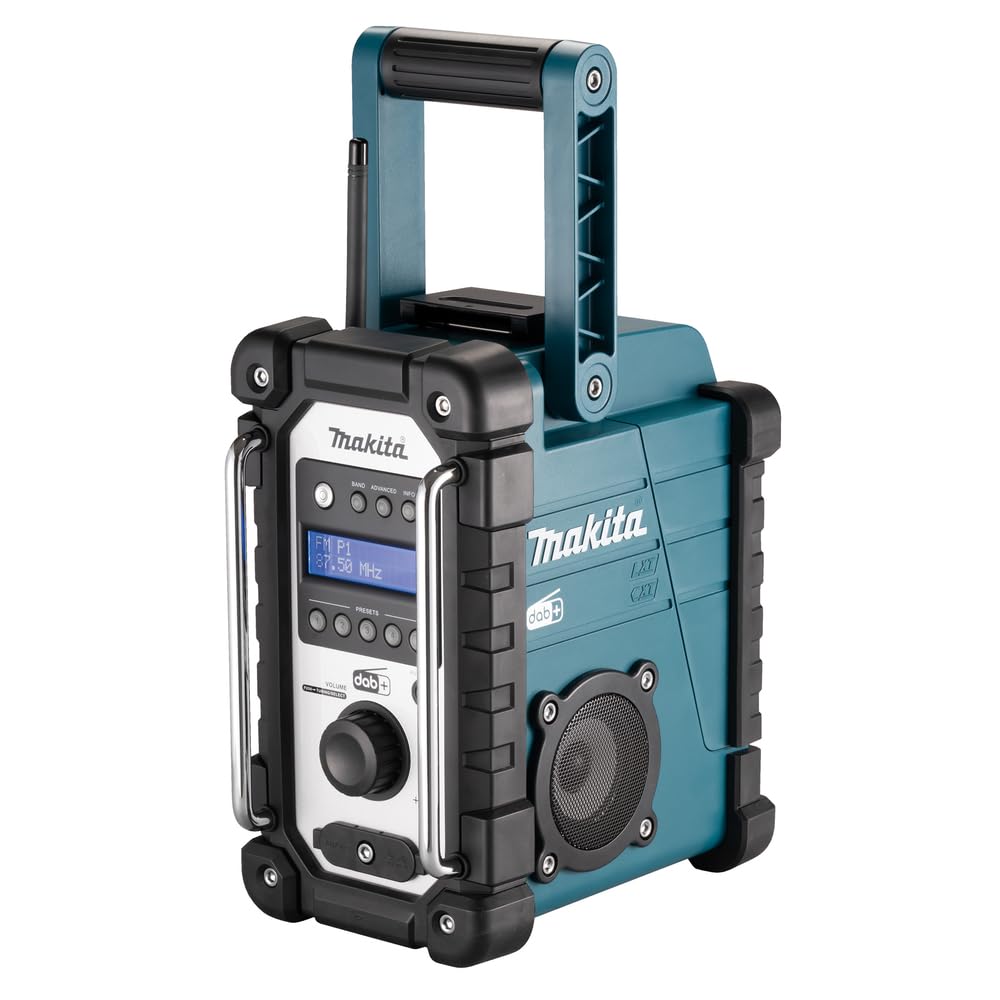
Figura 1: Davanti view of the Makita DMR110N Job Site Radio, showing the control panel, LCD display, volume knob, and speakers.
Componenti chiave:
- Pannello di controllo: Buttons for Band, Advanced Info, Presets, and Tuning.
- Schermo LCD: Shows station information, time, and settings.
- Manopola del volume: Regola il livello di uscita audio.
- Relatori: Two 76mm side speakers for stereo sound.
- Antenna: Flexible, retractable antenna for radio reception.
- Vano batteria: Located at the rear, for Makita Li-ion batteries.
- Porta adattatore CA: Per collegare l'adattatore di alimentazione CA in dotazione.
- Porta AUX-IN: Per collegare dispositivi audio esterni.
- Porta micro USB: Per gli aggiornamenti software.
5. Impostazione
5.1 Alimentazione dell'unità
The DMR110N can be powered by the supplied AC adapter or a compatible Makita Li-ion battery.

Figura 2: Makita DMR110N powered by the AC adapter.
Utilizzo dell'adattatore CA:
- Insert the AC adapter plug into the DC IN socket on the radio.
- Collegare l'adattatore CA a una presa a muro standard.
5.2 Installazione della batteria
Ensure the radio is turned off before installing or removing batteries.

Figura 3: Posteriore view of the radio with the battery compartment open.

Figura 4: Inserting a Makita Li-ion battery into the compartment.

Figura 5: Battery compartment closed after battery installation.
Steps for Battery Installation:
- Aprire il coperchio del vano batteria situato sul retro della radio.
- Align the battery with the grooves in the compartment and slide it in until it clicks into place.
- Chiudere saldamente il coperchio del vano batterie.
5.3 Configurazione dell'antenna
For optimal radio reception, extend the flexible antenna fully. The antenna can be pivoted for better signal strength. When not in use, the antenna can be removed and stored inside the radio's battery cover.
6. Istruzioni per l'uso
6.1 Accensione/spegnimento
Premere il tasto ENERGIA button (usually integrated with the volume knob) to turn the radio on or off.
6.2 Mode Selection (DAB/DAB+, FM)
Premere il tasto BANDA button repeatedly to switch between DAB/DAB+ and FM radio modes.
6.3 Tuning (DAB/DAB+)
- Switch to DAB/DAB+ mode using the BANDA pulsante.
- Al primo utilizzo o se non vengono trovate stazioni, la radio cercherà automaticamente le stazioni disponibili.
- Utilizzare il SINTONIZZARE buttons (up/down arrows) to navigate through the list of available DAB/DAB+ stations.
- Premere il tasto ENTRARE or SELEZIONARE pulsante per scegliere una stazione.
6.4 Tuning (FM)
- Passare alla modalità FM utilizzando il BANDA pulsante.
- Scansione automatica: Premere e tenere premuto il tasto SINTONIZZARE up or down button to automatically scan for the next available station.
- Sintonizzazione manuale: Premere brevemente il tasto SINTONIZZARE up or down button to adjust the frequency incrementally.
6.5 Controllo del volume
Ruotare il VOLUME knob clockwise to increase volume and counter-clockwise to decrease volume.
6.6 Preset
The radio allows you to store up to 5 DAB/DAB+ and 5 FM stations as presets for quick access.
Memorizzazione di un preset:
- Sintonizzati sulla stazione desiderata.
- Tieni premuto uno dei PRESET buttons (1-5) until the display confirms the station has been saved.
Richiamo di un preset:
- Premere brevemente il tasto corrispondente PRESET button (1-5) to recall the saved station.
6.7 Connessione AUX-IN
Connect an external audio device (e.g., smartphone, MP3 player) to the radio using a 3.5mm audio cable (not included).

Figura 6: Avvicinamento view of the AUX-IN (green) and Micro USB ports.
- Plug one end of the audio cable into the AUX-IN port on the radio.
- Collegare l'altra estremità al jack delle cuffie o all'uscita audio del dispositivo esterno.
- Select AUX mode on the radio (if available, otherwise it may auto-detect or require cycling through modes).
- Controlla la riproduzione e il volume dal tuo dispositivo esterno.
6.8 Micro USB Port for Software Updates
The micro USB port is provided for future software updates. Refer to the Makita website or service center for instructions on how to perform software updates, if available.
7. Manutenzione
7.1 Pulizia
Pulire la radio con un panno morbido, damp panno. Non utilizzare detergenti abrasivi o solventi, poiché potrebbero danneggiare il casing. Ensure all ports are dry before use.
7.2 Cura della batteria
If using batteries, remove them if the radio will not be used for an extended period. Store batteries in a cool, dry place. Follow Makita's guidelines for battery charging and storage.
7.3 Conservazione
Store the radio in a clean, dry environment, away from direct sunlight and extreme temperatures. The flexible antenna can be removed and stored in the battery compartment for protection during transport or storage.
8. Risoluzione Dei Problemi
If you encounter issues with your DMR110N radio, refer to the following common problems and solutions:
| Problema | Possibile causa | Soluzione |
|---|---|---|
| La radio non si accende. | No power supply; battery depleted or incorrectly installed; AC adapter not connected. | Check AC adapter connection; ensure battery is charged and correctly inserted; try a different power source. |
| Poor radio reception (DAB/DAB+, FM). | Antenna not extended or positioned correctly; weak signal area; interference. | Fully extend and adjust the antenna; move the radio to a different location; perform a full scan for DAB/DAB+ stations. |
| Nessun suono dagli altoparlanti. | Volume too low; radio muted; incorrect mode selected (e.g., AUX with no device connected). | Increase volume; check if radio is muted; ensure correct mode is selected. |
| External device not playing via AUX-IN. | Cable not connected properly; incorrect mode selected; external device volume too low. | Ensure AUX cable is fully inserted; select AUX mode on the radio; increase volume on both radio and external device. |
If the problem persists after trying these solutions, contact Makita customer support or a qualified service technician.
9. Specifiche
Technical specifications for the Makita DMR110N Job Site Radio:

Figura 7: Dimensions of the Makita DMR110N Job Site Radio.
| Caratteristica | Specificazione |
|---|---|
| Numero di modello | DMR110N |
| Fonte di alimentazione | AC/DC (AC adapter or Makita Li-ion batteries 7.2V, CXT, LXT) |
| Gamma di frequenza FM | 87.5 - 108 MHz |
| Gamma di frequenza DAB/DAB+ | Band III 5A - 13F |
| Altoparlanti | 2 x 76mm (3 inches) |
| Connettività | Auxiliary (3.5mm), USB (for software updates) |
| Tipo di visualizzazione | LCD (retroilluminato) |
| Livello di resistenza all'acqua | IP64 (dust and rain resistant) |
| Dimensioni del prodotto (L x P x A) | 25L x 16W x 43H cm (9.8L x 6.3W x 16.9H pollici) |
| Peso dell'articolo | 4.6 kg (10.1 libbre) |
10. Garanzia e supporto
10.1 Informazioni sulla garanzia
The Makita DMR110N comes with a 1-year manufacturer's warranty. An additional 2 years of warranty can be obtained by registering the product within 30 days of purchase. Please note the following conditions:
- The warranty does not apply if non-genuine or non-recommended parts or accessories are fitted to the tool.
- The use of non-genuine or incompatible batteries and chargers with Makita tools will invalidate the Makita warranty.
Conservare la prova d'acquisto per eventuali reclami in garanzia.
10.2 Assistenza clienti
Per ulteriore assistenza, supporto tecnico o richieste di garanzia, visitare il sito ufficiale Makita website or contact your local Makita service center. Contact details can typically be found on the Makita websito o nella confezione del prodotto.