1. Introduzione
This instruction manual provides detailed guidance for the installation, operation, maintenance, and troubleshooting of your MAXSUN Terminator B660 LGA 1700 mATX Motherboard. Please read this manual thoroughly before proceeding with installation or operation to ensure proper functionality and to prevent damage to the product or other components.
The MAXSUN Terminator B660 motherboard is designed to support 12th and 13th Generation Intel Core, Pentium, and Celeron Processors, offering robust performance for personal computing. It features PCIe 4.0, DDR4 memory support, multiple M.2 slots, 2.5Gb LAN, and a comprehensive set of display and USB connectivity options.
2. Caratteristiche del prodotto
- Socket Intel LGA 1700: Supports 13th & 12th Gen Intel Core / Pentium / Celeron Processors & Windows 11 Ready.
- Max Power Supply: 8+1+1 Phases pure digital power supply rated for 50A Dr.MOS, premium and durable alloy chokes.
- Soluzione termica ottimizzata: VRM heatsinks with underneath thermal pads and southbridge hollow heatsinks, providing a large contact area for MOSFETs and chokes, transferring much more heat to the heatsink.
- Faster Connectivity: Dual Channel DDR4 Memory (Up to 128 GB 4*DIMMS, MAX: 5000+MHz), Ultra Durable PCIe 4.0 x16 Slot & Ultra-Fast M.2 SSD NVMe PCIe 4.0 x4 Connectors, USB 3.2, HDMI/DP/VGA, 2.5G Ethernet and 5.1 Channel HD Audio.
- Manutenzione rapida: Debug light for easy bug position checking. Clr Cmos Button for one-click recovery of security settings.

Figura 2.1: Oltreview of the MAXSUN Terminator B660M Motherboard.
3. Configurazione e installazione
3.1 Installazione della CPU
Carefully open the LGA 1700 socket lever. Align the triangular mark on your Intel 12th/13th Gen CPU with the corresponding mark on the socket. Gently place the CPU into the socket without forcing it. Close the lever to secure the CPU.
3.2 Installazione della memoria (RAM)
The motherboard supports Dual Channel DDR4 memory. Open the clips on both ends of the DIMM slots. Align the notch on the DDR4 memory module with the key in the DIMM slot. Press down firmly on both ends of the memory module until the clips snap into place. For dual-channel configuration, refer to the motherboard layout for recommended slot pairing.
3.3 Installazione del dispositivo di archiviazione (SSD M.2 e unità SATA)
This motherboard features three M.2 slots for NVMe PCIe 4.0 x4 SSDs. Locate the M.2 slots and remove the retaining screw/standoff. Insert the M.2 SSD at an angle, then gently push it down and secure it with the screw/standoff. For traditional SATA drives, connect the SATA data cables to the SATA ports on the motherboard and the power cables from your power supply to the drives.

Figure 3.1: Location of DDR4 and M.2 slots for memory and storage installation.
3.4 Installazione della scheda di espansione (PCIe)
The motherboard includes a PCIe 4.0 x16 slot for graphics cards and additional PCIe 3.0 slots for other expansion cards. Align your expansion card with the desired PCIe slot and press down firmly until it is seated correctly. Secure the card with a screw to the chassis.
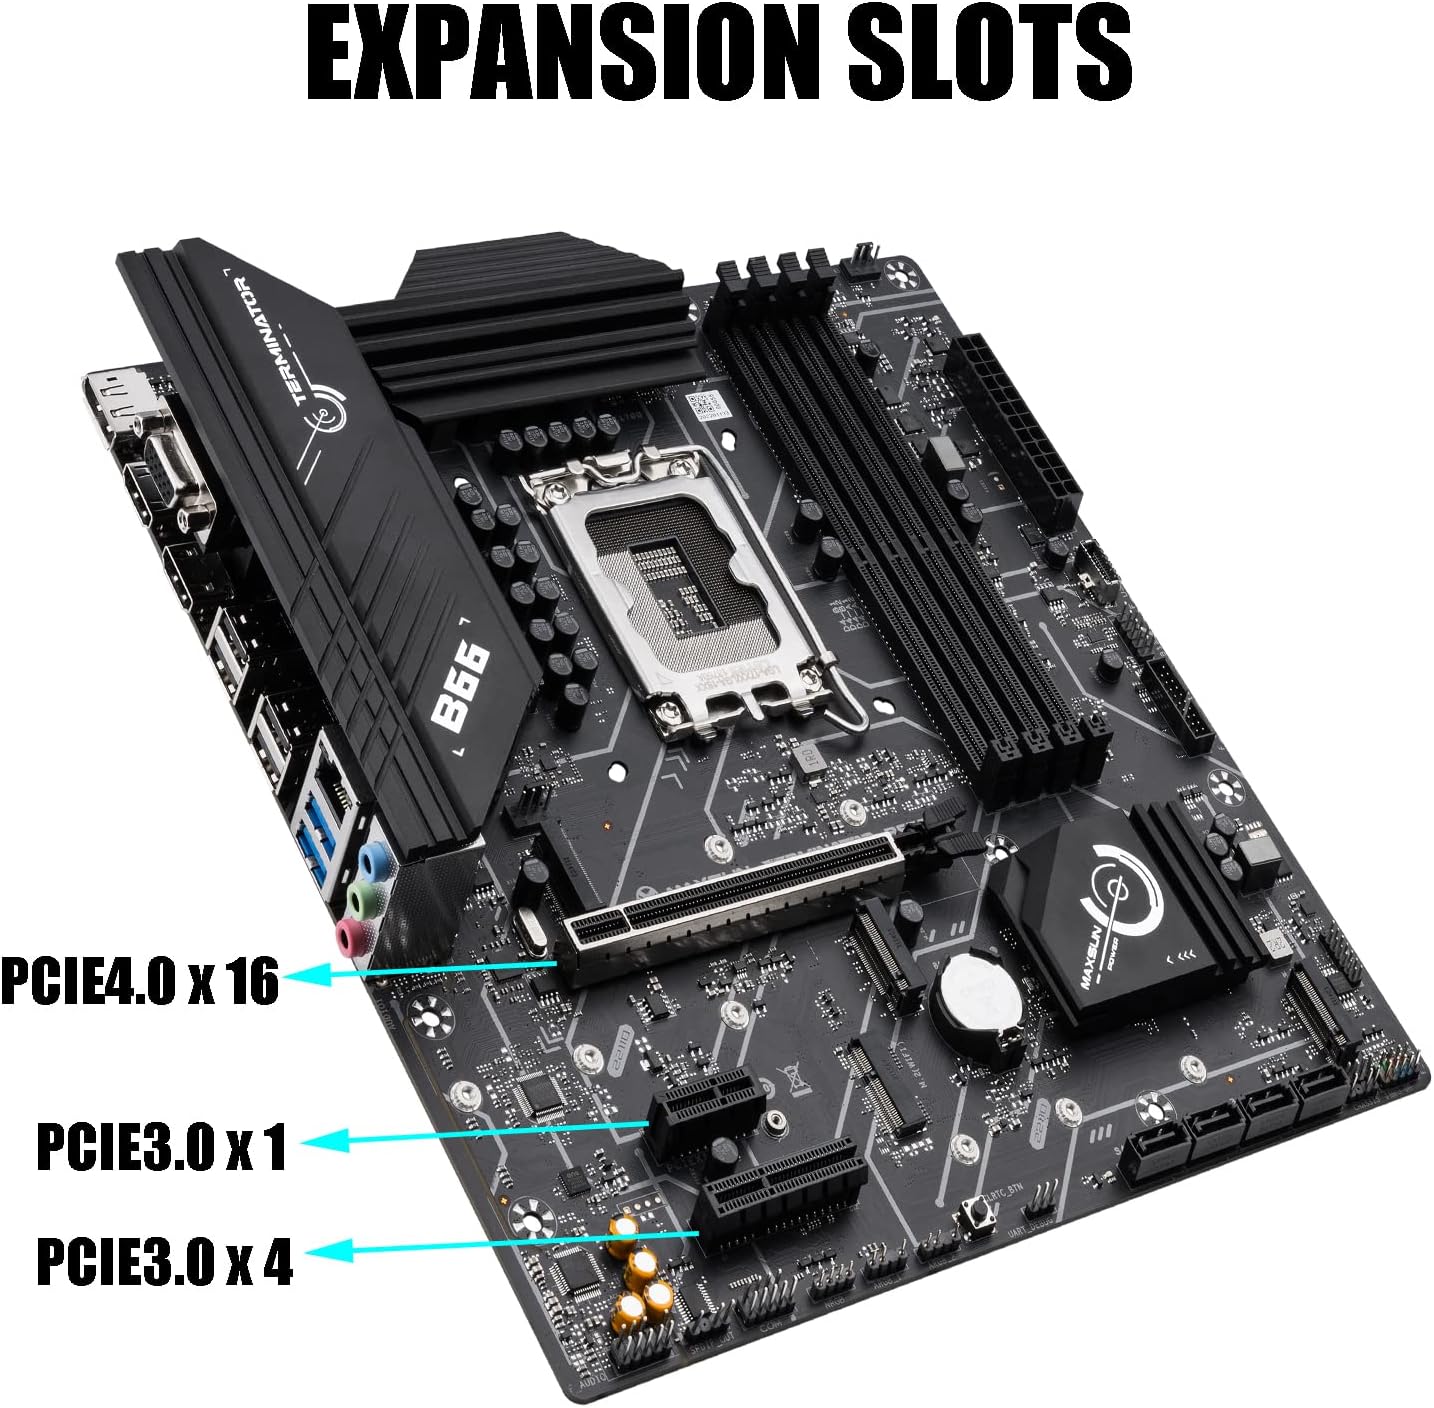
Figura 3.2: Oltreview of the motherboard's expansion slots, including PCIe 4.0 x16 and PCIe 3.0 slots.
3.5 Collegamenti dell'alimentazione
Connect the 24-pin ATX power connector and the 8-pin CPU power connector from your power supply unit (PSU) to the corresponding ports on the motherboard. Ensure all connections are secure.
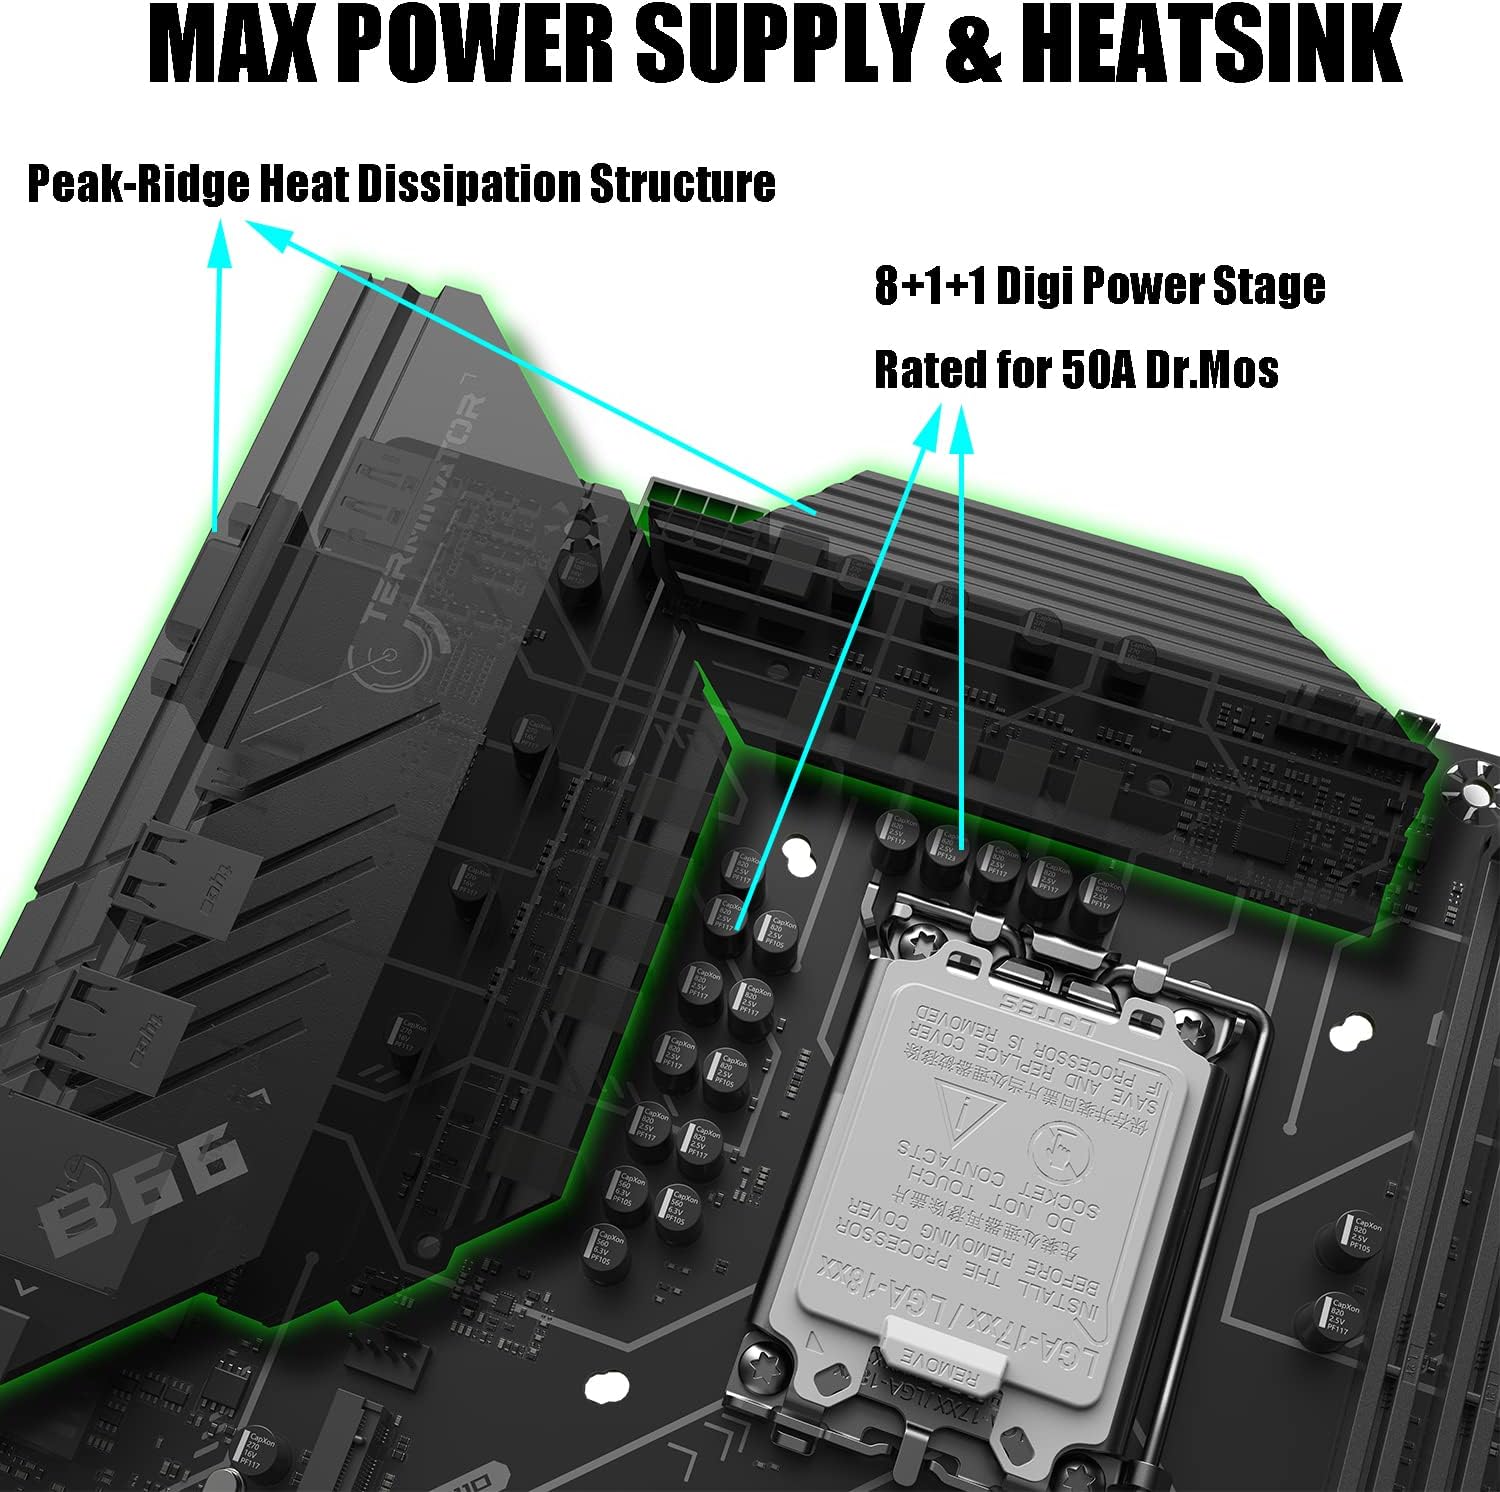
Figure 3.3: Close-up of the power supply area and VRM heatsinks.
3.6 Connecting I/O Devices
Connect your peripherals such as keyboard, mouse, monitor, and network cable to the appropriate ports on the motherboard's rear I/O panel. The motherboard provides DP, HDMI, VGA for display output, USB 3.2, USB 2.0, and 2.5G Ethernet ports.

Figura 3.4: dettagliata view of the Stainless-Steel Back I/O panel with various connectivity options.
4. Istruzioni per l'uso
4.1 Accensione iniziale
After completing all hardware installations, connect the power cord to your PSU and press the power button on your computer case. The system should initiate the boot process.
4.2 Accessing BIOS/UEFI Setup
Per accedere all'utilità di configurazione BIOS/UEFI, premere ripetutamente il tasto Eliminare key during the initial boot sequence (immediately after powering on). This will allow you to configure system settings, boot order, and other advanced options.
4.3 Installazione del sistema operativo
Once in the BIOS/UEFI, you can set the boot order to install your preferred operating system from a USB drive or optical media. Ensure your USB drive is formatted correctly (e.g., FAT32 for UEFI boot).
5. Manutenzione
5.1 BIOS Update Procedure
Updating the BIOS can improve system stability, add support for new hardware, or fix bugs. Follow these steps carefully:
- Prepare a USB storage device formatted in FAT32. Other boot disks such as PE or DOC cannot be used.
- Visit the MAXSUN support site (www.maxsun.com.cn/en/) to download and unzip the latest BIOS file for your MS-TERMINATOR B660M motherboard.
- Copy the entire extracted EFI folder to the root folder of the prepared USB storage device.
- Before updating BIOS, remove all hard drives (including M.2 and SATA SSDs) from the motherboard.
- Insert your USB storage device into a USB port on the motherboard. Power on the system and repeatedly press the Eliminare tasto per accedere all'interfaccia BIOS.
- In the BIOS, press F9 E Entrare to load optimized defaults. Then navigate to the "Startup" tab and disable "Flash Write Protect". Press F10 E Entrare to save and reset.
- After the system restarts, press the F11 key repeatedly to select the USB storage device boot option starting with UEFI.
- The system will automatically execute the program to update the BIOS.
- When the screen displays "FS0:\EFI\BOOT>" or "FPT Operation Successful", unplug your USB storage device. Otherwise, the system will repeat the update.
- Quindi premere Ctrl+Alternativa+Eliminare at the same time, and the system will automatically restart and enter the NEW BIOS.
- In the new BIOS, press F9 E Entrare to load optimized defaults. Then press F10 E Entrare to save and reset.
Video 5.1: Detailed guide on how to update the BIOS for MAXSUN motherboards.
5.2 Pulizia e cura generale
Regularly clean dust from the motherboard and other components using compressed air. Ensure the system is powered off and unplugged before cleaning. Avoid using liquids or abrasive materials.
6. Risoluzione Dei Problemi
6.1 Debug Light Diagnostics
The motherboard features a debug light system to assist in identifying boot issues. If the system fails to boot, observe the debug LEDs. Each LED corresponds to a specific component (CPU, DRAM, VGA, BOOT). The illuminated LED indicates the component causing the boot failure, helping you pinpoint the problem quickly.
6.2 Ripristino CMOS
If you encounter system instability or incorrect settings after making changes in the BIOS, you can use the "Clr Cmos Button" to reset the BIOS settings to their factory defaults. Ensure the system is powered off before performing a CMOS clear. Refer to the motherboard layout for the exact location of the button or jumper.
6.3 Problemi generali
- Nessuna visualizzazione: Ensure the monitor is connected to the correct display output (DP, HDMI, or VGA) and the graphics card (if installed) is properly seated and powered.
- Instabilità del sistema: Check all power connections, memory seating, and CPU cooler installation. Ensure drivers are up to date.
- Periferica non rilevata: Verify USB or SATA connections. Check BIOS settings for port enablement.
7. Specifiche
| Caratteristica | Specificazione |
|---|---|
| Marca | MAXSUN |
| Nome del modello | TERMINATOR |
| Numero modello articolo | MS-TERMINATOR B660M |
| Presa CPU | LGA1700 |
| Processori compatibili | Intel 12th Gen LGA 1700 CPU |
| Tipo di chipset | B660 |
| Tecnologia della memoria RAM | DDR4 |
| Velocità di clock della memoria | 5000 MHz (massimo) |
| Dispositivi compatibili | Personal computer |
| Piattaforma | Finestre |
| Peso dell'articolo | 2.88 libbre |
| Dimensioni del pacco | 11.54 x 11.18 x 2.6 pollici |
8. Garanzia e supporto
For warranty information, technical support, or service inquiries, please refer to the official MAXSUN website or contact your local retailer. Keep your proof of purchase for warranty claims. MAXSUN is committed to providing competitive hardware solutions and considerate service.
Video 8.1: Un breve riassuntoview of the MAXSUN Terminator B660M Motherboard.