
1. Introduzione
Welcome to the user manual for your new Cheerlux C50 Projector. This guide provides essential information on setting up, operating, maintaining, and troubleshooting your device. Please read this manual thoroughly before using the projector to ensure optimal performance and safety. Keep this manual for future reference.
2. Istruzioni di sicurezza
Per prevenire incendi, scosse elettriche o lesioni, osservare le seguenti precauzioni di sicurezza:
- Non ostruire le aperture di ventilazione. Lasciare spazio sufficiente attorno al proiettore per un corretto flusso d'aria.
- Do not expose the projector to rain or moisture. Avoid placing objects filled with liquids, such as vases, on the projector.
- Non aprire il proiettore casing. Affidare tutti gli interventi di assistenza a personale qualificato.
- Utilizzare solo l'adattatore di alimentazione fornito con il proiettore.
- Evitare di guardare direttamente nell'obiettivo del proiettore quando lamp è acceso, poiché la luce intensa può danneggiare gli occhi.
- Posizionare il proiettore su una superficie stabile e piana per evitare che cada.
- Scollegare il proiettore dalla presa di corrente durante i temporali o quando non viene utilizzato per lunghi periodi.
3. Contenuto della confezione
Si prega di verificare che tutti gli articoli siano presenti e in buone condizioni:
- Proiettore Cheerlux C50
- Telecomando
- Cavo di alimentazione
- Cavo HDMI
- cavo AV
- Manuale d'uso
4. Prodotto finitoview
Familiarize yourself with the components and ports of your Cheerlux C50 Projector.

This image displays the Cheerlux C50 Projector from a front-top angle, highlighting its lens, focus ring, and control panel buttons on the top surface. The projector features a white and grey casing.
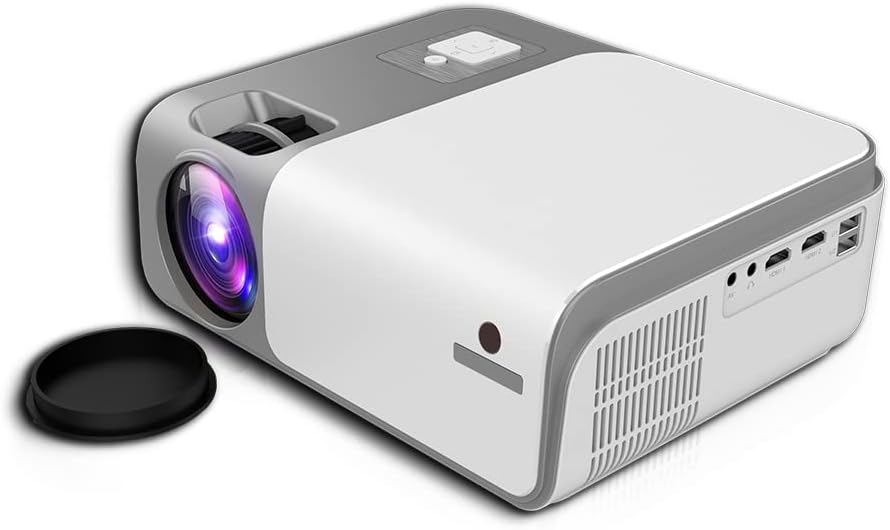
This image shows the rear and side of the Cheerlux C50 Projector, revealing various input/output ports such as HDMI, USB, and AV, along with ventilation grilles. A lens cap is visible next to the lens.
4.1. Pannello frontale
- Lente di proiezione: Emette l'immagine.
- Anello di messa a fuoco: Regola la nitidezza dell'immagine.
4.2. Pannello superiore
- Pulsanti di controllo: Power, Menu, Source, Navigation (Up/Down/Left/Right), OK.
4.3. Pannello posteriore
- Potenza in ingresso: Si collega al cavo di alimentazione.
- Porte HDMI (x2): Collegati a dispositivi abilitati HDMI (laptop, console di gioco, lettori Blu-ray).
- Porte USB (x2): Collegare unità USB per la riproduzione multimediale.
- Porta AV: Collegati ai dispositivi più vecchi tramite un cavo AV.
- Uscita audio (3.5 mm): Collegare altoparlanti esterni o cuffie.
- Ricevitore IR: Per segnali di controllo remoto.
5. Impostazione
5.1. Collegamento elettrico
- Collegare il cavo di alimentazione alla porta di ingresso dell'alimentazione del proiettore.
- Collegare l'altra estremità del cavo di alimentazione a una presa a muro.
- La spia di alimentazione sul proiettore si illuminerà.
5.2. Posizionamento
Position the projector on a stable, flat surface. The ideal projection distance for the Cheerlux C50 is between 1.5 to 6 meters, depending on the desired screen size. Ensure the projector is centered with your projection screen or wall.
5.3. Messa a fuoco e correzione trapezoidale
- Regolazione della messa a fuoco: Turn the focus ring on the front of the projector until the projected image appears sharp and clear.
- Keystone Correction (4P): If the projected image appears trapezoidal (wider at the top or bottom), use the 4P keystone correction function. This can typically be accessed via the projector's menu or dedicated buttons on the remote control. Adjust each of the four corners independently to achieve a perfectly rectangular image.
6. Operativo
6.1. Accensione/spegnimento
- Accensione: Press the power button on the projector or the remote control. The projector will start up, and the lamp si illuminerà.
- Spegni: Press the power button again. Confirm shutdown if prompted. Allow the projector to cool down before unplugging it.
6.2. Fonti di input
Connect your desired device to the projector using the appropriate cable (HDMI, AV, USB). Then, press the 'Source' button on the projector or remote control to select the corresponding input source.
- HDMI: For high-definition video and audio from laptops, game consoles, etc.
- USB: Per la riproduzione di contenuti multimediali files (photos, videos, music) directly from a USB flash drive.
- AV: For standard definition video and audio from older devices like DVD players.
6.3. Connettività wireless (WiFi e Bluetooth)
The Cheerlux C50 Projector features built-in WiFi and Bluetooth for enhanced connectivity.
- Connessione wifi: Navigate to the 'Settings' menu, select 'Network' or 'WiFi Settings'. Choose your desired WiFi network from the list and enter the password.
- Connessione Bluetooth: In the 'Settings' menu, select 'Bluetooth'. Turn on Bluetooth and pair with your Bluetooth-enabled speakers or headphones.
6.4. Mirroring dello schermo
The projector supports wireless screen mirroring from compatible smartphones and tablets.

This image illustrates the Cheerlux C50 Projector wirelessly connected to a smartphone. The phone's screen, displaying a movie scene, is being mirrored to the projector, indicated by a Wi-Fi signal icon between the devices.
- Ensure both your projector and mobile device are connected to the same WiFi network.
- Sul proiettore, seleziona l'opzione "Screen Mirroring" o "Wireless Display" dal menu principale.
- On your mobile device, activate its screen mirroring feature (e.g., 'Smart View' for Samsung, 'Screen Mirroring' for Android, 'AirPlay' for iOS).
- Seleziona il nome del proiettore dall'elenco dei dispositivi disponibili sul tuo telefono.
- The mobile device's screen content will now be projected.
6.5. Navigazione nel menu
Use the navigation buttons (Up, Down, Left, Right) and 'OK' button on the projector or remote control to browse through the on-screen menu. The 'Menu' button typically opens the main settings, and the 'Return' or 'Exit' button closes menus.
7. Manutenzione
7.1. Pulizia
- Lente: Utilizzare un panno morbido e privo di lanugine, specificamente progettato per lenti ottiche. Non utilizzare detergenti abrasivi.
- Casing: Pulire l'esterno del proiettore con un panno morbido e asciutto. Per lo sporco ostinato, leggermente dampimmergi il panno nell'acqua.
- Prese d'aria: Periodically clean the vents with a soft brush or compressed air to prevent dust buildup, which can affect cooling.
7.2. Conservazione
When not in use for extended periods, store the projector in a cool, dry place, away from direct sunlight and extreme temperatures. Cover the lens with its cap to protect it from dust and scratches.
8. Risoluzione Dei Problemi
Se riscontri problemi con il proiettore, fai riferimento ai seguenti problemi comuni e alle relative soluzioni:
| Problema | Possibile causa | Soluzione |
|---|---|---|
| Nessuna immagine proiettata | Cavo di alimentazione allentato, sorgente di ingresso errata, dispositivo non collegato. | Check power connection, select correct input source, ensure source device is on and connected. |
| L'immagine è sfocata | Messa a fuoco non regolata, proiettore troppo vicino/lontano. | Adjust the focus ring. Reposition the projector within the recommended distance. |
| L'immagine è trapezoidale | Proiettore non perpendicolare allo schermo. | Use the 4P keystone correction function in the menu. |
| Nessun suono | Volume too low, external speakers not connected, source device muted. | Increase projector volume, check external speaker connection, unmute source device. |
| Il telecomando non funziona | Batteries dead, obstruction, not pointing at IR receiver. | Sostituire le batterie, rimuovere gli ostacoli, puntare il telecomando direttamente verso il ricevitore IR del proiettore. |
9. Specifiche
Technical specifications for the Cheerlux C50 Projector:
| Caratteristica | Specificazione |
|---|---|
| Nome del marchio | Generic (Cheerlux C50) |
| Tecnologia di connettività | Wi-Fi, Bluetooth |
| Risoluzione nativa | 1920x1080 |
| Luminosità | 4000 lumen |
| Fattore di forma | Portatile |
| Tipo di montaggio | Supporto da tavolo |
| Tipo di controllore | Telecomando |
| Distanza massima di lancio | 6 metri |
| Cosatage | 3 watt |
| Caratteristiche speciali | Built In Wi Fi, Portable, Wireless, 4P Keystone Correction |
10. Garanzia e supporto
The Cheerlux C50 Projector comes with a standard manufacturer's warranty. Please refer to the warranty card included in your package for specific terms and conditions, including warranty period and coverage details. For technical support, service, or further inquiries, please contact your retailer or the manufacturer's customer service department.
Conservare la ricevuta d'acquisto come prova d'acquisto per eventuali reclami in garanzia.