
Introduzione
The SRIKEKL A8Z Body Camera is a compact and portable device designed for video recording, photo capture, and voice recording. It features a 180-degree rotatable lens, infrared LED lights for low-light conditions, and a magnetic back clip for versatile mounting. This manual provides detailed instructions for setting up, operating, and maintaining your body camera.

Image: The SRIKEKL A8Z Body Camera discreetly recording in a professional setting.
Prodotto finitoview
Contenuto della confezione
- SRIKEKL A8Z Body Camera
- Scheda di memoria 64GB
- Cavo USB di ricarica/dati
- Manuale d'uso
- OTG Adapter (for Android phone connection)
Disposizione del dispositivo

Immagine: Frontale view of the camera, highlighting the lens, power/photo button, record/video button, lamp switch, Micro SD slot, and reset button.
The camera features a compact design with easily accessible controls:
- Lente: 180-degree rotatable lens for flexible recording angles.
- Pulsante di accensione/foto: Utilizzato per accendere/spegnere il dispositivo e scattare foto.
- Pulsante Rec/Video: Used to start/stop video recording.
- Lamp Interruttore: Controls the infrared LED lights for night vision.
- Slot per microSD: Per inserire la scheda di memoria.
- Porta USB: Per la ricarica e il trasferimento dei dati.
- Pulsante di reset: To restart the device if it becomes unresponsive.
Opzioni di montaggio
The camera offers versatile mounting options:
- Clip posteriore: Securely attach the camera to clothing, pockets, or other surfaces.
- Adsorbimento magnetico: The back of the camera has a strong magnet, allowing it to be attached to any iron object.

Image: The camera's convenient back clip design for attaching to clothing.

Immagine: Examples of the camera's strong magnetic adsorption feature on different surfaces.
Impostare
1. Inserimento della scheda di memoria
- Assicurarsi che la fotocamera sia spenta.
- Individuare lo slot per la scheda Micro SD sul lato della fotocamera.
- Gently insert the provided 64GB Micro SD card into the slot until it clicks into place.
- Per rimuoverla, spingere leggermente la scheda finché non scatta fuori.
2. Ricarica iniziale
Before first use, fully charge the camera's built-in battery. A full charge typically takes 3-4 hours.
- Connect the camera to a USB power source (e.g., computer USB port, wall charger, power bank) using the provided USB cable.
- The indicator light will show the charging status (refer to the camera's LED indicator guide for specific light patterns).
- Once fully charged, the indicator light will change (e.g., turn solid or off).

Image: The camera connected to a laptop via USB for charging or data transfer.
3. Impostazione di data e ora
Per garantire tempi precisiamps on your recordings:
- Collega la fotocamera al computer tramite il cavo USB.
- Access the camera's storage (it will appear as a removable disk).
- Locate a text file (per esempio,
time.txtorsettings.txt) on the memory card. - Apri questo file and modify the date and time format according to the instructions within the file (per esempio,
YYYY-MM-DD HH:MM:SS). - Salva il file and safely eject the camera from your computer.
- Power on the camera; the new date and time settings will be applied.
Istruzioni per l'uso
Accensione/spegnimento
- Accensione: Premere e tenere premuto il tasto Potenza/Foto button for approximately 2 seconds. The indicator light will illuminate.
- Spegni: Premere e tenere premuto il tasto Potenza/Foto pulsante per circa 3 secondi finché la spia non si spegne.
Registrazione video
- Assicurati che la fotocamera sia accesa.
- Premere il tasto Registrazione/Video button once to start video recording. The indicator light will flash to indicate recording is in progress.
- Per interrompere la registrazione, premere il pulsante Registrazione/Video button again. The video file will be saved to the memory card, and the indicator light will return to standby mode.
Scattare foto
- Ensure the camera is powered on and not currently recording video.
- Premere il tasto Potenza/Foto button once to take a photo. The indicator light may flash briefly.
- La foto verrà salvata sulla scheda di memoria.
Registrazione vocale
The camera can also function as a standalone voice recorder.
- Assicurati che la fotocamera sia accesa.
- Refer to the specific instructions in your camera's internal settings file (accessed via computer) for activating voice-only recording mode. This typically involves a specific button press sequence or a setting change.
- Once activated, the camera will record audio files alla scheda di memoria.
180-Degree Lens Rotation
The camera lens can be manually rotated 180 degrees to adjust the recording angle as needed, allowing for flexible placement and capture from various perspectives (front, top, back).
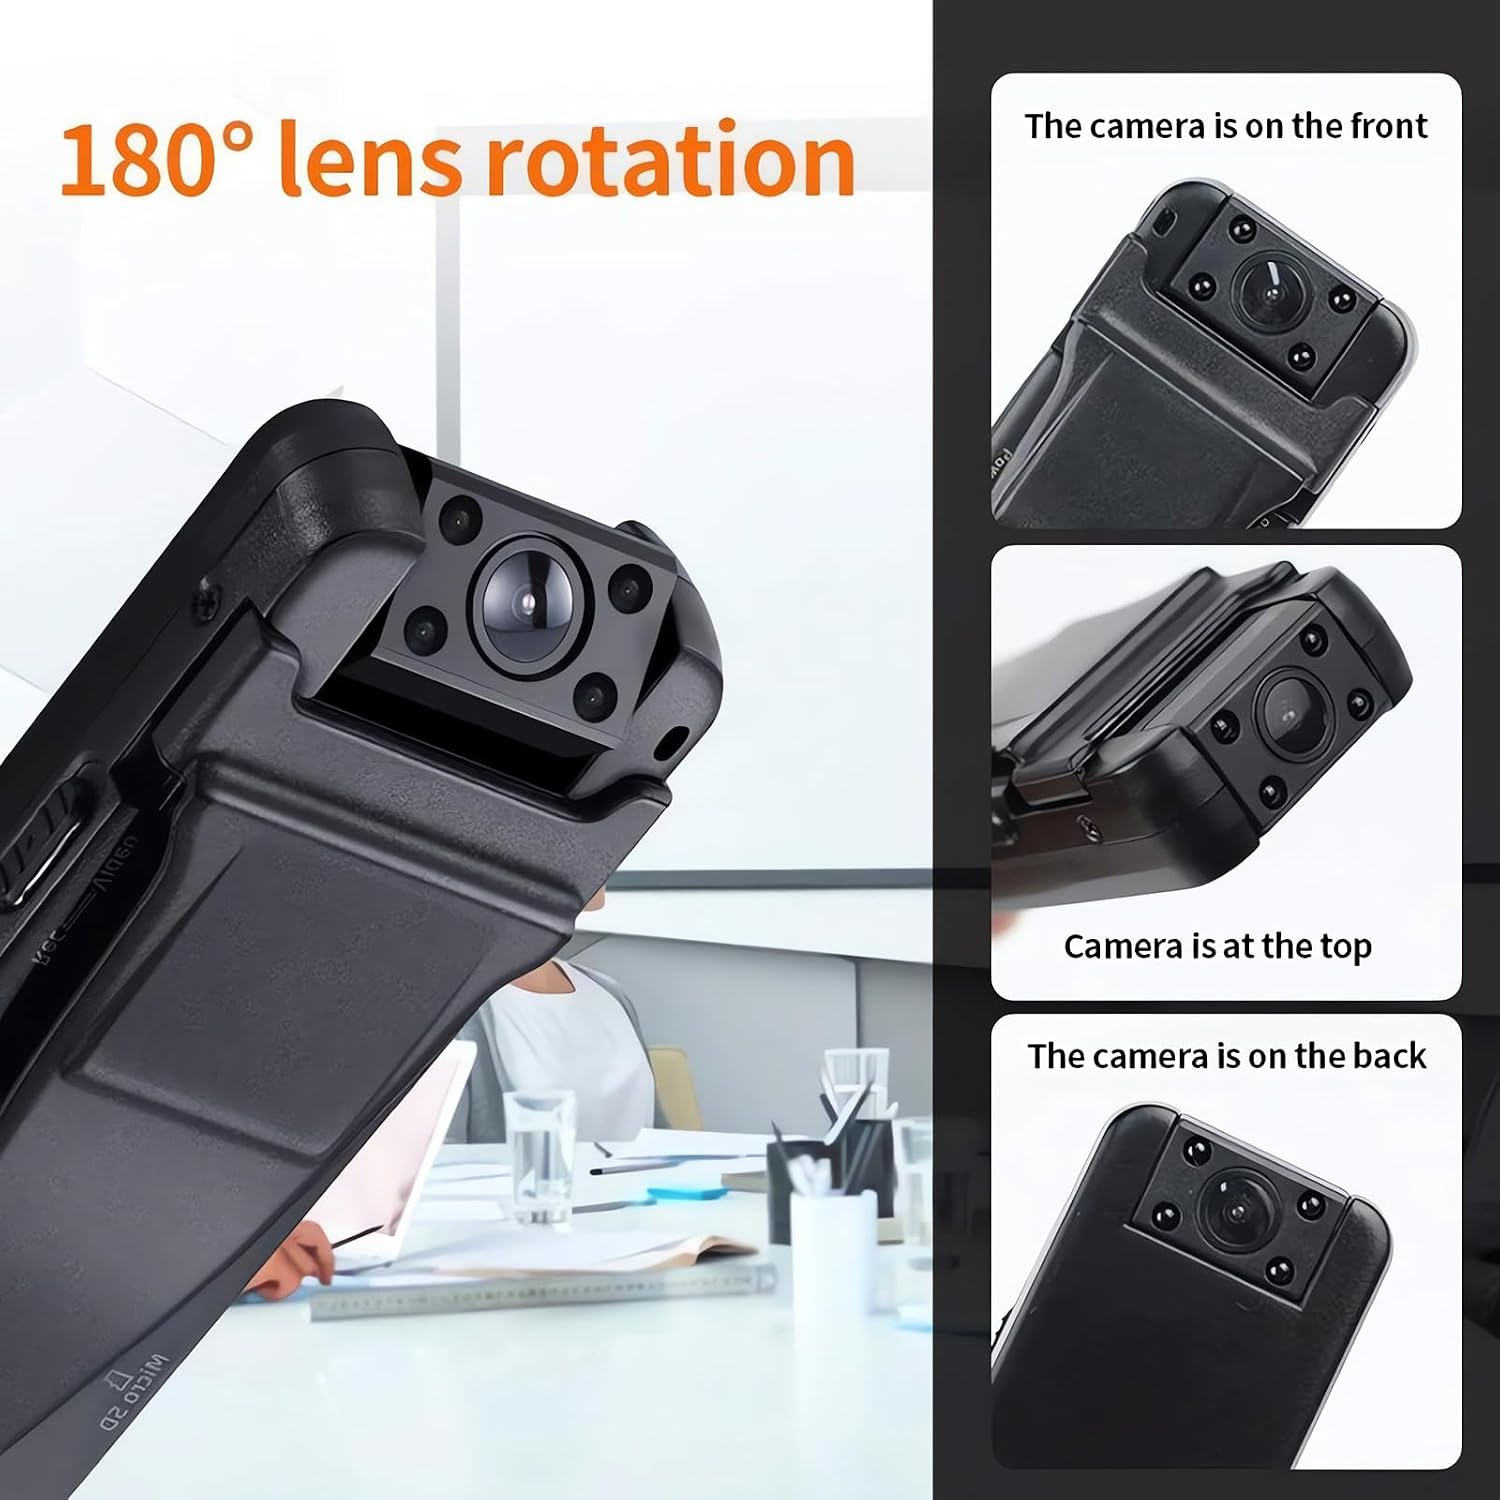
Image: Illustration of the camera's 180-degree rotatable lens for flexible recording.
Visione notturna
The camera is equipped with built-in infrared LED lights for recording in low-light or dark conditions without visible light or sound.
- To activate night vision, slide the Lamp Interruttore in posizione ON.
- To deactivate night vision, slide the Lamp Interruttore in posizione OFF.

Image: The camera utilizing its HD non-light night vision feature in a dark environment.
Rilevamento del movimento
The motion detection feature allows the camera to record only when movement is detected, conserving battery life and storage space.
- To enable or disable motion detection, you may need to access the camera's settings file via a computer (similar to setting date/time). Refer to the specific instructions in the settings file.
- When enabled, the camera will automatically start recording when motion is detected and stop when motion ceases.
Data Transfer and Viewing
Connessione a un computer
- Assicurarsi che la fotocamera sia spenta.
- Collega la fotocamera al computer utilizzando il cavo USB in dotazione.
- The camera will be recognized as a removable disk.
- Open the disk to access your recorded video, photo, and audio files.
- Copia il files al tuo computer per viewing e conservazione.
- Safely eject the removable disk before disconnecting the camera.
Connecting to an Android Phone (OTG)
For Android users, you can view files directly on your phone using the OTG adapter.
- Assicurarsi che la fotocamera sia spenta.
- Connect the camera to the OTG adapter.
- Connect the OTG adapter to your Android phone.
- Your phone's file manager will detect the camera's storage, allowing you to view e gestire files.
Manutenzione
- Pulizia: Utilizzare un panno morbido e asciutto per pulire il corpo macchina e l'obiettivo. Evitare l'uso di prodotti chimici aggressivi o materiali abrasivi.
- Magazzinaggio: Conservare la fotocamera in un luogo fresco e asciutto, lontano dalla luce solare diretta e da temperature estreme.
- Cura della batteria: To maintain battery health, it is recommended to charge the camera every 2 months if not in regular use. Avoid fully discharging the battery frequently.
- Scheda di memoria: Periodically format the memory card to ensure optimal performance and prevent data corruption. Back up important files prima della formattazione.
Risoluzione dei problemi
| Problema | Possibile soluzione |
|---|---|
| La fotocamera non si accende. | Ensure the battery is charged. Connect to a power source and try again. If unresponsive, press the Reset button with a thin object. |
| Impossibile registrare video/scattare foto. | Check if the memory card is inserted correctly and has sufficient free space. Format the memory card if necessary (after backing up data). |
| La data e l'ora sono errate. | Connect the camera to a computer and update the time settings file on the memory card as described in the Setup section. |
| La qualità del video è scarsa o sfocata. | Ensure the lens is clean. Check lighting conditions; use night vision if necessary. Ensure the lens is rotated to the desired position. |
| La fotocamera non risponde. | Use a thin object (e.g., paperclip) to press the Reset button. This will restart the device without deleting data. |
| Cannot connect to computer/phone. | Ensure the USB cable is fully inserted and functional. Try a different USB port or cable. For phones, ensure the OTG adapter is compatible and correctly connected. |
Specifiche

Image: Dimensions of the SRIKEKL A8Z Body Camera.
| Caratteristica | Dettaglio |
|---|---|
| Numero di modello | A8Z |
| Risoluzione video | 1920x1080P (Full HD) |
| Frequenza dei fotogrammi video | 30 fotogrammi al secondo |
| Formato video | Formato MP4 (H.264) |
| Formato audio | WAV 512 Kbps |
| Rotazione dell'obiettivo | 180 gradi |
| Visione notturna | Built-in Infrared LED lights (non-light, non-sound) |
| Rilevamento del movimento | Supportato |
| Capacità della batteria | 1300 mAh, 3.7 V. |
| Tempo di registrazione | Up to 8-10 hours (depending on usage and settings) |
| Tempo di ricarica | 3-4 ore |
| Magazzinaggio | Supports 8GB-128GB Micro SD card (64GB included) |
| Connettività | USB (Wired), Wi-Fi (as per product specifications, though primary data transfer is wired) |
| Dimensioni | Dimensioni: 93 mm x 36 mm x 20 mm |
| Peso | 60g (with back clip) |
| Materiale | Plastica |
| Grado di protezione IP | Grado di protezione IP54 |
Garanzia e supporto
Specific warranty information for the SRIKEKL A8Z Body Camera is not provided in the product details. For warranty claims or technical support, please refer to the retailer or contact SRIKEKL customer service directly through their official channels.