
Introduzione
This manual provides comprehensive instructions for the setup, operation, and maintenance of your XREXS Large Digital Wall Clock. Please read this manual thoroughly before use to ensure proper functionality and longevity of the device. This clock is designed for clear visibility and versatile use in various indoor environments.
Cosa c'è nella scatola
- XREXS Large Digital Wall Clock Unit
- Telecomando
- Adattatore di alimentazione
- Manuale d'uso
- Modello di montaggio
- 2 x AAA Batteries (for memory backup and remote control)
Impostare
1. Collegamento elettrico
Connect the provided power adapter to the clock's power input port and plug it into a standard electrical outlet. The clock operates primarily on AC power. The display will illuminate upon successful connection.

The clock requires continuous power from the adapter for operation. The internal batteries serve only as a backup for memory retention during power outages.
2. Installazione della batteria
Install the 2 AAA batteries into the battery compartment located on the back of the clock. These batteries provide memory backup for time and settings in case of a power interruption. Ensure the plastic wrap is removed from the batteries before installation.
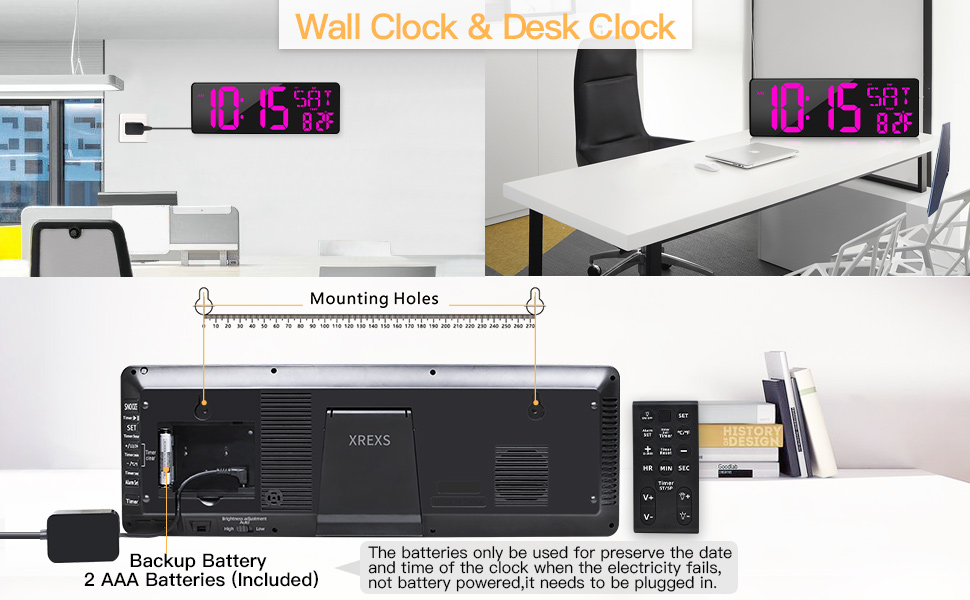
The back of the clock with the battery compartment open, showing the two AAA batteries for backup.
3. Initial Screen Preparation
Carefully peel off any protective film from the clock's display screen before first use to ensure optimal clarity.
Istruzioni per l'uso
1. Impostazione ora e data
Use the remote control for convenient setting. Press the IMPOSTATO button to enter setting mode. Use the directional buttons (up/down) to adjust values and IMPOSTATO again to confirm and move to the next setting (Year, Month, Day, Hour, Minute).

The remote control provides full functionality for setting the clock's various features.
2. Formato 12/24 ore
Premere il tasto +/-12/24HR button on the remote control to toggle between 12-hour (with AM/PM indicator) and 24-hour time formats.

The clock supports both 12-hour and 24-hour time displays.
3. Celsius/Fahrenheit Temperature Display
Premere il tasto ° C / ° F button on the remote control to switch the temperature display between Celsius and Fahrenheit.
4. Regolazione della luminosità
The clock features a 4-level adjustable display brightness. You can manually adjust the brightness using the brightness adjustment buttons on the remote control. Additionally, there is an auto-dimming feature that adjusts brightness based on ambient light. A switch on the back of the clock allows you to select High, Low, or Auto brightness modes.

Choose from four brightness levels or enable auto-dimming for optimal viewing.
5. Timer Function (Count Up/Down)
The clock includes a versatile timer function. Press the Entra/Esci dal timer button on the remote to activate the timer mode. Use the HR, MINIMO, E SEC buttons to set your desired countdown time (0-29 hours, 59 minutes, 59 seconds). Press Timer ST/SP to start or stop the timer. A 90-second 'DIDI' ringing will sound when the countdown ends. The timer has a memory function, retaining the last setting if not turned off. It can also count up from zero.

The clock offers a stopwatch and countdown timer, useful for various activities.
6. Funzione di allarme
Set an alarm by pressing the Allarme impostato button on the remote. Adjust the alarm time using the directional buttons. You can choose to have the alarm active every day, on working days (Monday-Friday), or on weekends. Toggle the alarm on or off as needed.

Configure your alarm for specific days or daily repetition.
7. Ciaourly carillon
The clock offers an hourly chime feature. To activate or deactivate, press and hold the Allarme impostato button. You can select different chime modes: no chime, hourly chime, or chime only between 6 AM and 9 PM. The volume of the chime can also be adjusted.
8. Accensione/spegnimento dello schermo
Premere il tasto ACCESO/SPENTO button on the remote control to turn the display on or off completely, which is useful for bedrooms or when you do not wish to see the time.
Montaggio e posizionamento
The XREXS Digital Wall Clock offers flexible placement options:
- Montaggio a parete: The clock features two keyholes on the back for easy wall mounting. Use the provided mounting template to mark the correct positions for screws on your wall.
- Posizionamento scrivania/tavolo: A fold-out backstand allows the clock to be placed securely on a tabletop, desk, or shelf.

The clock can be easily mounted on a wall or placed on a flat surface using its integrated stand.
Manutenzione
- Clean the clock's display and body with a soft, dry cloth.
- Evitare l'uso di detergenti abrasivi o prodotti chimici aggressivi, poiché potrebbero danneggiare la superficie.
- Ensure the clock is placed in a well-ventilated area to prevent overheating.
Risoluzione dei problemi
| Problema | Possibile causa/soluzione |
|---|---|
| Clock turns off by itself | Check if the power adapter is securely plugged into both the clock and the wall outlet. Ensure there are no power interruptions. |
| Il display è scuro o non visibile | Adjust brightness settings using the remote control or the switch on the back (High/Low/Auto). Ensure the display is not turned off via the remote. |
| Il telecomando non risponde | Check the batteries in the remote control. Ensure any protective plastic film has been removed from new batteries. Point the remote directly at the clock. |
| Alarm sound is too low | Adjust the volume setting for the alarm via the remote control. |
| Time/Date incorrect after power outage | Ensure backup batteries are installed and fresh. The clock should retain settings with functional backup batteries. |
Specifiche
- Marca: XREX
- Modello: Purple LED Display (B09XMHVCJJ)
- Tipo di visualizzazione: Digitale
- Dimensioni del prodotto: 16.5"L x 5.7"A
- Fonte di energia: Elettrico con cavo
- Utilizzo interno/esterno: Al chiuso
- Caratteristiche speciali: Adjustable Brightness, Alarm, Illuminated, Large Display, Snooze, Count Up/Down Timer, Day/Date/Temperature Display
- Materiale del telaio: Acrilonitrile-butadiene-stirene
- Batterie: 2 x AAA (included for backup)
- Tipo di montaggio: Montaggio a parete
- Peso dell'articolo: 16 once (1 libbra)