
1. Introduzione
This manual provides detailed instructions for the installation, operation, and maintenance of the ROGER R93/RX20/U 2-Channel Universal 433.92 MHz Radio Receiver. This device is designed for automation systems, allowing wireless control of various applications such as gate openers, garage doors, and other access control systems. Please read this manual thoroughly before installation and use to ensure proper function and safety.
2. Informazioni sulla sicurezza
- L'installazione deve essere eseguita solo da personale qualificato.
- Scollegare l'alimentazione prima di eseguire qualsiasi installazione o manutenzione.
- Garantire l'alimentazione voltage matches the receiver's requirements (12/24 V AC/DC).
- Do not expose the device to extreme temperatures, moisture, or corrosive environments beyond its specified operating range.
- Tenere il dispositivo lontano da forti fonti di interferenza elettromagnetica.
- This device is intended for use with compatible 433.92 MHz fixed code transmitters.
3. Prodotto finitoview
The ROGER R93/RX20/U is a compact, 2-channel universal radio receiver operating at 433.92 MHz. It is housed in a durable plastic enclosure, making it suitable for various indoor and protected outdoor installations. The receiver supports up to 50 memory codes, allowing multiple remote controls to operate the connected automation system. Its relay outputs provide flexible integration with existing control panels.
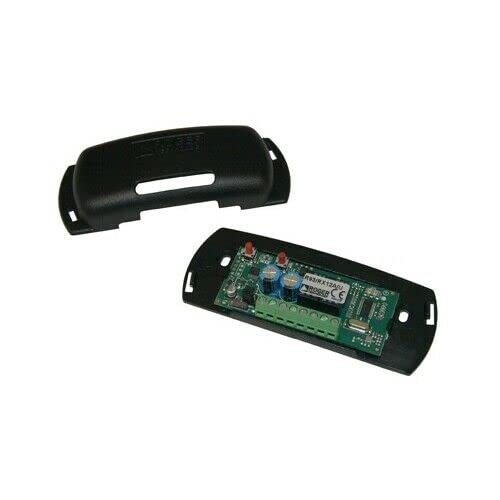
Figura 1: ROGER R93/RX20/U 2-Channel Universal 433.92 MHz Radio Receiver. This image shows the compact plastic enclosure of the receiver module, typically used for integrating into automation systems.
4. Specifiche
| Caratteristica | Specificazione |
|---|---|
| Modello | R93/RX20/U |
| Alimentazione elettrica | 12/24 V AC/DC |
| Assorbimento di corrente | 30mA |
| Temperatura di esercizio | da -10 a +55 °C |
| Numero di canali | 2 |
| Codifica | Fisso Codice |
| Modulazione | UNA MASCHERA |
| Frequenza portante | 433.92 MHz |
| Max. Relay Current | 0.5 A |
| Max. Relay Voltage | 24 V AC / DC |
| Risultati | Staffetta |
| Memory Codes | 50 |
| Sensibilità | -107 dBm |
| Impedenza di ingresso | 50 Ohm |
| Dimensioni (L x P x A) | Dimensioni: 55 x 44 x 20 mm |
| Allegato | Plastica |
5. Installazione e configurazione
Before beginning installation, ensure all power to the automation system is disconnected. The R93/RX20/U receiver is designed for integration into existing control panels or enclosures.
5.1 Montaggio
- Choose a suitable location within the control panel or a separate protective enclosure. The location should be dry, protected from direct sunlight, and away from large metal objects that could interfere with radio signals.
- Secure the receiver using appropriate screws or mounting hardware (not included) through the designated mounting holes on the enclosure.
- Ensure adequate ventilation if installing in a confined space.
5.2 Cablaggio
Connect the receiver to the control unit according to the following guidelines. Refer to your automation system's control panel manual for specific connection points.
- Alimentazione elettrica: Connect the 12/24 V AC/DC power supply to the designated power input terminals on the receiver. Observe polarity if using DC power.
- Uscite relè: The receiver has two relay outputs. Connect these outputs to the corresponding input terminals on your automation system's control board. These outputs typically trigger actions like opening/closing a gate or activating a light.
- Antenna: Connect the 433.92 MHz antenna (if external) to the receiver's antenna terminal. Position the antenna for optimal signal reception, away from metal obstructions.
Nota: Incorrect wiring can damage the receiver or the connected automation system. If unsure, consult a professional electrician or installer.
6. Istruzioni per l'uso
Once installed and powered, the receiver is ready to receive signals from programmed 433.92 MHz fixed code transmitters. When a valid signal is received, the corresponding relay output will activate, triggering the connected function in your automation system.
6.1 Programming Transmitters (Remote Controls)
The R93/RX20/U receiver can store up to 50 unique fixed codes. The programming procedure typically involves a button on the receiver itself. Consult the specific instructions provided with your ROGER TECHNOLOGY transmitter for detailed pairing steps, as these can vary slightly.
- Locate the programming button (often labeled "PROG" or "LEARN") on the receiver module.
- Press and hold the programming button for approximately 2-3 seconds until an indicator LED (if present) illuminates or changes state. This indicates the receiver is in learning mode.
- While the receiver is in learning mode, press the desired button on your 433.92 MHz fixed code transmitter.
- The receiver's LED should flash or change state again to confirm successful programming.
- Repeat for any additional transmitters or buttons you wish to program, up to the maximum of 50 codes.
- To exit learning mode, wait for the receiver to automatically time out (usually after 10-15 seconds) or press the programming button briefly again.
6.2 Erasing Codici programmati
To erase all programmed codes from the receiver's memory:
- Press and hold the programming button for approximately 8-10 seconds.
- The indicator LED will typically flash rapidly or remain solid for a moment, then turn off, indicating all codes have been erased.
- Test the previously programmed transmitters to confirm they no longer activate the receiver.
7. Manutenzione
The ROGER R93/RX20/U receiver is designed for reliable, low-maintenance operation. However, periodic checks can help ensure its longevity and performance.
- Pulizia: Keep the receiver's enclosure clean and free from dust and debris. Use a soft, dry cloth. Do not use abrasive cleaners or solvents.
- Connessioni: Controllare periodicamente tutti i collegamenti elettrici per accertarsi che siano saldi e privi di corrosione.
- Ambiente: Assicurarsi che l'ambiente operativo rimanga entro gli intervalli di temperatura e umidità specificati.
- Antenna: Verify the antenna is securely connected and positioned optimally for reception.
8. Risoluzione Dei Problemi
| Problema | Possibile causa | Soluzione |
|---|---|---|
| Il ricevitore non risponde al trasmettitore. |
|
|
| Limited reception range. |
|
|
| Receiver LED not illuminating. |
|
|
9. Garanzia e supporto
This ROGER TECHNOLOGY product is covered by a standard manufacturer's warranty against defects in materials and workmanship. The specific terms and duration of the warranty may vary by region and retailer. Please retain your proof of purchase for warranty claims.
For technical support, troubleshooting assistance, or warranty service, please contact your authorized ROGER TECHNOLOGY dealer or the retailer from whom you purchased the product. You may also visit the official ROGER TECHNOLOGY websito per ulteriori informazioni e contatti.