
1. Informazioni sulla sicurezza
Please read and understand all instructions completely before beginning installation. Failure to follow these instructions may result in electric shock, fire, or other hazards that could cause property damage or personal injury.
- Rischio di incendio: Supply conductors (power wiring) connecting to the fixture must be rated 90°C. If you are uncertain, consult a qualified electrician.
- Rischio di scossa elettrica: L'installazione del kit LED Retrofit richiede la conoscenza dei sistemi elettrici degli apparecchi di illuminazione. Se non qualificati, non tentare l'installazione. Rivolgersi a un elettricista qualificato.
- Install this kit only in luminaires that have the construction features and dimensions shown in the product documentation.
- To prevent wiring harness or abrasion, do not expose wiring to edges of sheet metal or other sharp objects.
- Questo lamp is not intended for use with emergency exit luminaires or emergency lights.
- Prima di tentare l'installazione, controlla il codice elettrico locale, poiché stabilisce gli standard di cablaggio per la tua località.
- The fixture is designed to be switched from a wall switch. Ensure the black power supply wire is connected to the switch. Do NOT connect the white supply wire to the switch.
- Do not leave bare wires or exposed outside the wire nut connectors.
- Non praticare o modificare fori aperti in un contenitore di cavi o componenti elettrici durante l'installazione del kit.
- This product is ETL Listed and operates at 120VAC.
2. Prodotto finitoview
The Maxxima 2-inch Ultra-Thin Recessed Anti-Glare LED Downlight is a canless, IC rated lighting fixture designed for various indoor applications. It features a round black trim and offers customizable lighting with 5 selectable color temperatures and dimming capabilities.
- Efficienza energetica: 9W LED, equivalent to 40W, consuming less power.
- Luminosità: 550 Lumens with anti-glare lighting and a 36° beam spread.
- Color Temperature Selectable (CCT): Choose from 2700K (Soft White), 3000K (Warm White), 3500K (Bright White), 4000K (Neutral White), or 5000K (Daylight).
- Dimmerabile: Compatible with most standard LED dimmers, offering a 20%-100% dimmable range.
- CRI elevato: 90 CRI rating for accurate color appearance.
- Costruzione durevole: Features a durable cast aluminum body and deep recessed trim.
- Damp Valutazione: Adatto per l'uso in damp locations such as bathrooms and kitchens.

Figure 2.1: Maxxima 2-inch Ultra-Thin Recessed LED Downlight, Black
3. Elenco delle parti
Prima di iniziare l'installazione, assicurarsi che tutti i componenti siano presenti:
- LED Downlight with spring clips
- Junction Box (with integrated CCT selection switch)
- Connector cable (pre-attached to downlight and junction box)
- Guarnizione in schiuma
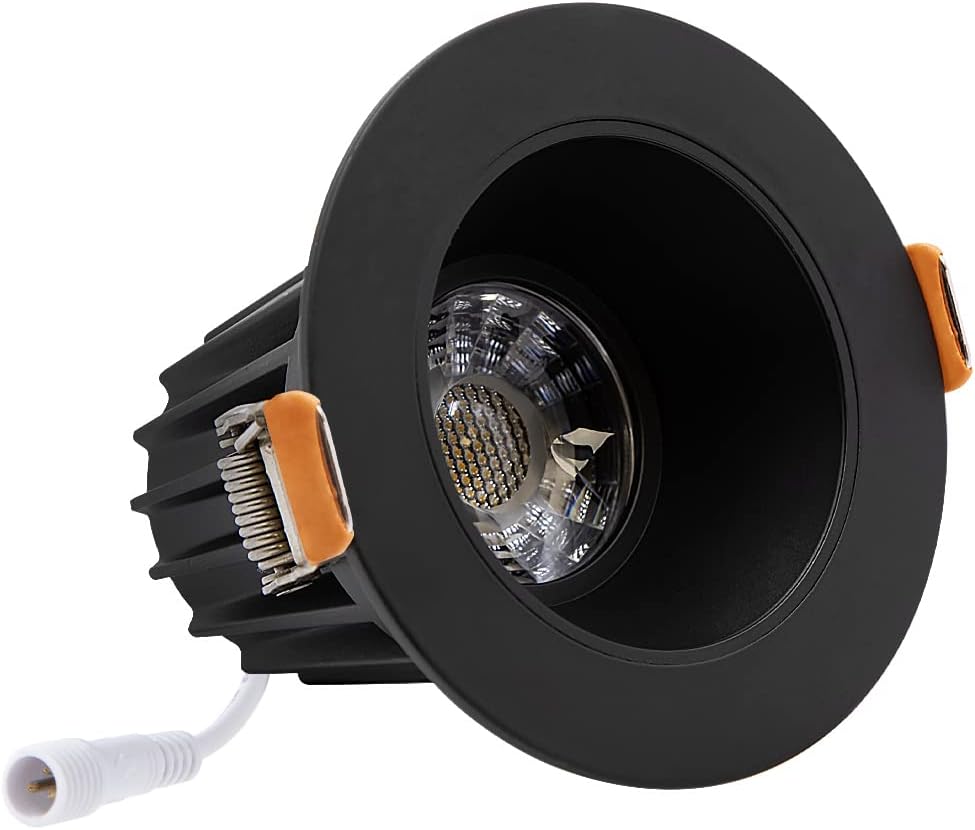
Figura 3.1: lato view of the Maxxima 2-inch Ultra-Thin Recessed LED Downlight, showing the heat sink and connector.
4. Configurazione e installazione
This downlight is designed for easy installation without the need for a traditional recessed can or housing.
- Preparare l'apertura: Cut a hole in the ceiling drywall with a recommended diameter of 2.5 inches. Ensure there are no obstructions in the ceiling space.
- Collegare il cablaggio: Open the junction box. Connect the building's supply wires (typically black for live, white for neutral, and green/bare copper for ground) to the corresponding wires inside the junction box using appropriate wire connectors. Ensure all connections are secure and comply with local electrical codes.
- Seleziona la temperatura del colore: Before closing the junction box, use the CCT selection switch located inside the junction box to choose your desired color temperature (2700K, 3000K, 3500K, 4000K, or 5000K).
- Position Junction Box: Place the junction box into the ceiling beam or through the cutout hole into the ceiling cavity.
- Collegare Downlight: Connect the downlight's cable to the junction box's cable using the provided quick connector. Ensure a firm connection.
- Installare Downlight: Gently push the spring clips on the sides of the downlight upwards. Insert the downlight into the cutout hole. The spring clips will automatically secure the fixture against the ceiling. Ensure the foam gasket creates a tight seal.

Figura 4.1: Dimensioni del prodotto per la pianificazione dell'installazione.

Figure 4.2: CCT selection switch inside the junction box.
Video 4.1: Official product video demonstrating the features and installation of the Maxxima 2-inch Anti-Glare 5 CCT Slim LED Downlight.
5. Istruzioni per l'uso
Once installed, operating your Maxxima LED downlight is straightforward.
5.1. Selezione della temperatura del colore
The desired color temperature (CCT) must be selected using the switch inside the junction box Prima installation or by accessing the junction box after installation. The available options are 2700K, 3000K, 3500K, 4000K, and 5000K.

Figure 5.1: Visual comparison of selectable color temperatures.
5.2. Oscuramento
This downlight is dimmable from 20% to 100% with most standard LED dimmers. Ensure your dimmer switch is compatible with LED fixtures for optimal performance and to prevent flickering.

Figure 5.2: Downlight installed in a ceiling, demonstrating illumination.
6. Manutenzione
The Maxxima LED downlight requires minimal maintenance.
- Pulizia: Per pulire l'apparecchio, assicurarsi che l'alimentazione sia spenta. Pulire la superficie con un panno morbido, asciutto o leggermente asciutto.amp stoffa. Non utilizzare prodotti chimici aggressivi o detergenti abrasivi.
- Nessuna parte riparabile dall'utente: The LED light source is integrated and not replaceable. Do not attempt to open or repair the fixture.
7. Risoluzione Dei Problemi
Se riscontri problemi con il tuo downlight, fai riferimento ai seguenti problemi comuni e alle relative soluzioni:
| Problema | Possibile causa | Soluzione |
|---|---|---|
| La luce non si accende | No power supply; Loose wiring; Incorrect CCT setting; Faulty fixture | Check circuit breaker; Verify all wire connections are secure; Ensure CCT switch is set to a valid position; Contact support if fixture is faulty. |
| La luce tremola | Dimmer incompatibile; Cablaggio allentato; Circuito sovraccarico | Ensure dimmer is LED compatible; Check all electrical connections; Reduce load on circuit. |
| La luce è troppo fioca o troppo intensa | Dimmer setting; CCT setting | Adjust dimmer to desired level; Verify CCT setting is as intended. |
| La luce fa un rumore ronzante | Incompatible dimmer; Loose wiring | Replace with an LED-compatible dimmer; Check and secure all wiring connections. |
8. Specifiche
| Specificazione | Dettaglio |
|---|---|
| Marca | Massimo |
| Nome del modello | MRL-S20803B |
| Dimensioni del prodotto | 3.16 cm L x 3.16 cm P x 2.6 cm A |
| Peso dell'articolo | 13.1 once |
| Colore | Nero |
| Materiale | Alluminio |
| Modulo lampada | Da incasso |
| Tipo di installazione | Flush Mount |
| Foro consigliato | 2.5 pollici |
| Fonte di alimentazione | Elettrico con cavo |
| Voltage | 120 Volt |
| Cosatage | 9 watt |
| Luminosità | 550 lumen |
| Efficienza | 61 lm/W |
| Temperatura del colore | Selezionabile 2700K, 3000K, 3500K, 4000K, 5000K |
| CRI | 90 |
| Dimmerabile | Sì (20%-100%) |
| Uso interno/esterno | Interno (Damp Valutato) |
| Certificazione | ETL quotato |
9. Garanzia e supporto
This Maxxima LED downlight is covered by a Garanzia di 3 anno dalla data di acquisto.
For warranty claims, technical support, or any questions regarding your product, please contact Maxxima customer service. Refer to the product packaging or the official Maxxima websito per informazioni di contatto aggiornate.
Si prega di conservare la prova d'acquisto ai fini della garanzia.