
1. Introduzione
The OWON SDS1102 is a 2-channel digital storage oscilloscope designed for a wide range of electronic measurement and analysis tasks. It features a 100 MHz bandwidth, a 1 GSa/s real-time sampling rate, and a clear 7-inch TFT-LCD display. This manual provides essential information for setting up, operating, maintaining, and troubleshooting your device, ensuring optimal performance and longevity.

Figure 1: OWON SDS1102 Digital Oscilloscope
2. Informazioni sulla sicurezza
Please read and understand all safety instructions before operating the device. Failure to comply with these instructions may result in electric shock, fire, or damage to the product.
- Utilizzare esclusivamente il cavo di alimentazione fornito con il dispositivo.
- Assicurarsi che il dispositivo sia correttamente collegato a terra per evitare scosse elettriche.
- Non utilizzare il dispositivo in ambienti bagnati o damp condizioni.
- Evitare di esporre il dispositivo alla luce solare diretta o a temperature elevate.
- Non aprire il dispositivo casing; affidare ogni intervento di manutenzione a personale qualificato.
- Verify probe attenuation settings match the oscilloscope's input settings.
3. Contenuto della confezione
Verifica che tutti gli articoli elencati di seguito siano inclusi nel tuo pacchetto:
- OWON SDS1102 Digital Oscilloscope
- Cavo di alimentazione
- CD-ROM (contenente software e documentazione)
- Cavo USB
- Sonde per oscilloscopio (2 unità)
- Strumento di regolazione della sonda (cacciavite)
- Manuale dell'utente (questo documento)
4. Prodotto finitoview
The SDS1102 is designed for efficiency and accuracy in various applications, from electronic circuit debugging to automotive maintenance.
Caratteristiche principali:
- Schermo LCD HD: A 7-inch color TFT-LCD with 65535 colors and 800 x 480 pixel resolution provides clear and concise waveform readings. It supports four automatic cursor modes for precise voltage misurazioni della differenza di tempo.
- Alta Samptasso di ling: Equipped with a 1 GSa/s sampling rate, the device allows for detailed waveform capture and analysis. It includes single waveform recording and playback, and supports plug-and-play USB storage devices.
- Powerful System: Features an auto-range function and supports horizontal, vertical, single/multi-waveform tracking. Probe attenuation settings include 1x, 10x, 100x, and 1000x. It offers 30 types of automatic measurement functions and supports LABVIEW communication for secondary development.
- Portabilità: With ultra-thin body design (301 x 152 x 70 mm) and a weight of 1.1 kg, the oscilloscope is highly portable, saving desktop space and operating quietly.

Figure 2: Key features of the SDS1102 Oscilloscope

Figure 3: Compact design and dimensions for portability

Figure 4: Diverse applications of the SDS1102 Oscilloscope
5. Impostazione
5.1 Accensione iniziale
- Connect the power cord to the oscilloscope and a suitable power outlet.
- Premere il pulsante di accensione per accendere il dispositivo.
- The 7-inch TFT-LCD display will illuminate, showing the OWON logo and then the main waveform interface.
5.2 Calibrazione della sonda
Before taking measurements, it is crucial to calibrate the oscilloscope probes for accurate readings. This process compensates for any slight variations in the probes as supplied.
- Connect a probe to one of the BNC input connectors (e.g., CH1).
- Ensure the probe's attenuation switch (usually on the probe body) is set to 10x.
- Connect the probe tip to the test point, which is a small metal loop located on the bottom right of the oscilloscope's front panel.
- Attach the black grounding alligator clip of the probe to the lower metal loop, which serves as the ground test point.
- Premere il tasto Impostazione automatica button on the oscilloscope. The device will automatically adjust settings to display the test signal. The test point outputs a 1 kHz, 5V square wave.
- Observe the waveform on the screen. If it does not appear as a perfect square wave (e.g., rounded corners or overshoot), use the supplied probe adjustment tool (small screwdriver).
- Carefully insert the screwdriver into the compensation screw on the BNC connector of the probe and adjust it until the displayed square wave is clean and flat on top and bottom, with sharp corners. A slight turn (approximately 1/8th) may be sufficient.
- Repeat this process for all probes you intend to use.
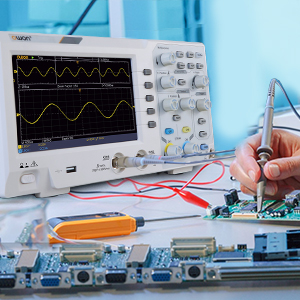
Figure 5: Oscilloscope probe connected to a circuit for testing
6. Istruzioni per l'uso
6.1 Visualizzazione della forma d'onda di base
- Collegare la sonda al circuito in prova.
- Regolare il Vertical Scale (VOLTS/DIV) E Horizontal Scale (SEC/DIV) knobs to get a stable and viewable waveform on the screen.
- Utilizzare il Posizione manopole per spostare la forma d'onda verticalmente o orizzontalmente.
- Premere il tasto Impostazione automatica pulsante per l'ottimizzazione automatica della forma d'onda.

Figure 6: Auto-range function in action
6.2 Misurazioni del cursore
The SDS1102 supports four automatic cursor modes for precise measurements.
- Premere il tasto Cursore pulsante.
- Selezionare il tipo di cursore desiderato (ad esempio, Voltage, Time) using the menu options.
- Adjust the cursor positions using the multipurpose knob to measure specific points on the waveform.
- The measured values (e.g., ◊V, ◊T) will be displayed on the screen.

Figure 7: Performing cursor measurements
6.3 Misurazioni automatiche
The oscilloscope offers 30 types of automatic measurements for quick analysis.
- Premere il tasto Misura pulsante.
- Navigate through the menu to select the desired automatic measurements (e.g., Frequency, Peak-to-Peak Voltage, RMS).
- The selected measurements will be displayed on the screen, updating in real-time.

Figure 8: Automatic measurement display
6.4 Waveform Recording and Playback
The device allows for recording and replaying single waveforms.
- Premere il tasto Salva/Richiama button (or similar function).
- Select the option to record a waveform.
- To replay, select the playback option and choose the desired stored waveform.
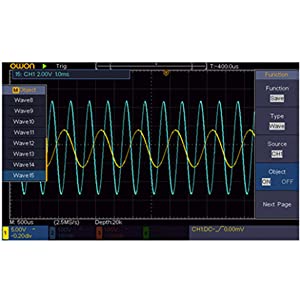
Figure 9: Waveform save and recall menu
6.5 USB Connectivity and PC Control
The SDS1102 supports plug-and-play USB storage devices for saving data and configurations. It also allows for remote communication and control via a computer using the USB interface, with support for LABVIEW and SCPI commands.

Figure 10: USB connection for PC communication and data transfer
7. Manutenzione
The OWON SDS1102 is designed for continuous, maintenance-free use under normal operating conditions. However, proper care ensures its longevity and performance.
- Pulizia: Utilizzare un panno morbido e asciutto per pulire l'esterno dell'oscilloscopio. Per lo sporco ostinato, utilizzare un panno leggermenteamp È possibile utilizzare un panno imbevuto di detergente delicato, assicurandosi che non penetri liquido nel dispositivo. Non utilizzare detergenti abrasivi o solventi.
- Magazzinaggio: When not in use, store the oscilloscope in a clean, dry environment, away from extreme temperatures and humidity.
- Cura della sonda: Maneggiare le sonde con cura. Evitare di piegare o sollecitare i cavi. Mantenere pulite le punte delle sonde.
- Manutenzione interna: The device does not require user-performed internal maintenance. Do not attempt to open the casing, poiché ciò potrebbe invalidare la garanzia ed esporvi a rischi elettrici.
8. Risoluzione Dei Problemi
If you encounter issues with your OWON SDS1102, refer to the following common troubleshooting steps:
| Problema | Possibile causa | Soluzione |
|---|---|---|
| Il dispositivo non si accende. | Power cord not connected; power outlet faulty; device fault. | Check power cord connection. Test power outlet with another device. If problem persists, contact support. |
| Nessuna forma d'onda visualizzata. | Probe not connected; probe faulty; input signal too small/large; incorrect vertical/horizontal settings. | Ensure probes are securely connected. Check probe functionality. Adjust VOLTS/DIV and SEC/DIV. Use Autoset. |
| Waveform is distorted or noisy. | Uncalibrated probe; poor grounding; external interference. | Perform probe calibration (Section 5.2). Ensure proper grounding. Minimize external electromagnetic interference. |
| USB storage not recognized. | USB device format incompatible; faulty USB device/port. | Ensure USB device is formatted correctly (e.g., FAT32). Try a different USB device or port. |
For issues not covered here, please refer to the full manual on the provided CD-ROM or contact OWON customer support.
9. Specifiche
| Caratteristica | Specificazione |
|---|---|
| Produttore | Ovunque |
| Numero di modello | OWON-SDS1102 |
| Dimensioni (L x P x A) | Dimensioni: 30.1 x 15.2 x 7 cm |
| Peso | 1.67 kg |
| Display | 7-inch Color TFT-LCD, 800 x 480 pixels |
| Canali | 2 |
| Larghezza di banda | 100 MHz |
| Sampla tariffa | 1 GSa/s |
| Lunghezza del record | 10K punti |
| Ora di alzarsi | ≤1.7 ns |
| Attenuazione della sonda | 1x, 10x, 100x, 1000x |
| Misurazioni automatiche | 30 tipi |
| Connettività | USB (for storage, PC communication) |
| Supporto software | LABORATORIOVIEW, SCPI |
| Batterie incluse | NO |
| Data prima disponibilità | 23 giugno 2022 |

Figure 11: Summary of key technical specifications
10. Garanzia e supporto
OWON products are designed for reliability and performance. For warranty information, please refer to the documentation included on the CD-ROM or visit the official OWON website. Information regarding the availability of spare parts is currently unavailable.
For technical support, product inquiries, or service requests, please contact OWON customer service through their official channels. Keep your purchase receipt and product model number (OWON-SDS1102) handy when contacting support.