1. Introduzione
Thank you for choosing the Vacmaster VQ1220SC 1250W 20L Wet and Dry Vacuum Cleaner. This appliance is designed for both wet and dry cleaning tasks, offering powerful suction and a convenient blower function. Please read this manual thoroughly before operating the vacuum cleaner to ensure safe and efficient use. Keep this manual for future reference.

The Vacmaster VQ1220SC is suitable for various cleaning environments, including workshops and homes.
2. Informazioni sulla sicurezza
Quando si utilizza questo apparecchio, seguire sempre le precauzioni di sicurezza di base per ridurre il rischio di incendi, scosse elettriche o lesioni.
- Leggere tutte le istruzioni prima dell'uso.
- Non lasciare l'apparecchio incustodito quando è collegato alla presa di corrente. Staccare la spina dalla presa quando non è in uso e prima della manutenzione.
- Non utilizzare all'aperto o su superfici bagnate, a meno che non sia specificamente progettato per tale uso.
- Non permettere che venga utilizzato come giocattolo. È necessaria molta attenzione quando viene utilizzato da bambini o in loro prossimità.
- Utilizzare solo come descritto in questo manuale. Utilizzare solo gli accessori consigliati dal produttore.
- Non utilizzare con cavo o spina danneggiati. Se l'apparecchio non funziona come dovrebbe, è caduto, è stato danneggiato, è stato lasciato all'aperto o è caduto in acqua, riportarlo a un centro di assistenza.
- Non tirare o trasportare l'apparecchio tramite il cavo, non usare il cavo come maniglia, non chiudere una porta sul cavo e non tirare il cavo attorno a spigoli o angoli taglienti. Non far passare l'apparecchio sul cavo. Tenere il cavo lontano dalle superfici calde.
- Non staccare la spina tirando il cavo. Per staccare la spina, afferrare la spina, non il cavo.
- Non maneggiare la spina o l'apparecchio con le mani bagnate.
- Non inserire alcun oggetto nelle aperture. Non utilizzare con aperture bloccate; tenere lontano da polvere, lanugine, capelli e qualsiasi cosa possa ridurre il flusso d'aria.
- Tenere capelli, abiti larghi, dita e tutte le parti del corpo lontani dalle aperture e dalle parti mobili.
- Non raccogliere nulla che stia bruciando o che stia producendo fumo, come sigarette, fiammiferi o cenere calda.
- Prestare particolare attenzione quando si puliscono le scale.
- Non utilizzare per aspirare liquidi infiammabili o combustibili, come la benzina, né in aree in cui potrebbero essere presenti.
- Non raccogliere materiali tossici, come candeggina, ammoniaca o prodotti per la pulizia degli scarichi.
- Non utilizzare senza filtri installati.
3. Contenuto della confezione
Carefully unpack your Vacmaster VQ1220SC and ensure all components are present:
- Vacmaster VQ1220SC Wet and Dry Vacuum Cleaner Unit
- Tubo di aspirazione
- Extension Wands (Tubes d'aspiration)
- Bocchetta per pavimenti
- Strumento per fessure
- Filtro a cartuccia (per aspirazione a secco)
- Filtro in schiuma (per aspirazione a umido)
- Dust Bag (for dry vacuuming, optional)
- Manuale d'uso
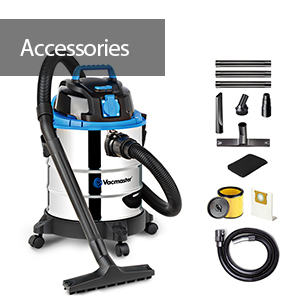
Assicurati che tutti gli accessori elencati siano inclusi nella confezione.
4. Impostazione
4.1 Fissaggio delle rotelle
- Capovolgere il serbatoio.
- Insert the casters into the slots on the bottom of the tank until they click into place.
4.2 Installazione del filtro
Il tipo di filtro richiesto dipende dal fatto che si voglia aspirare a umido o a secco.
Per l'aspirazione a secco:
- Ensure the cartridge filter is securely installed over the filter cage.
- For optimal dust collection and to prolong filter life, a disposable dust bag can be installed inside the tank.
Per l'aspirazione a umido:
- Remove the cartridge filter and any dust bag.
- Install the foam filter over the filter cage. This filter protects the motor from liquids.
4.3 Collegamento del tubo flessibile e degli accessori
- Insert the larger end of the suction hose into the vacuum port on the front of the motor head until it locks.
- Attach the desired extension wands and nozzle (floor nozzle or crevice tool) to the smaller end of the hose.
5. Istruzioni per l'uso
5.1 Aspirazione a secco
Use for collecting dry debris, dust, and dirt.
- Ensure the cartridge filter is installed and a dust bag is optionally in place.
- Collegare il cavo di alimentazione a una presa elettrica adatta (240 V).
- Accendere l'aspirapolvere tramite l'interruttore di alimentazione.
- Passare l'ugello sulla zona da pulire.
- Una volta terminato, spegnere l'aspirapolvere e staccare la spina.

Effective dry vacuuming on various surfaces.
5.2 Aspirazione a umido
Use for collecting liquids and wet spills. Do not use a dust bag during wet vacuuming.
- Ensure the foam filter is installed and the cartridge filter and dust bag are removed.
- Collegare il cavo di alimentazione a una presa elettrica idonea.
- Accendere l'aspirapolvere.
- Guide the nozzle over the liquid spill. The vacuum will automatically shut off when the tank is full.
- When finished or when the tank is full, turn the vacuum OFF, unplug it, and empty the tank.

The Vacmaster VQ1220SC efficiently handles liquid spills.
5.3 Funzione soffiante
The vacuum can be converted into a powerful blower for clearing debris from surfaces.
- Assicurarsi che l'aspirapolvere sia SPENTO e scollegato.
- Remove the suction hose from the vacuum port.
- Insert the suction hose into the exhaust port (blower port) located on the motor head.
- Connect the power cord and turn the vacuum ON.
- Direct the hose to blow away leaves, sawdust, or other light debris.

The blower function is useful for clearing light debris from outdoor areas.
5.4 Power Take-off Socket
The integrated power take-off socket allows you to connect power tools and synchronize their operation with the vacuum cleaner.
- Plug your power tool into the power take-off socket on the vacuum cleaner.
- Connect the vacuum hose to the dust extraction port of your power tool (if applicable).
- Turn the vacuum cleaner ON. When the power tool is activated, the vacuum will automatically start. When the power tool is turned off, the vacuum will continue to run for a few seconds to clear any remaining dust from the hose.

Connect power tools to the integrated socket for synchronized dust extraction.
6. Manutenzione
Una manutenzione regolare garantisce prestazioni ottimali e prolunga la durata del tuo aspirapolvere.
6.1 Svuotamento del serbatoio
- Assicurarsi che l'aspirapolvere sia SPENTO e scollegato.
- Unlatch the clips on the sides of the tank and lift off the motor head.
- Carefully empty the contents of the tank into a waste receptacle.
- Pulisci l'interno del serbatoio con l'adamp panno se necessario.
- Riposizionare la testa del motore e fissare le clip.
6.2 Pulizia dei filtri
Filtro a cartuccia (uso a secco):
- Remove the cartridge filter from the filter cage.
- Gently tap the filter to dislodge dust. For stubborn dirt, use a soft brush or compressed air.
- Do not wash the cartridge filter with water unless specified by the manufacturer.
- Replace the filter when it is clean and dry.
Filtro in schiuma (uso umido):
- Rimuovere il filtro in schiuma dalla gabbia del filtro.
- Rinse the foam filter under running water until clean.
- Allow the foam filter to air dry completely before re-installing or storing.
6.3 Pulizia generale
- Pulisci l'esterno dell'aspirapolvere con l'adamp stoffa.
- Check the hose and accessories for blockages and clear them as needed.
- Store the vacuum cleaner and accessories in a dry place.
7. Risoluzione Dei Problemi
If you encounter issues with your Vacmaster VQ1220SC, refer to the following common problems and solutions:
| Problema | Possibile causa | Soluzione |
|---|---|---|
| L'aspirapolvere non si accende | No power supply; Faulty power switch; Damaged cord/plug | Check power outlet and plug connection; Test with another outlet; Contact customer support if switch or cord is damaged. |
| Perdita di aspirazione | Clogged hose/nozzle; Full tank/dust bag; Clogged filter; Improperly sealed motor head | Clear any blockages; Empty tank/replace dust bag; Clean or replace filter; Ensure motor head is securely latched. |
| Water not being picked up (wet vacuuming) | Foam filter not installed; Tank is full (float valve activated); Blockage in hose/nozzle | Install foam filter; Empty tank; Clear blockages. |
| Motor runs, but no blowing (blower function) | Hose not correctly inserted into exhaust port; Blockage in hose/nozzle | Ensure hose is firmly in the exhaust port; Clear any blockages. |
Se il problema persiste dopo aver provato queste soluzioni, contattare l'assistenza clienti Vacmaster.
8. Specifiche
| Caratteristica | Specificazione |
|---|---|
| Marca | Vaccino |
| Numero di modello | VQ1220SC |
| Energia | 1250 Watt |
| Capacità | 20 litri |
| Voltage | 240 Volt |
| Livello sonoro | 73 decibel |
| Materiale | Acciaio inossidabile |
| Caratteristiche | Wet/Dry Function, Blower Function, Power Take-off Socket |
| Tipo di filtro | Cartridge (for dry), Foam (for wet) |
| Dimensioni del prodotto (L x P x A) | Dimensioni: 35 x 35 x 50.8 cm |
| Peso dell'articolo | 4 chilogrammi |
9. Garanzia e supporto
9.1 Informazioni sulla garanzia
The Vacmaster VQ1220SC comes with a Garanzia di 2 anno from the date of purchase. This warranty covers manufacturing defects and ensures the product is free from defects in material and workmanship under normal use. Please retain your proof of purchase for warranty claims.
La garanzia non copre:
- Normale usura.
- Damage caused by improper use, neglect, or accident.
- Danni causati da riparazioni o modifiche non autorizzate.
- Parti di consumo come filtri e sacchetti raccoglipolvere.
9.2 Assistenza clienti
For technical assistance, warranty claims, or to order replacement parts, please contact Vacmaster customer support. Refer to the contact information provided with your product packaging or visit the official Vacmaster websito per i dettagli.
When contacting support, please have your model number (VQ1220SC) and date of purchase readily available.