
1. Prodotto finitoview
The Maxxima 6-inch Slim Square LED Downlight is a canless, ultra-thin recessed lighting solution designed for easy installation in various indoor and damp locations. This fixture features 5 CCT (Correlated Color Temperature) selectable options, allowing you to choose between 2700K (Soft White), 3000K (Warm White), 3500K (Bright White), 4000K (Neutral White), and 5000K (Daylight) to suit your preference. It provides 1000 lumens of light output while consuming only 12 watts of power, offering an energy-efficient alternative to traditional lighting.
The downlight comes with an integrated junction box and wiring hardware, eliminating the need for a separate can or housing. Its cast aluminum body ensures durability and a lightweight design. This product is ETL Listed and suitable for damp locations, making it ideal for bathrooms, kitchens, hallways, and more.

Immagine 1.1: anteriore view of the Maxxima 6-inch Slim Square LED Downlight.
2. Informazioni sulla sicurezza
- AVVERTIMENTO: Rischio di scossa elettrica. Scollegare l'alimentazione dal fusibile o dall'interruttore automatico prima dell'installazione o della manutenzione.
- Questo prodotto deve essere installato in conformità al codice di installazione applicabile da una persona a conoscenza della costruzione e del funzionamento del prodotto nonché dei pericoli connessi.
- Use only with 120V AC, 60Hz circuits.
- Do not modify the fixture. Any modification may void the warranty and create safety hazards.
- Adatto per damp locations. Do not use in areas where directly exposed to water.
- IC Rated: Suitable for direct contact with insulation.
- Assicurarsi che tutti i collegamenti elettrici siano sicuri e adeguatamente isolati.
3. Contenuto della confezione
- 1 x Maxxima 6-inch Slim Square LED Downlight
- 1 x scatola di giunzione
- Wiring Hardware
- 1 guarnizioni in schiuma
- Manuale di istruzioni
4. Specifiche
| Caratteristica | Specificazione |
|---|---|
| Numero di modello | MRL-S61245S |
| Misurare | 6 pollici (quadrati) |
| Consumo energetico | 12 Watt |
| Flusso luminoso | 1000 lumen |
| Temperatura del colore (CCT) | Selezionabile: 2700K, 3000K, 3500K, 4000K, 5000K |
| Voltage | 120 V CA |
| CRI | 82 |
| Diffusione del fascio | 120° |
| Dimmerabile | SÌ |
| Dimensioni della scatola di giunzione | 1.4"H x 2.7"L x 4.11"P |
| Dimensioni taglio | 0.85" |
| Dimensioni del prodotto | 6.7 x 6.7 x 0.9 pollici |
| Peso | 1 libbra |
| Materiale | Alluminio, Metallo |
| Certificazioni | ETL Listed, IC Rated |
| Valutazione della posizione | Damp Location Suitable |
5. Configurazione e installazione
Prima di iniziare: Ensure power is turned OFF at the circuit breaker before starting installation to prevent electrical shock.
- Preparare l'apertura del soffitto: Cut a square hole in the ceiling at the desired location. The recommended hole size for this 6-inch square downlight is approximately 6.25 inches x 6.25 inches.
- Connect the Downlight to the Junction Box: The downlight connects to the provided junction box via a male-female connector. Align the pins and push firmly until it clicks into place.
- Wire the Junction Box: Open the junction box cover. Connect the household electrical wires to the wires inside the junction box using the provided wiring hardware (wire nuts):
- Collegare il nero wire from the household circuit to the nero wire of the junction box.
- Collegare il bianco wire from the household circuit to the bianco wire of the junction box.
- Collegare il ground (bare copper or green) wire from the household circuit to the verde wire of the junction box.
- Install the Downlight: Gently push the spring clips on the sides of the downlight upwards. Insert the downlight into the ceiling opening. The spring clips will automatically snap down and secure the fixture in place against the ceiling.
- Secure the Junction Box: Place the junction box inside the ceiling cavity, ensuring it is not pinched or damaged by the downlight or other structures.
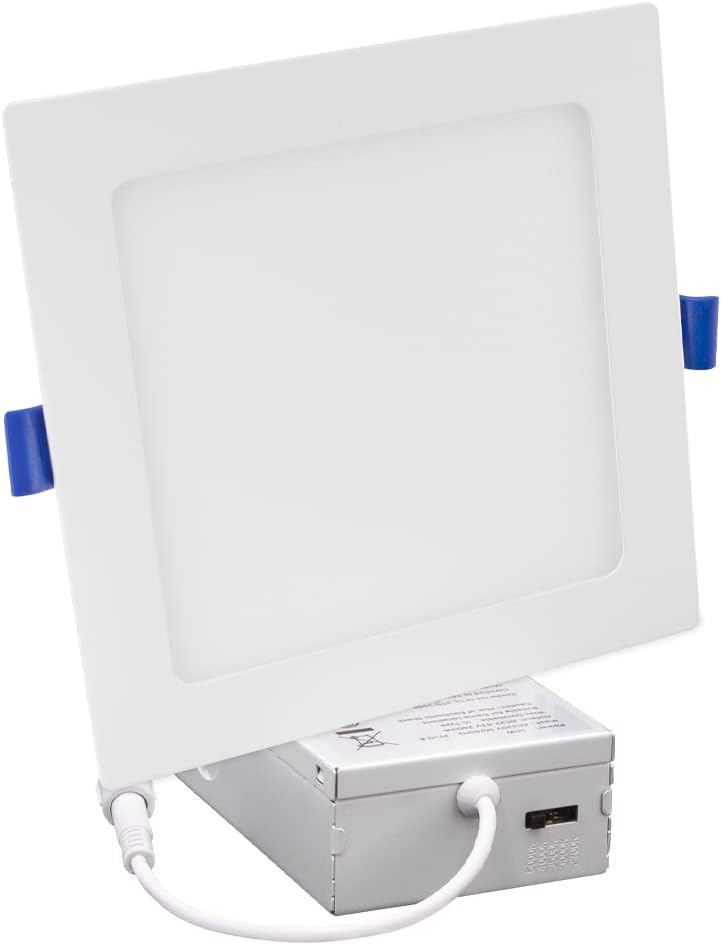
Image 5.1: The downlight's cable connects to the junction box.

Immagine 5.2: Lato view of the downlight, highlighting the spring clips for installation.
Per una guida visiva, fare riferimento al video ufficiale di installazione:
Video 5.3: Installazione ufficiale e funzionalitàview for the Maxxima 6-inch Slim Square LED Downlight.
6. Istruzioni per l'uso
6.1. Selezione della temperatura colore (CCT)
The Maxxima 6-inch Slim Square LED Downlight features a 5 CCT selectable switch located on the side of the junction box. This switch allows you to choose your preferred light color before or after installation. To change the CCT:
- Ensure power is OFF before accessing the junction box if it's already installed.
- Locate the CCT selection switch on the side of the junction box.
- Slide the switch to select one of the five available color temperatures: 2700K, 3000K, 3500K, 4000K, or 5000K.
- Restore power to test the selected CCT.

Immagine 6.1: Primo piano view of the 5 CCT selection switch on the junction box.

Image 6.2: Illustration of how different CCTs (2700K to 5000K) appear in a room.
6.2. Funzionalità di oscuramento
This LED downlight is dimmable. To utilize the dimming feature, ensure you are using a compatible LED dimmer switch (sold separately). Follow the dimmer switch manufacturer's instructions for installation and operation.
7. Manutenzione
The Maxxima 6-inch Slim Square LED Downlight requires minimal maintenance. The LED light source is integrated and not user-replaceable.
- Pulizia: Ensure power is OFF before cleaning. Wipe the fixture with a soft, dry, or slightly damp panno. Non utilizzare prodotti chimici aggressivi, detergenti abrasivi o solventi, poiché potrebbero danneggiare la finitura o i componenti elettrici.
- Ispezione: Periodically inspect the fixture for any signs of damage or loose connections. If any issues are found, disconnect power and contact a qualified electrician or Maxxima support.
8. Risoluzione Dei Problemi
| Problema | Possibile causa | Soluzione |
|---|---|---|
| La luce non si accende | Nessuna alimentazione all'apparecchio Collegamento del cablaggio allentato Apparecchio difettoso | Controllare l'interruttore automatico e l'interruttore a parete. Verify all wiring connections are secure (ensure power is OFF first). Contact Maxxima support if power is confirmed and connections are secure. |
| La luce tremola o si attenua inaspettatamente | Interruttore dimmer incompatibile Collegamento del cablaggio allentato Voltage fluttuazioni | Ensure a compatible LED dimmer is used. Replace if necessary. Check wiring connections (power OFF). Consultare un elettricista per controllare il volume domesticotage. |
| Incorrect CCT displayed | Interruttore CCT impostato in modo errato | Adjust the CCT selection switch on the junction box to the desired setting (power OFF). |
9. Garanzia e supporto
This Maxxima 6-inch Slim Square LED Downlight (Model MRL-S61245S) is backed by a Garanzia del produttore di 3 anni dalla data di acquisto. Questa garanzia copre difetti di materiali e lavorazione in condizioni di normale utilizzo.
For warranty claims, technical assistance, or any questions regarding your product, please contact Maxxima customer support. Keep your proof of purchase for warranty validation.
Maxxima Customer Support: Refer to the contact information provided on the product packaging or the official Maxxima websito per i dettagli di supporto più aggiornati.