1. Introduzione
This manual provides detailed instructions for the installation, operation, and maintenance of your SOGTICPS BL912-40A-WIFI MPPT Solar Charge Controller. This advanced charge controller is designed for off-grid solar applications, compatible with 12V/24V battery systems, including Gel, Flooded, and Lithium types. It features efficient MPPT tracking, an LCD display, dual USB outputs, and WiFi connectivity for remote monitoring.
Caratteristiche principali:
- Innovative MPPT (Maximum Power Point Tracking) technology for up to 99% tracking efficiency.
- Volume automatico del sistema 12V/24Vtage rilevamento.
- Integrated LCD display for real-time monitoring of temperature, charge current, discharge current, and power generation.
- Comprehensive system protection: over-temperature, over-current, short-circuit, open-circuit, and reverse polarity.
- Compatibility with Gel, Flooded, and Lithium battery types.
- Dual 5V 2A USB outputs for charging mobile devices.
- WiFi communication for remote parameter adjustment and monitoring via a dedicated application.
- Industrial-grade main control chip with 16AD sampprecisione.
- Two-way MOS tube anti-reverse circuit for high-power charging and low heat generation.
2. Istruzioni di sicurezza
Leggere attentamente tutte le istruzioni prima dell'installazione e dell'uso. Il mancato rispetto di queste istruzioni può causare danni all'unità, lesioni personali o danni materiali.
- Assicurarsi che tutti i collegamenti siano serrati e corretti per evitare un volume eccessivotage caduta e potenziali pericoli.
- Installare il controller in ambienti chiusi, lontano dalla luce solare diretta, dalle alte temperature e dall'umidità.
- The controller generates heat during operation; ensure adequate ventilation.
- Connect the battery first, then the solar panel, and finally the load. Disconnect in the reverse order: load, solar panel, then battery.
- Do not connect any inverter directly to the load terminals of the controller.
- Ensure the solar panel's open-circuit voltage (Voc) non supera il volume massimo di ingresso del controllertage.
- Use appropriate circuit breakers or fuses for the battery and solar panel circuits.
- Tenere i bambini lontani dall'impianto solare.
- Non tentare di smontare o riparare il controller da soli. Contattare personale qualificato per l'assistenza.
3. Prodotto finitoview
The SOGTICPS BL912-40A-WIFI solar charge controller features a robust design with an intuitive LCD display and multiple connection points.

Immagine: Davanti view of the SOGTICPS BL912-40A-WIFI Solar Charge Controller, highlighting its security protection features such as short-circuit, overload, overcharge, under-voltage, e over-voltage protezione.
Componenti:
- Schermo LCD: Mostra lo stato e i parametri del sistema in tempo reale.
- Pulsanti di controllo: For navigating menus and setting parameters.
- Solar Panel Input Terminals: Connect to solar panels.
- Terminali della batteria: Connect to the battery bank.
- Terminali di uscita del carico: Collegare ai carichi CC.
- Dual USB Ports (5V 2A): Per caricare dispositivi esterni.
- Antenna Wi-Fi: Per la comunicazione senza fili.
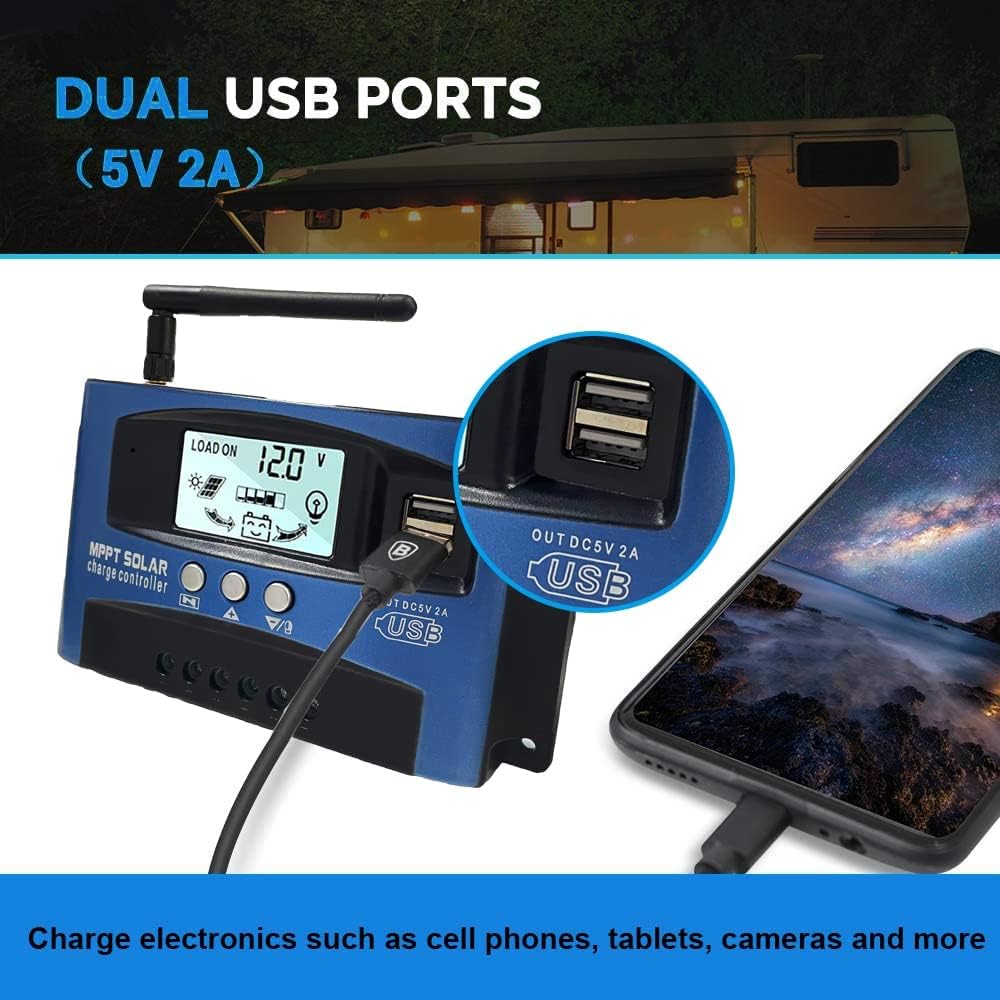
Immagine: Avvicinamento view of the SOGTICPS BL912-40A-WIFI Solar Charge Controller, showing the dual 5V 2A USB ports in use, charging a smartphone.
4. Configurazione e installazione
Proper installation is critical for the safe and efficient operation of your solar charge controller. Follow the connection order precisely.
Ordine di connessione:
- Collegare prima la batteria: Connect the battery to the charge controller's battery terminals. Ensure correct polarity (+ to + and - to -). The controller will automatically detect 12V or 24V system voltage.
- Collegare i pannelli solari: Connect the solar panels to the charge controller's solar input terminals. Again, observe correct polarity.
- Collegamento del carico CC (facoltativo): Connect your DC loads to the load output terminals.
Importante: When disconnecting, reverse the order: first disconnect the load, then the solar panels, and finally the battery. Failure to follow this order may damage the controller or other components.
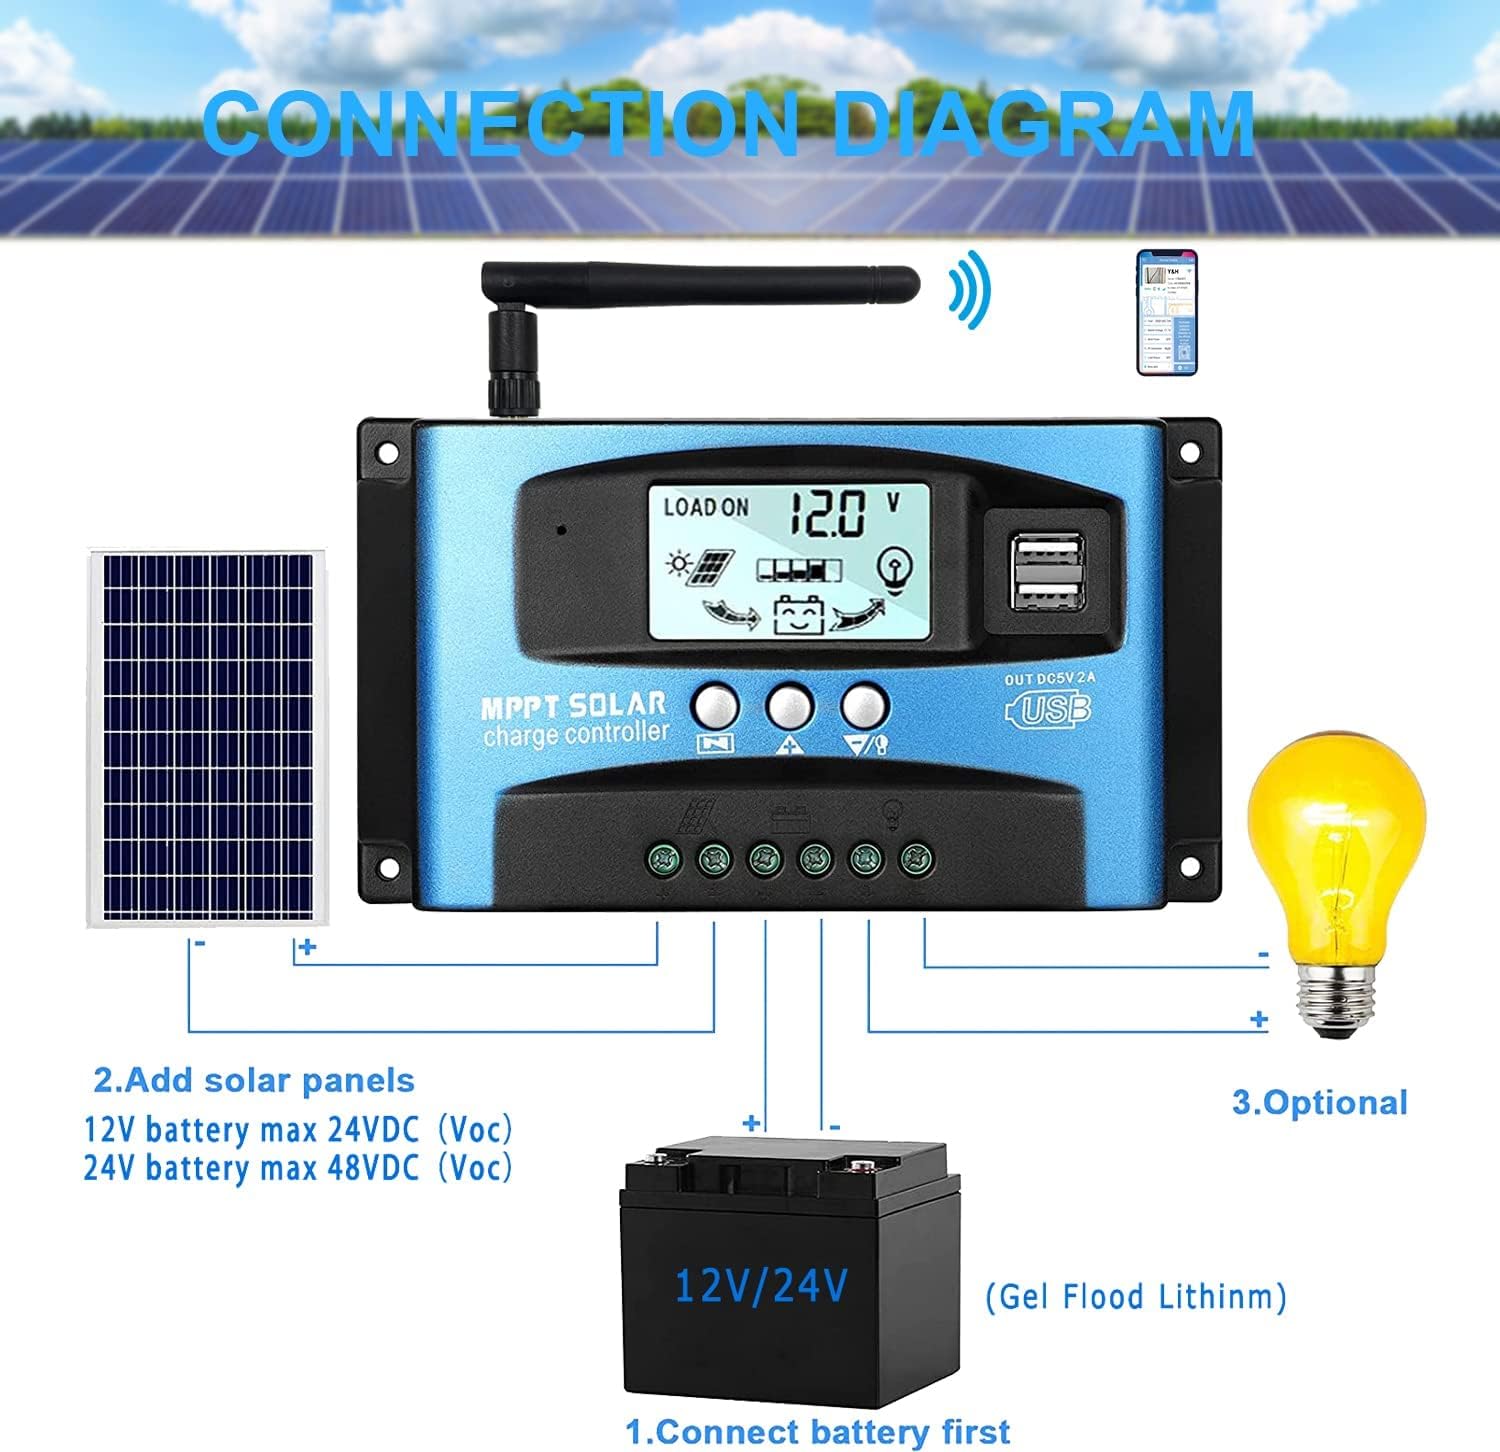
Immagine: A clear connection diagram illustrating the proper wiring sequence for the solar charge controller, connecting to a battery, solar panels, and an optional DC load. It emphasizes connecting the battery first.
Compatibilità della batteria:
The controller is compatible with various battery types, including Gel, Flooded (Lead-Acid), and Lithium batteries. Ensure the correct battery type is selected in the controller settings for optimal charging.

Immagine: Visual representation showing the SOGTICPS BL912-40A-WIFI Solar Charge Controller's compatibility with Gel, Flooded, and Lithium battery types, indicated by arrows pointing between battery icons and the controller.
5. Istruzioni per l'uso
LCD Display and Navigation:
The LCD provides real-time information about your solar system. Use the control buttons to navigate through the display interfaces and adjust parameters.

Immagine: A series of LCD screen captures demonstrating the browsing interface and parameter setting process for the SOGTICPS BL912-40A-WIFI Solar Charge Controller. It shows main display, float voltage, discharge reconnect, discharge stop, load work mode, battery type, and work parameter display.
- Browsing Interface: Premere il tasto MENU button to cycle through different display interfaces, showing information such as main display, float voltage, scarica ricollega voltage, volume di arresto dello scaricotage, load work mode, battery type, and other work parameters.
- Impostazione dei parametri: In interfaces 2-8, press the MENU button to enter the setting mode. Use the UP E GIÙ buttons to adjust the values. Press MENU nuovamente per confermare e uscire dalla modalità di impostazione.
Monitoraggio WiFi:
The controller supports WiFi connectivity, allowing you to monitor and control your solar system remotely via a smartphone application.

Immagine: The SOGTICPS BL912-40A-WIFI Solar Charge Controller shown alongside a smartphone displaying its monitoring application interface. This illustrates the wireless monitoring capability of the PV system.
- Installazione dell'app: Download the dedicated application for your smartphone (Android). Refer to the QR code or instructions provided with the product for app download.
- Connessione: Follow the in-app instructions to connect your controller to your local WiFi network.
- Monitoraggio remoto: Una volta connesso, puoi view real-time data such as temperature, charge current, discharge current, accumulated power generation, battery voltage, and adjust charging modes from anywhere.
6. Manutenzione
Una manutenzione regolare garantisce la longevità e le prestazioni ottimali del regolatore di carica solare.
- Controllare le connessioni: Controllare periodicamente tutti i collegamenti elettrici per assicurarsi che siano ben saldi e privi di corrosione.
- Controller pulito: Mantenere il controller pulito e privo di polvere e detriti. Utilizzare un panno asciutto per la pulizia.
- Ventilazione: Assicurarsi che l'area di installazione abbia una ventilazione adeguata per evitare il surriscaldamento.
- Ispezione della batteria: Regularly check battery terminals for corrosion and ensure battery fluid levels (for flooded batteries) are correct.
- Monitoraggio del sistema: Use the LCD display or the WiFi app to monitor system performance and identify any anomalies early.
7. Risoluzione Dei Problemi
Se riscontri problemi con il tuo regolatore di carica solare, fai riferimento ai seguenti problemi comuni e alle relative soluzioni:
| Problema | Possibile causa | Soluzione |
|---|---|---|
| Nessuna visualizzazione sul display LCD | Batteria non collegata o bassa tensionetage; polarità inversa. | Controllare i collegamenti della batteria e il voltage. Assicurarsi che la polarità sia corretta. |
| Batteria non in carica | Solar panels not connected; insufficient sunlight; faulty solar panel; incorrect battery type setting. | Check solar panel connections and ensure adequate sunlight. Verify solar panel functionality. Confirm battery type setting. |
| Il carico non funziona | Carico scollegato; batteria bassatage protection; overload protection. | Check load connections. Charge battery. Reduce load or check for short circuits. |
| WiFi app issues (connection/language) | Incorrect WiFi setup; app region/language settings; firmware issues. | Ensure correct WiFi network and password. Check app settings for language. Contact support if issues persist. |
8. Specifiche
| Parametro | Valore |
|---|---|
| Modello | BL912-40A-WIFI |
| Corrente di carica nominale | 40 A |
| Volume di sistematage | Rilevamento automatico 12V/24V |
| Potenza massima in ingresso FV (12 V) | 480 L |
| Potenza massima in ingresso FV (24 V) | 960 L |
| Volume consigliato del pannello solaretage | 18V for 12V battery; 36V for 24V battery |
| Autoconsumo | <10mA |
| Temperatura di esercizio | Da -14 °F a 140 °F (da -10 °C a 60 °C) |
| Tipo di visualizzazione | LCD |
| Uscita USB | Doppio 5V 2A |
| Comunicazione | Wifi |
| Dimensioni (confezione) | Dimensioni: 18 x 11 x 5 cm |
| Peso (confezione) | 330 grammi |
| Riferimento produttore | 2-BL912-40A-WIFI-DE |
| Codice UPC | 732246237116 |
9. Garanzia e supporto
For warranty information and technical support, please refer to the documentation included with your purchase or contact SOGTICPS customer service. Keep your purchase receipt as proof of purchase.