Introduzione
Thank you for choosing the Andoer Professional Portable Aluminum Camera Tripod Stand Monopod. This versatile 2-in-1 device is designed to provide stable support for your DSLR or SLR camera, featuring a 4-section adjustable design, an 8KG payload capacity, and a 3-way hydraumatic pan tilt head. This manual provides detailed instructions for proper setup, operation, maintenance, and troubleshooting to ensure optimal performance and longevity of your equipment.
Informazioni sulla sicurezza
- Ensure all locks and adjustments are securely tightened before mounting a camera or leaving the tripod unattended.
- Do not exceed the maximum load capacity of 8KG (17.6 lbs) to prevent damage to the tripod and your camera equipment.
- Evitare di posizionare il treppiede su superfici instabili o irregolari.
- Keep hands and fingers clear of moving parts, especially when extending or collapsing the legs.
- Do not expose the tripod to extreme temperatures or corrosive environments.
- When carrying the tripod, ensure it is fully collapsed and secured in its carrying pouch.
Prodotto finitoview e componenti
Familiarize yourself with the main components of your Andoer tripod/monopod:

Immagine: Dettagliato view of the Andoer tripod highlighting its key components such as the 3-way hydraulic dampening head, quick release plate, carrying strap, rotating handle with sponge, soft grip sponge, tube angle lock, aluminum alloy tube with flip locks, hanging hook, and sturdy rubber feet.
- 3-way Hydraulic Dampening Head: Allows for smooth pan, tilt, and flip adjustments.
- Piastra a sgancio rapido: Per agganciare e sganciare rapidamente la fotocamera.
- Tracolla: Per un trasporto comodo.
- Rotating Handle with Sponge: Provides comfortable grip for head adjustments.
- Soft Grip Sponge: Located on one leg for comfortable handling, especially in cold weather.
- Tube Angle Lock: To adjust the spread angle of the tripod legs.
- Aluminum Alloy Tube with Flip Locks: For extending and securing leg sections.
- Gancio per appendere: Located at the bottom of the center column for adding weight for increased stability.
- Sturdy Rubber Feet: Garantisce stabilità su diverse superfici.
Impostare
1. Apertura del treppiede
- Release the leg locks and extend the tripod legs outwards.
- Adjust the leg spread using the tube angle locks located at the top of each leg. There are 3 levels of adjustment for different stability requirements and shooting angles.
- Ensure all leg angle locks click into place for secure positioning.
2. Adjusting Leg Sections and Height

Immagine: The tripod shown at different heights, demonstrating its adjustable 4-section legs and extendable center column, reaching up to 200cm.
- Open the flip locks on each leg section.
- Estendere le sezioni delle gambe fino all'altezza desiderata.
- Securely close all flip locks to prevent the legs from collapsing.
- To extend the center column, loosen the center column lock knob, raise the column to the desired height, and then tighten the knob.
3. Collegamento della fotocamera
- Remove the quick release plate from the 3-way pan tilt head by releasing its lock.
- Attach the quick release plate to the bottom of your camera using the 1/4-inch screw. Ensure it is tightened securely.
- Slide the camera with the attached quick release plate back into the head and secure it with the quick release lock. Verify that the camera is firmly attached before use.
Istruzioni per l'uso
1. Adjusting the 3-Way Pan Tilt Head
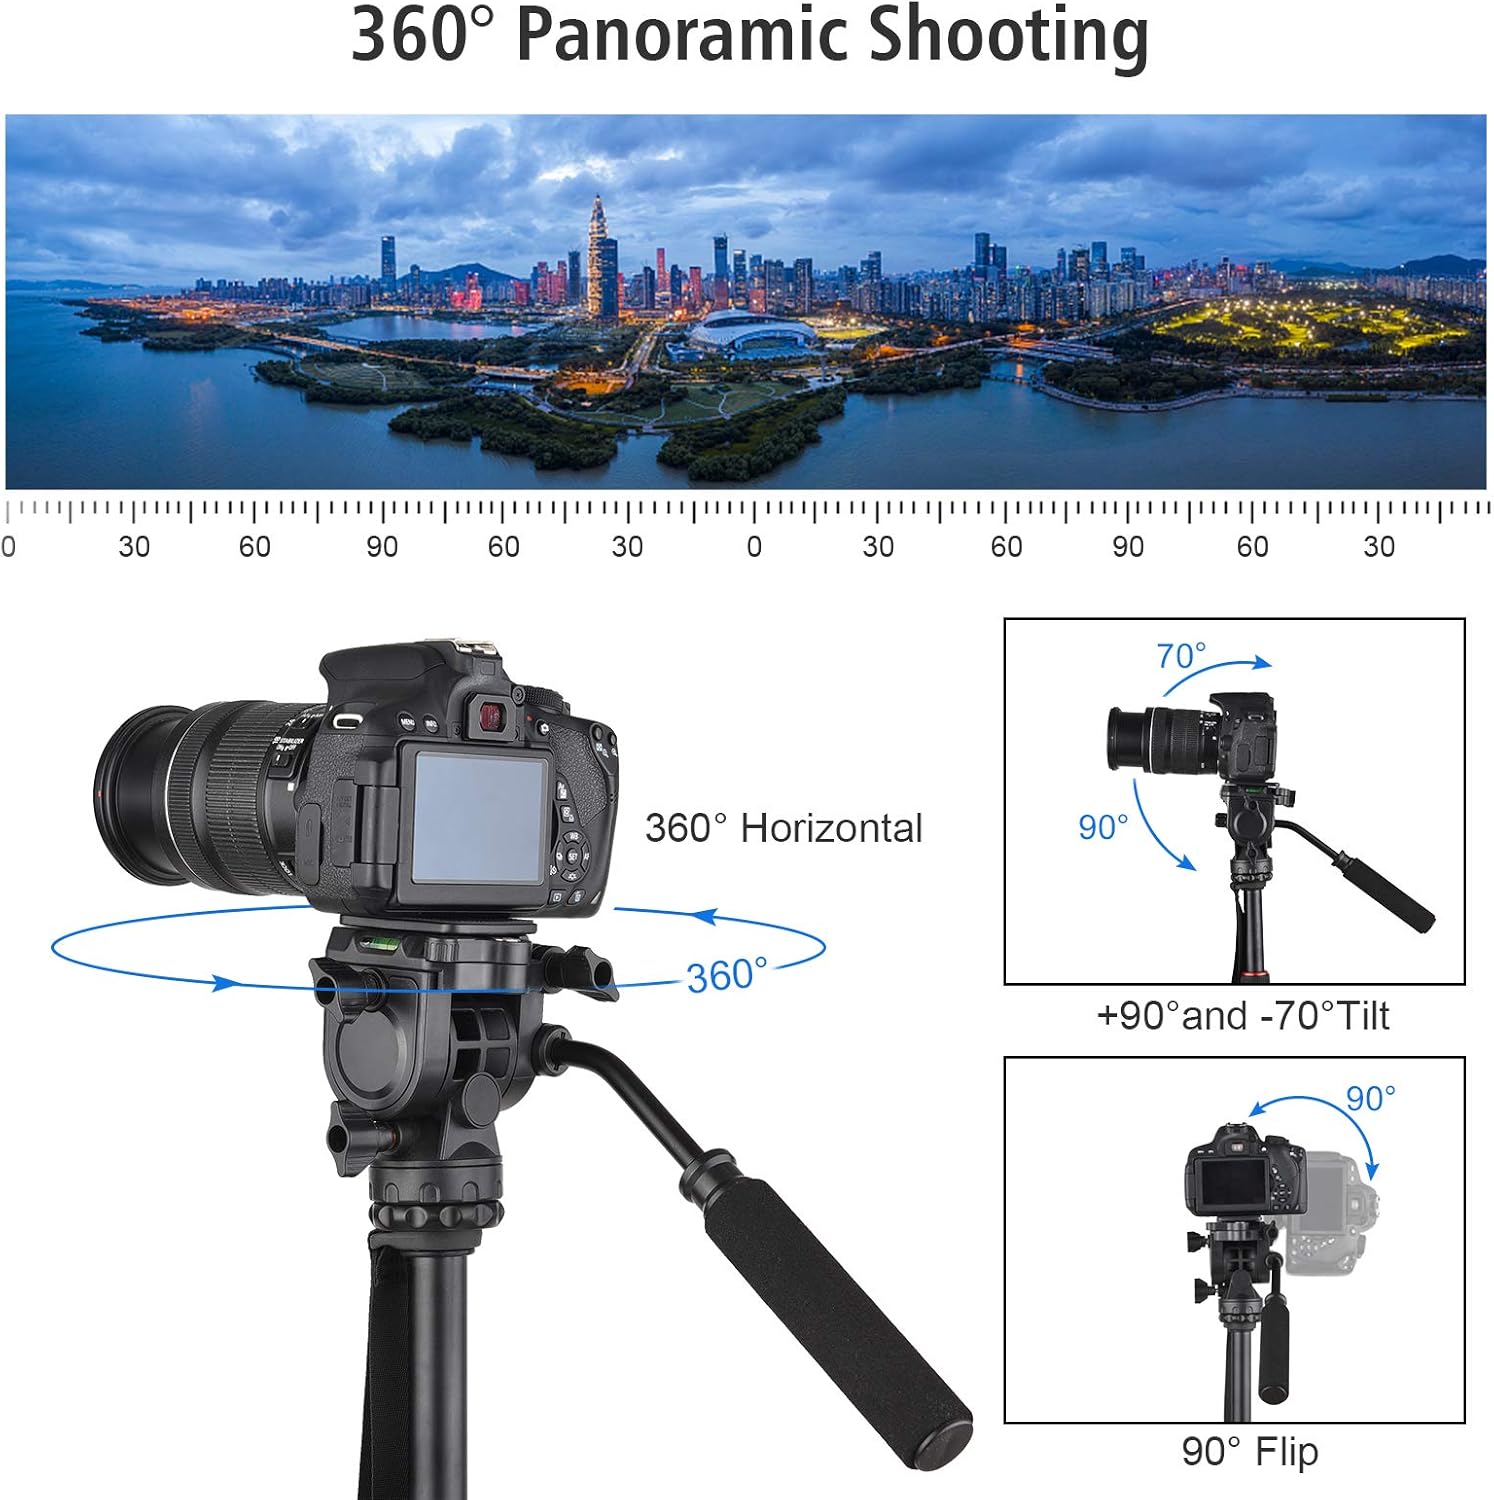
Immagine: Visual representation of the tripod head's movement capabilities, including 360-degree horizontal panning, +90 to -70 degree vertical tilting, and 90-degree side flipping for portrait orientation.
- Panoramica (rotazione orizzontale): Loosen the pan lock knob (usually at the base of the head) to rotate the camera 360 degrees horizontally. Tighten to secure.
- Tilting (Vertical Adjustment): Loosen the tilt lock knob on the side of the head to adjust the camera's vertical angle (+90 to -70 degrees). Tighten to secure.
- Flipping (Portrait Orientation): Loosen the flip lock knob to tilt the camera 90 degrees for portrait shooting. Tighten to secure.
2. Macro Shooting (Inverted Center Column)
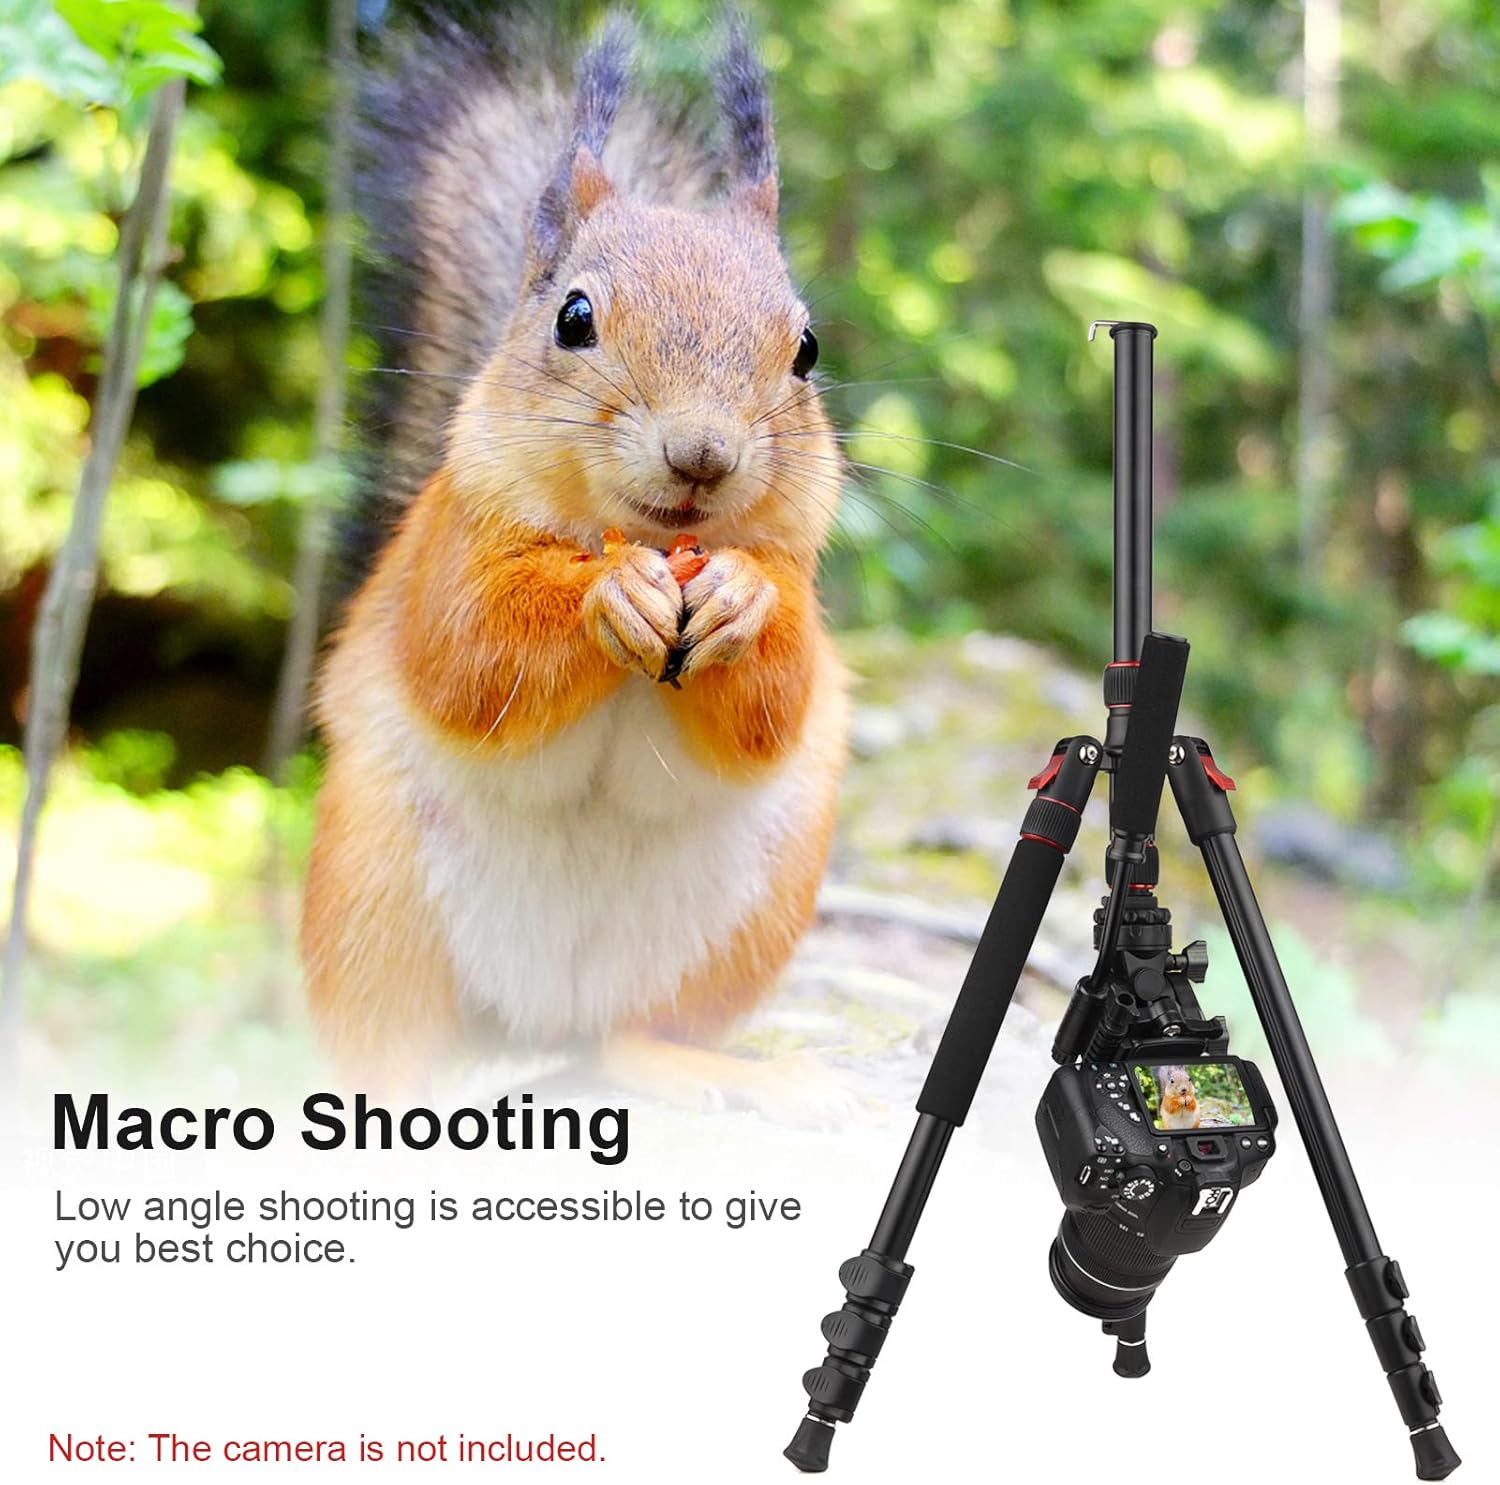
Immagine: The tripod configured for macro shooting, demonstrating how the center column can be inverted to allow the camera to be positioned very close to the ground for low-angle shots.
- Remove the camera and head from the center column.
- Fully extend the center column and remove it from the tripod body.
- Invert the center column and reinsert it into the tripod body from the bottom.
- Reattach the head and camera. This allows for extremely low-angle or macro photography.
3. Conversione in monopiede

Immagine: The tripod and its monopod configuration. One leg of the tripod, identifiable by its soft grip sponge, can be detached and combined with the center column to create a standalone monopod.
- Identify the tripod leg with the soft grip sponge. This leg is detachable.
- Svitare questa gamba dal telaio del treppiede.
- Rimuovere la colonna centrale dal treppiede.
- Avvitare la gamba staccata nella parte inferiore della colonna centrale.
- Attach the 3-way pan tilt head to the top of the newly formed monopod.
Manutenzione

Immagine: The tripod in its folded state, ready for storage or transport in the included carrying bag.
- Pulizia: Pulisci il treppiede con un panno morbido eamp dopo ogni utilizzo, soprattutto se utilizzato in ambienti polverosi, sabbiosi o bagnati. Evitare prodotti chimici aggressivi.
- Lubrificazione: Periodically check moving parts. If any part feels stiff, apply a small amount of silicone-based lubricant. Do not over-lubricate.
- Magazzinaggio: Store the tripod in its carrying pouch in a dry, cool place away from direct sunlight and extreme temperatures. Ensure it is clean and dry before storage.
- Ispezione: Regularly inspect all screws, locks, and rubber feet for wear and tear. Replace any damaged parts immediately.
Risoluzione dei problemi
- Il treppiede è instabile: Ensure all leg section flip locks are securely closed and leg angle locks are engaged. Check that the quick release plate is firmly attached to the camera and head. Consider hanging weight from the center column hook for added stability.
- Leg sections won't extend/retract smoothly: Clean the leg sections to remove any dirt or debris. Apply a small amount of silicone lubricant if necessary.
- Il movimento della testa è rigido o lento: Check the tension of the pan, tilt, and flip lock knobs. Adjust them to achieve the desired resistance. If still stiff, clean around the joints.
- La telecamera oscilla sulla testa: Ensure the quick release plate is tightly screwed onto the camera and securely locked into the tripod head.
Specifiche
| Caratteristica | Specificazione |
|---|---|
| Marca | Andare |
| Modello | B0BCV52WLC |
| Materiale | Lega di alluminio + plastica |
| Extendable Sections | 4 |
| Tripod Leg Angle | Regolabile su 3 livelli |
| Working Height (Max.) | 200 cm / 78.74 pollici |
| Altezza minima | 64 pollici (circa 162.5 cm) |
| Dimensioni piegate | 54 x 11 x 11 cm / 21.26 x 4.33 x 4.33 pollici |
| Load Capacity (Max.) | 8 kg / 17.6 libbre |
| Tipo di testa del treppiede | 3-Way Hydraumatic Pan Tilt Head |
| Peso dell'articolo | 4.5 libbre (circa 2.04 kg) |
| Dispositivi compatibili | Camera (DSLR, SLR) |
Garanzia e supporto
For warranty information or technical support, please refer to the documentation included with your purchase or contact Andoer customer service through their official webo al rivenditore presso cui è stato acquistato il prodotto. Conservare la prova d'acquisto per eventuali reclami in garanzia.


