
1. Introduzione
Grazie per l'acquistoasing the Innocn 39G1R 39-inch 2K WQHD 165Hz Curved Gaming HDR Monitor. This manual provides essential information for setting up, operating, maintaining, and troubleshooting your new monitor. Please read this manual thoroughly before use and keep it for future reference.
2. Informazioni sulla sicurezza
Observe the following safety precautions to prevent damage to the monitor or injury to yourself.
- Non esporre il monitor a pioggia, umidità o temperature estreme.
- Assicurare una ventilazione adeguata attorno al monitor. Non ostruire le aperture di ventilazione.
- Utilizzare solo l'adattatore di alimentazione fornito con il monitor.
- Evitare di posizionare oggetti pesanti sul cavo di alimentazione.
- Scollegare la spina di alimentazione dalla presa se il monitor non verrà utilizzato per un periodo prolungato.
- Non tentare di smontare o riparare il monitor da soli. Per qualsiasi intervento di assistenza, rivolgersi a personale qualificato.
3. Contenuto della confezione
Si prega di verificare che tutti gli articoli siano presenti nel pacco:
- Innocn 39G1R Monitor
- Supporto per monitor (base e collo)
- Adattatore di alimentazione e cavo
- Cavo DisplayPort
- Cavo HDMI
- Manuale d'uso
4. Prodotto finitoview
The Innocn 39G1R is a 39-inch curved gaming monitor designed for an immersive visual experience. It features a WQHD (2560x1440) resolution, a high 165Hz refresh rate, and HDR support. The VA panel offers a 3000:1 contrast ratio for deep blacks and vibrant colors. It also includes Adaptive-Sync/G-Sync compatibility and built-in speakers.


5. Impostazione
5.1 Montaggio del supporto
- Estrarre con cautela il monitor e i componenti del supporto dalla confezione.
- Attach the stand neck to the monitor's rear mounting point. Ensure it clicks securely into place or is fastened with screws if provided.
- Attach the stand base to the bottom of the stand neck. Tighten the thumb screw or screws to secure the base.
- Posizionare il monitor assemblato su una superficie stabile e piana.
5.2 Montaggio VESA
The monitor supports VESA 100x100mm mounting. To mount the monitor on a wall or an alternative stand:
- Remove the original stand if it is already attached.
- Attach your VESA-compatible mount to the 100x100mm screw holes on the back of the monitor using appropriate screws (not included).
- Assicurarsi che il supporto sia fissato saldamente prima di riposizionarloasing il monitor.
5.3 Collegamento del monitor
Collegare i cavi necessari alle porte corrispondenti sul retro del monitor e al computer o ad altri dispositivi.
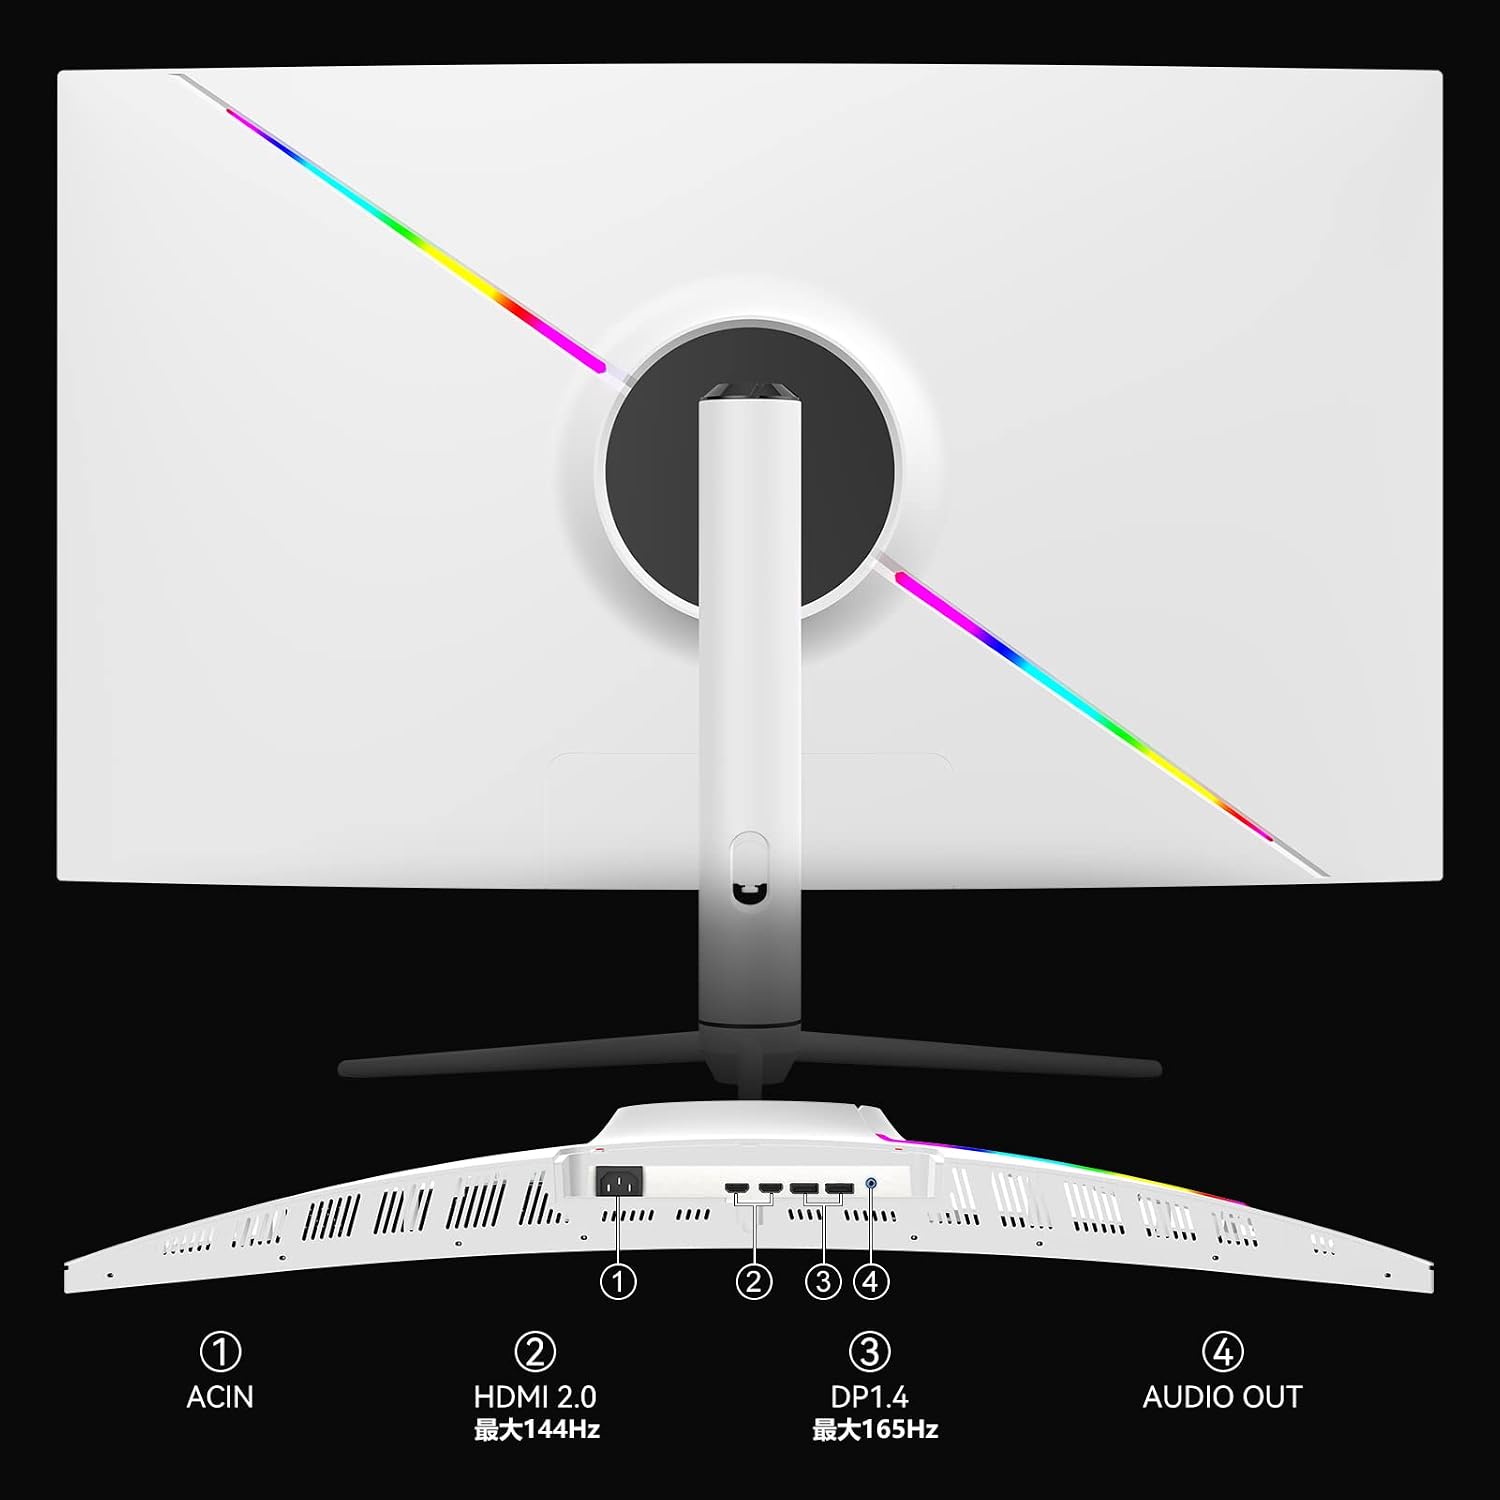
- Collegamento elettrico: Collegare l'adattatore di alimentazione all'ingresso di alimentazione del monitor e quindi collegarlo a una presa di corrente.
- Porta Display (DP): For optimal performance and 165Hz refresh rate, connect a DisplayPort cable from your computer's graphics card to the monitor's DP 1.4 port.
- HDMI: Connect an HDMI cable from your computer or game console to one of the monitor's HDMI 2.0 ports. HDMI supports up to 144Hz refresh rate.
- Uscita audio: Connect external speakers or headphones to the Audio Out port if desired. The monitor has built-in speakers, but external audio devices can be used for enhanced sound.
6. Istruzioni per l'uso
6.1 Accensione/spegnimento
Premere il pulsante di accensione, solitamente situato sul retro o sulla parte inferiore del monitor, per accenderlo o spegnerlo. La spia di accensione si accende quando il monitor è acceso.
6.2 Navigazione nel menu OSD
The On-Screen Display (OSD) menu allows you to adjust various monitor settings. Navigate the OSD menu using the joystick or buttons typically found on the back or bottom of the monitor. Press the joystick/button to enter the menu, move it up/down/left/right to select options, and press again to confirm.
6.3 Regolazione delle impostazioni di visualizzazione
- Risoluzione: Ensure your device is set to the monitor's native resolution of 2560x1440 (WQHD) for the clearest image.
- Frequenza di aggiornamento: Adjust the refresh rate in your operating system's display settings. Use DisplayPort for 165Hz; HDMI supports up to 144Hz.
- Immagine HDR: Enable HDR in the OSD menu and your device's display settings for enhanced contrast and color. The monitor's brightness reaches 300-400 Nits with HDR On.
- Adaptive-Sync/G-Sync: Activate Adaptive-Sync in the OSD menu and enable G-Sync compatibility in your graphics card's control panel (if applicable) to eliminate screen tearing and stuttering during gaming.
- Riduzione della luce blu: The monitor features TUV certified blue light reduction to minimize eye strain during prolonged use. This setting can be adjusted in the OSD menu.

7. Manutenzione
7.1 Pulizia del monitor
- Scollegare sempre il monitor prima di pulirlo.
- Utilizzare un panno morbido e privo di lanugine leggermente dampened with water or a mild, non-abrasive screen cleaner to wipe the screen.
- Per il casing, utilizzare un panno morbido e asciutto. Evitare l'uso di prodotti chimici aggressivi o materiali abrasivi.
7.2 Conservazione
Se si conserva il monitor per un periodo prolungato, scollegare tutti i cavi, imballarlo nella confezione originale, se possibile, e conservarlo in un luogo fresco e asciutto, lontano dalla luce solare diretta e da temperature estreme.
8. Risoluzione Dei Problemi
Se riscontri problemi con il monitor, fai riferimento ai seguenti problemi comuni e alle relative soluzioni:
| Problema | Possibile soluzione |
|---|---|
| Nessun potere | Ensure the power cable is securely connected to the monitor and the power outlet. Check if the power outlet is functioning. |
| Nessun segnale | Verify that the video cable (DP or HDMI) is correctly connected to both the monitor and your device. Select the correct input source via the OSD menu. |
| Immagine tremolante o distorta | Check the video cable for damage. Ensure your graphics card drivers are up to date. Adjust the refresh rate in your device's display settings. Enable Adaptive-Sync/G-Sync if applicable. |
| No Sound from Speakers/Headphones | Check the volume settings on the monitor and your connected device. Ensure external speakers/headphones are properly connected to the Audio Out port. |
| I pulsanti non rispondono | Unplug the monitor's power cable, wait for 30 seconds, then plug it back in to reset the monitor. |
9. Specifiche
| Caratteristica | Specificazione |
|---|---|
| Marca | INNOC |
| Modello | 39G1R |
| Dimensioni dello schermo | 39 pollici (38.5 pollici) viewcapace) |
| Risoluzione | 2560x1440 (WQHD) |
| Proporzioni | 16:9 |
| Tipo di pannello | VA |
| Frequenza di aggiornamento | 165 Hz (DisplayPort), 144 Hz (HDMI) |
| Tempo di risposta | 6 millisecondi |
| Supporto HDR | Yes (300-400 Nits with HDR On) |
| Rapporto di contrasto | 3000:1 |
| Gamma di colori | RGB 99% |
| Connettività | 1x DisplayPort 1.4, 2x HDMI 2.0, 1x Audio Out |
| Supporto VESA | 100x100mm |
| Altoparlanti incorporati | SÌ |
| Dimensioni (P x L x A) | Dimensioni: 28.7 cm x 87.9 cm x 51.4 cm |
10. Garanzia e supporto
Innocn provides a Periodo di garanzia di 12 mesi for this product. If you encounter any issues or have questions regarding your Innocn 39G1R monitor, please contact our customer support team.
For support, please refer to the contact information provided with your purchase documentation or visit the official Innocn website. When contacting support, please have your model number (39G1R) and purchase details ready.