
1. Introduzione
This manual provides essential information for the installation, operation, and maintenance of your Raymarine Element 12 S Chartplotter. The Element 12 S is a high-performance marine navigation display featuring a 12-inch touchscreen, Lighthouse North America charts, High CHIRP Sonar, RealBathy Mapping, AIS target overlays, and autopilot integration. Please read this manual thoroughly before using the device to ensure proper functionality and safety.
2. Informazioni sulla sicurezza
- Installazione: Ensure all electrical connections are made correctly and securely to prevent damage to the unit or vessel. Consult a qualified marine electronics technician if you are unsure about any installation steps.
- Alimentazione elettrica: Connect the unit only to a 12V DC power source. Incorrect voltagpuò causare gravi danni.
- Navigazione: The Element 12 S is an aid to navigation. Always use official government charts and exercise caution. Do not rely solely on electronic navigation for safe passage.
- Ambientale: This device is designed for marine environments. However, avoid exposing it to extreme temperatures or direct impact.
- Avvertenza sulla Proposta 65: Questo prodotto può contenere sostanze chimiche note nello Stato della California come causa di cancro, difetti alla nascita o altri danni riproduttivi. Lavarsi le mani dopo la manipolazione.
3. Contenuto della confezione
While specific included components may vary, a typical Raymarine Element 12 S package contains:
- Raymarine Element 12 S Display Unit
- Mounting Hardware (e.g., bracket, knobs, screws for dashboard mount)
- Cavo alimentazione/dati
- Documentation Pack (including this manual)
Note: Transducers, additional network cables, and other accessories are typically sold separately.
4. Prodotto finitoview
The Raymarine Element 12 S is a powerful chartplotter designed for intuitive navigation and marine data display.
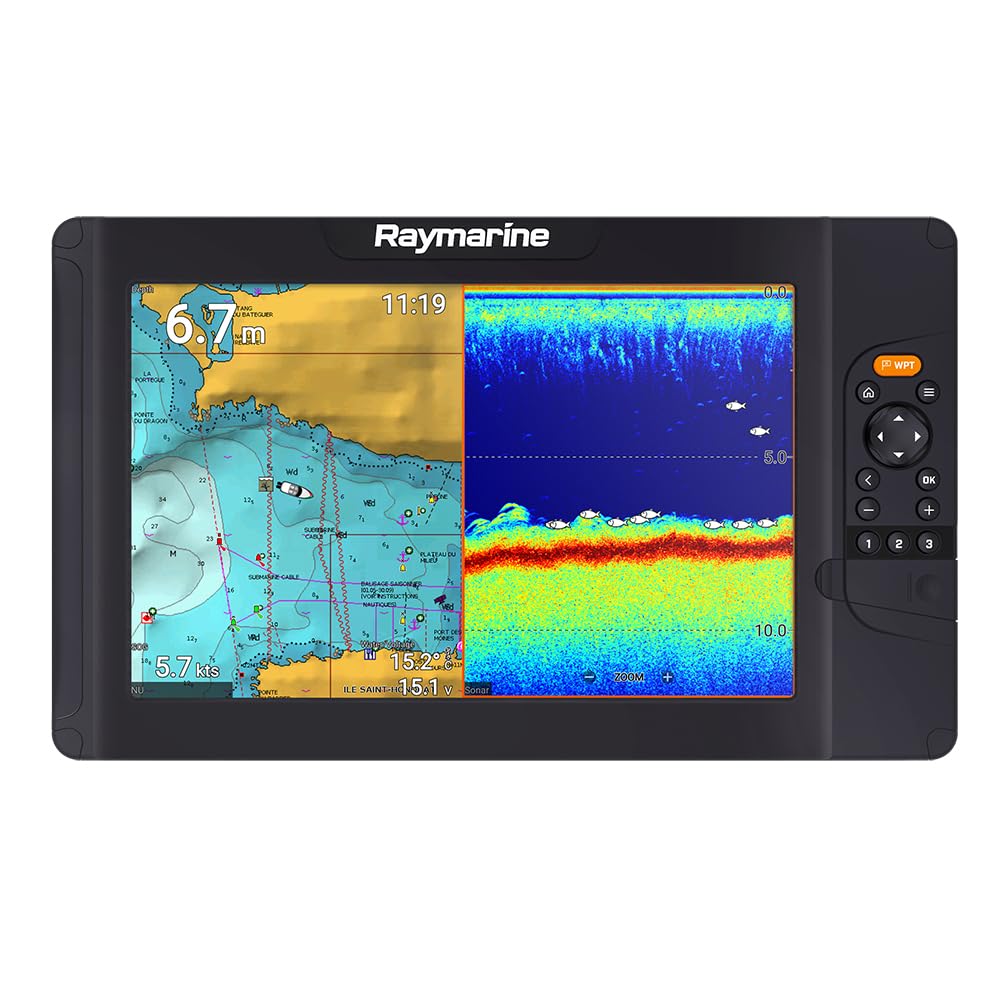
This image displays the Raymarine Element 12 S chartplotter unit. It features a large 12-inch color LCD/LED touchscreen display, suitable for dashboard mounting. The screen shows a detailed marine chart, indicating its primary function as a navigation device.
5. Configurazione e installazione
5.1 Montaggio del display
The Element 12 S is designed for dashboard mounting. Choose a location that provides clear visibility, easy access to the touchscreen, and protection from direct sunlight and excessive moisture. Ensure sufficient space behind the unit for cable connections and ventilation.
- Carefully mark the mounting holes using the provided template or bracket.
- Drill pilot holes as recommended by the mounting hardware instructions.
- Secure the mounting bracket to the dashboard using the appropriate fasteners.
- Attach the Element 12 S display to the bracket, ensuring it is firmly secured.
5.2 Collegamento di alimentazione
Connect the power cable to a 12V DC power source on your vessel. Ensure the circuit is protected by an appropriate fuse or circuit breaker (refer to the unit's specifications for recommended fuse size). Observe correct polarity: red wire to positive (+), black wire to negative (-).
5.3 Connessioni di rete
- Collegamento Ethernet: For connecting to other Raymarine devices (e.g., radar, additional displays) or a network switch.
- NMEA 2000: For integrating with other NMEA 2000 compatible devices such as engines, sensors, and autopilots. Ensure proper termination of the NMEA 2000 backbone.
- Wifi: The Element 12 S features built-in WiFi for connectivity with mobile devices and software updates.
5.4 Transducer Connection (if applicable)
If using a compatible High CHIRP Sonar transducer, connect it to the designated port on the Element 12 S. Ensure the transducer is correctly installed on your vessel according to its specific instructions for optimal sonar performance.
6. Istruzioni per l'uso
6.1 Accensione/Spegnimento
- Accensione: Press and hold the Power button until the Raymarine logo appears.
- Spegni: Press and hold the Power button until the shutdown menu appears, then select 'Power Off'. A quick press of the Power button will put the unit into standby mode.
6.2 Interfaccia touchscreen
The Element 12 S features a responsive capacitive touchscreen. Use touch gestures (tap, swipe, pinch-to-zoom) to navigate menus, control functions, and interact with charts and sonar displays.
6.3 Funzioni del chartplotter
- Navigazione: Access the Chart application to view Lighthouse North America charts. Plan routes, set waypoints, and monitor your vessel's position.
- Zoom: Use pinch-to-zoom gestures on the touchscreen or dedicated zoom controls (if available) to adjust chart scale.
- Sovrapposizioni di dati: Customize the display to show various data overlays such as speed, depth, course, and wind information.
6.4 Funzionamento del sonar
Utilize the High CHIRP Sonar for detailed underwater imaging. Select the Sonar application to view fish targets, bottom structure, and depth readings. Adjust gain, range, and frequency settings for optimal performance in different water conditions.
6.5 RealBathy Mapping
The RealBathy feature allows you to create personalized bathymetric charts in real-time using your sonar data. This is particularly useful for mapping uncharted areas or improving detail in frequently visited locations.
6.6 AIS Target Overlays
If connected to an AIS receiver, the Element 12 S can display AIS targets directly on your chart, enhancing situational awareness by showing the position, course, and speed of nearby vessels.
6.7 Autopilot Integration
Integrate your Element 12 S with a compatible Raymarine autopilot system. This allows for direct control of the autopilot from the chartplotter, enabling features like 'Go To Waypoint' or 'Follow Route'.
7. Manutenzione
7.1 Pulizia del display
Pulisci il touchscreen con un panno morbido eamp, lint-free cloth. For stubborn marks, use a mild screen cleaner specifically designed for electronics. Avoid abrasive cleaners, solvents, or harsh chemicals that can damage the screen coating.
7.2 Aggiornamenti software
Periodically check the Raymarine webposto (www.raymarine.com) for software updates. Updates often include new features, performance enhancements, and bug fixes. Software can typically be updated via a USB drive or over WiFi.
7.3 Ispezione dei cavi e delle connessioni
Regularly inspect all cables and connections for signs of wear, corrosion, or damage. Ensure all connections are secure to maintain optimal performance and prevent intermittent issues.
8. Risoluzione Dei Problemi
- Nessun potere: Check power cable connections, fuse/circuit breaker, and battery voltage.
- Nessun segnale GPS: Assicurarsi che l'antenna GPS abbia una visuale libera view del cielo. Controllare i collegamenti dell'antenna.
- Sonar Not Working: Verify transducer connection. Check sonar settings (gain, range). Ensure the transducer is clean and free of marine growth.
- Network Communication Issues: Check all Ethernet and NMEA 2000 cable connections. Verify network device power.
- Touchscreen non reattivo: Try restarting the unit. Ensure the screen is clean and dry.
For more detailed troubleshooting, refer to the comprehensive Raymarine support resources online or contact customer service.
9. Specifiche
| Caratteristica | Specificazione |
|---|---|
| Marca | Raggio marino |
| Nome del modello | E70535-00-102 |
| Dimensioni dello schermo | 12 pollici |
| Tipo di visualizzazione | LCD/LED |
| Tipo di schermo tattile | Capacitivo |
| Metodo di controllo | Tocco |
| Input dell'interfaccia umana | Schermo tattile |
| Tipo di servizio del veicolo | Barca |
| Tipo di montaggio | Supporto per cruscotto |
| Tecnologia di connettività | Ethernet, WiFi, NMEA 2000 |
| Tipo di mappa | North America (Lighthouse Charts) |
| Caratteristiche speciali | High CHIRP Sonar, RealBathy Mapping, AIS Target Overlays, Autopilot Integration |
| Modalità di uscita audio | Oratore |
| Le batterie sono incluse? | NO |
| Peso dell'articolo | 14.8 libbre |
| Numero di modello del produttore | CWR-85074 |
| Numero parte produttore | E70535-00-102 |
10. Garanzia e supporto
Raymarine products are backed by a manufacturer's warranty. The specific terms and duration of your warranty may vary by region and product registration. Please refer to the warranty card included with your product or visit the official Raymarine websito per informazioni dettagliate sulla garanzia.
For technical support, service, or further inquiries, please visit the Raymarine support portal on their official webposto (www.raymarine.com/support/) or contact your local Raymarine dealer.
