1. Introduzione
This manual provides essential information and instructions for the safe and efficient use of your Blackview BV7200 Rugged Smartphone. The BV7200 is designed for durability and performance in challenging environments, featuring advanced water and dust resistance, a powerful processor, and a high-capacity battery.
Le caratteristiche principali includono:
- IP68 & IP69K Certification: Advanced water and dust resistance for outdoor and demanding conditions.
- MediaTek Helio G85 Processor: Ensures smooth performance for gaming, multitasking, and general use.
- 50MP Dual Camera: Capture high-quality photos, even in low-light conditions.
- Batteria da 5180 mAh: Long-lasting power with 18W fast charging support.
- Schermo HD+ da 6.1 pollici: Durable screen with Corning Gorilla Glass 3, optimized for comfortable viewing.
- Modalità guanto: Allows screen operation even when wearing gloves.

Immagine: Oltreview del Neroview BV7200 Rugged Smartphone, highlighting its MediaTek Helio G85 processor, 50MP camera, IP68/IP69K ratings, 5180mAh battery, 6.1-inch display, and Glove Mode.
2. Impostazione
2.1. Installazione della scheda SIM e della scheda MicroSD
Per installare la/le scheda/e SIM e/o la scheda MicroSD:
- Individuare il vassoio della SIM sul lato del dispositivo.
- Utilizzare lo strumento di espulsione SIM in dotazione per aprire il vassoio.
- Carefully place your Nano-SIM card(s) and/or MicroSD card into the designated slots, ensuring correct orientation.
- Spingere delicatamente il vassoio nuovamente nel dispositivo finché non scatta in posizione.
2.2. Ricarica iniziale e accensione
Prima del primo utilizzo, si consiglia di caricare completamente il dispositivo.
- Connect the USB Type-C cable to the charging port at the bottom of the phone. Ensure the port cap is securely opened before inserting the cable and closed after charging to maintain water resistance.
- Collegare l'altra estremità del cavo a un adattatore di alimentazione compatibile e inserirlo in una presa a muro.
- Once sufficiently charged, press and hold the Power button (usually on the right side) for a few seconds until the Blackview appare il logo.
- Seguire le istruzioni sullo schermo per completare la configurazione iniziale, inclusa la selezione della lingua, la connessione Wi-Fi e la configurazione dell'account Google.
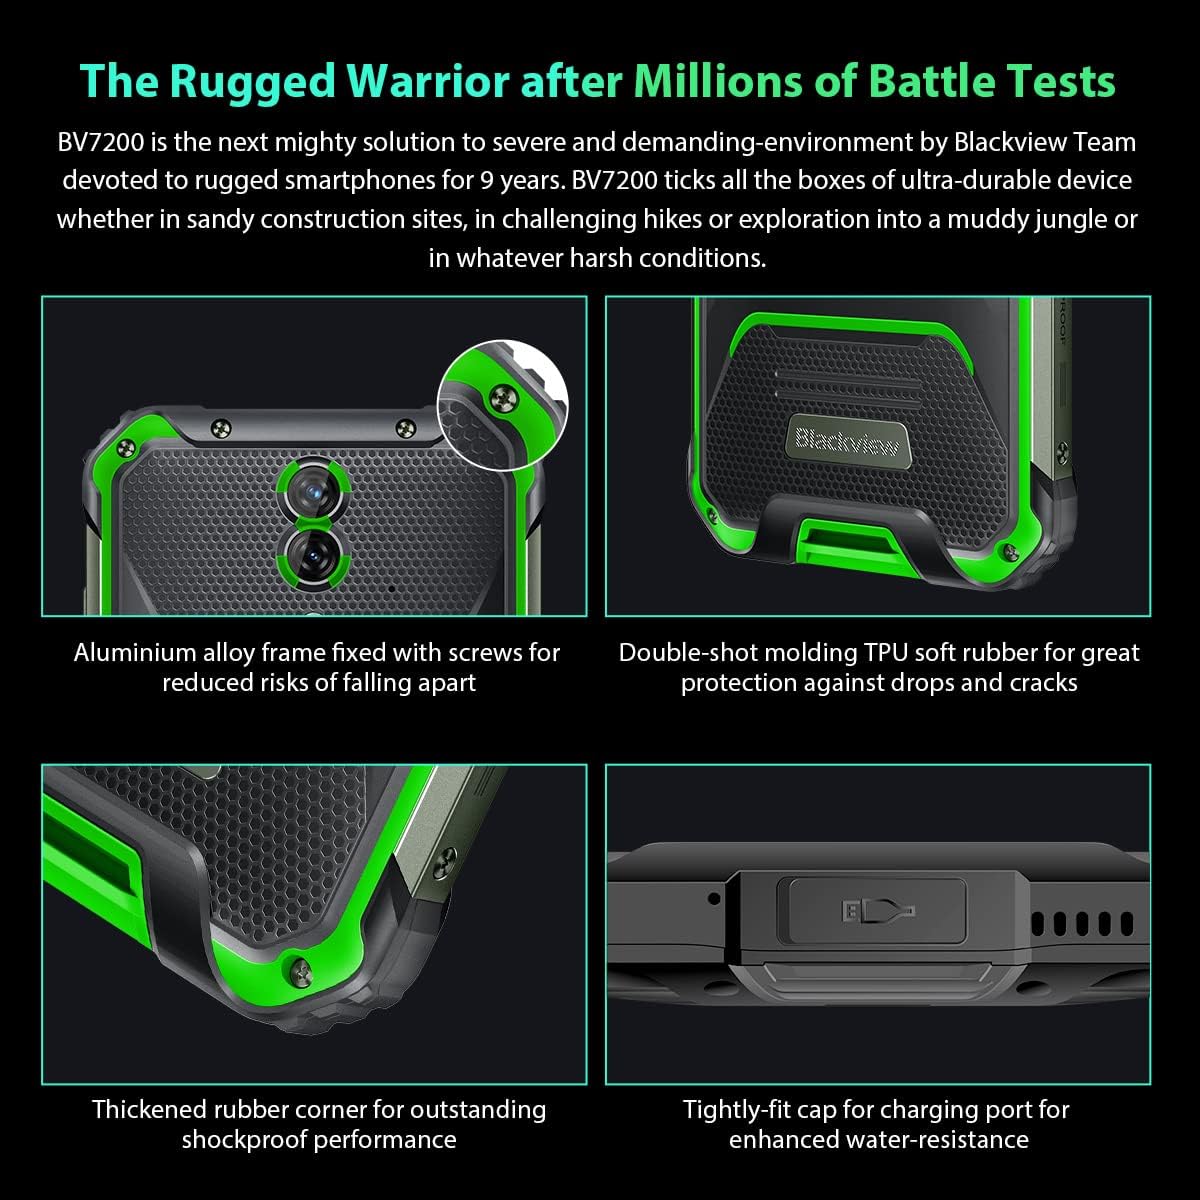
Immagine: Primo piano views del Neroview BV7200's rugged construction, including aluminum alloy frame, double-shot molding TPU rubber, thickened rubber corners, and the tightly-fit cap for the charging port, emphasizing its durability and water resistance.
3. Istruzioni per l'uso
3.1. Navigazione di base
Il Neroview BV7200 operates on Doke OS 3.0, based on Android 12. Use touch gestures for navigation:
- Rubinetto: Seleziona un elemento o apri un'app.
- Scorri: Scorrere le schermate o gli elenchi.
- Pizzico: Ingrandisci o rimpicciolisci le immagini e web pagine.
- Premere a lungo: Accedi ai menu contestuali o sposta le icone delle app.
3.2. Utilizzo della fotocamera
The BV7200 features a 50MP main rear camera and an 8MP ultra-wide/macro rear camera.
- Apri l'app Fotocamera dalla schermata iniziale o dal menu delle applicazioni.
- Seleziona la modalità desiderata (Foto, Video, Ritratto, Pro, ecc.).
- Tocca lo schermo per mettere a fuoco un'area specifica.
- Premere il pulsante Otturatore per scattare una foto o avviare/interrompere la registrazione video.

Image: Diagram illustrating the Blackview BV7200's 50MP Samsung ISOCELL JN1 main rear camera, 8MP ultra-wide and ultra-macro rear camera, and rear flash, highlighting its photographic capabilities.
3.3. Modalità guanto
The BV7200 supports Glove Mode, allowing you to operate the touchscreen while wearing gloves.
- To activate/deactivate Glove Mode, navigate to Settings > Smart Assistant > Glove Mode.
- Ensure this mode is enabled when using gloves for optimal touch responsiveness.

Image: Collage demonstrating the Blackview BV7200's Glove Mode in various scenarios, showing users operating the phone while wearing different types of gloves, emphasizing its utility in cold or industrial environments.
3.4. Water and Dust Resistance (IP68 & IP69K)
The BV7200 is certified IP68 and IP69K, making it resistant to water immersion and high-pressure water jets. This allows for use in aquatic sports or dusty environments.
- Always ensure all port caps (charging port, SIM tray) are securely closed before exposing the device to water or dust.
- Rinse the phone with clean water after exposure to saltwater or chemicals.
- Do not charge the phone if the charging port is wet. Allow it to dry completely.
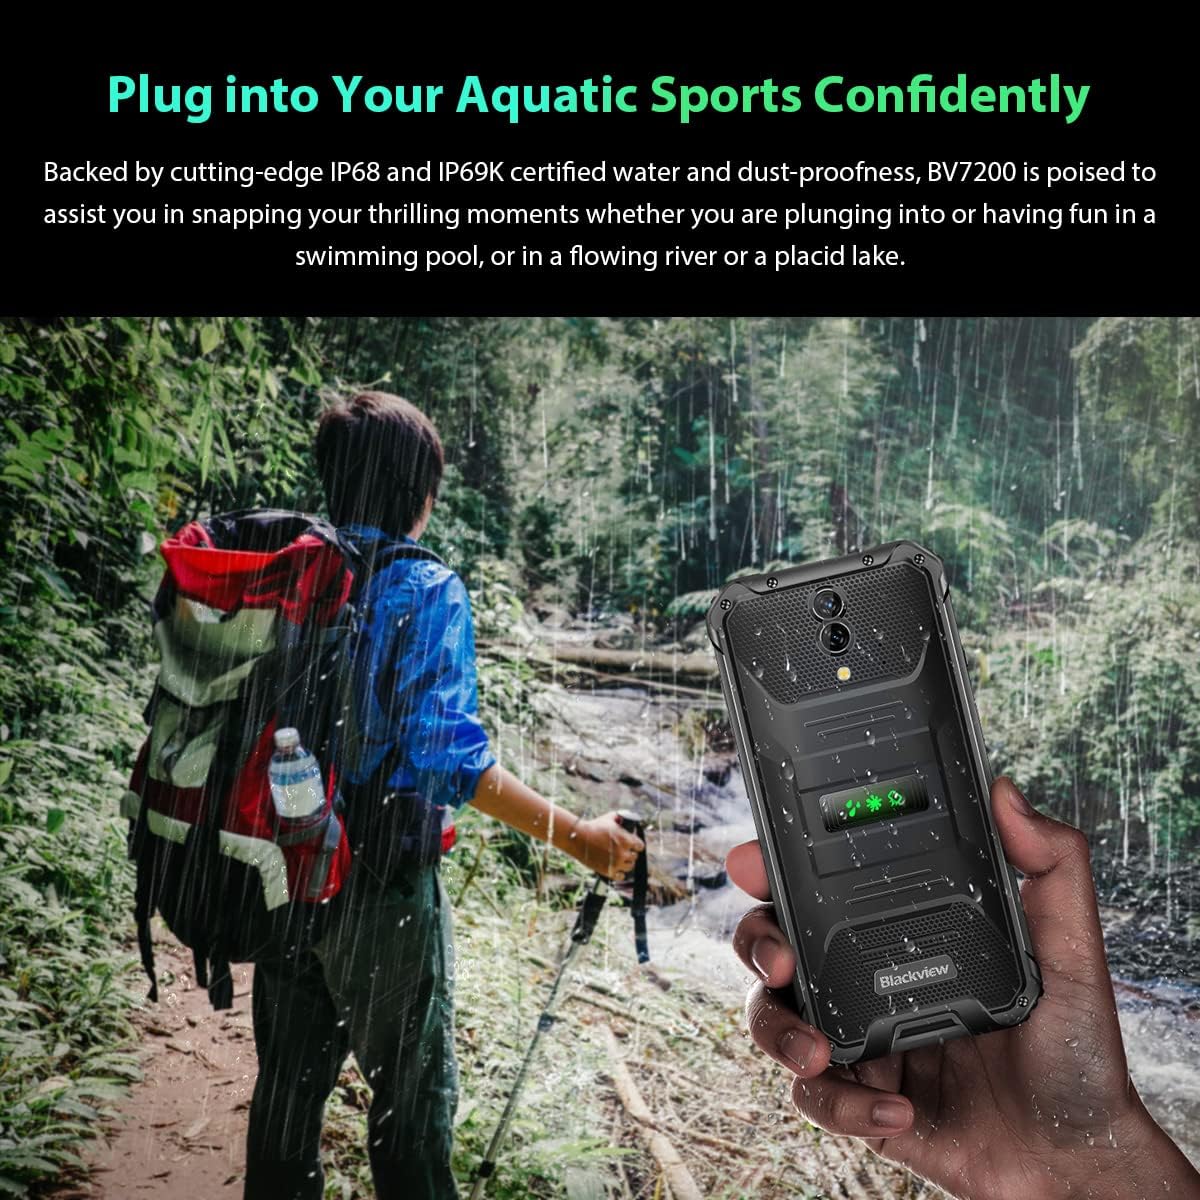
Image: A person holding the Blackview BV7200 near a stream or waterfall, illustrating its water resistance and suitability for outdoor and aquatic activities.
3.5. Gestione della batteria
The 5180mAh battery provides extended usage. The device supports 18W fast charging.
- Use the original charger and cable for optimal charging speed and safety.
- The battery is designed to withstand temperatures down to -10°C.
- To prolong battery life, avoid extreme temperatures and fully discharging the battery regularly.
3.6. Espansione della memoria
The BV7200 features 6GB of RAM with an additional 4GB virtual memory expansion, totaling 10GB, for enhanced multitasking and performance.

Image: Graphic illustrating the memory expansion feature of the Blackview BV7200, showing 6GB of physical RAM and an additional 4GB of virtual RAM, combining for a total of 10GB for improved performance.
4. Manutenzione
4.1. Pulizia del dispositivo
Per pulire il tuo Blackview BV7200:
- Pulire lo schermo e il corpo con un panno morbido e privo di lanugine.
- Per lo sporco ostinato utilizzare una spugna leggermente damp panno con sapone neutro, quindi asciugare.
- Non utilizzare prodotti chimici aggressivi, solventi o detergenti abrasivi.
- Ensure all port caps are closed before cleaning with liquids.
4.2. Aggiornamenti software
Controlla e installa regolarmente gli aggiornamenti software per garantire prestazioni ottimali, sicurezza e accesso alle nuove funzionalità.
- Vai a Impostazioni > Sistema > Aggiornamento di sistema per verificare la disponibilità di aggiornamenti.
- Prima di avviare un aggiornamento, assicurati che il tuo dispositivo abbia una batteria sufficientemente carica e una connessione Wi-Fi stabile.
5. Risoluzione Dei Problemi
5.1. Problemi comuni e soluzioni
- Il dispositivo non si accende: Assicurati che la batteria sia carica. Collega il dispositivo a un caricabatterie per almeno 15 minuti, quindi prova ad accenderlo di nuovo.
- Schermo non reattivo: Restart the device by holding the Power button for about 10-15 seconds. If the issue persists, try a factory reset (data will be lost).
- Connectivity issues (Wi-Fi/Bluetooth/Mobile Data):
- Attiva e disattiva Wi-Fi/Bluetooth/Dati mobili.
- Riavviare il dispositivo.
- Controllare le impostazioni del router/rete.
- For mobile data, ensure SIM card is correctly inserted and activated.
- App che si bloccano: Cancella la cache e i dati dell'app (Impostazioni > App > [Nome app] > Archiviazione > Cancella cache/Cancella dati). Se il problema persiste, disinstalla e reinstalla l'app.
5.2. Ripristino delle impostazioni di fabbrica
Un ripristino delle impostazioni di fabbrica cancellerà tutti i dati dal telefono e lo ripristinerà alle impostazioni di fabbrica originali. Esegui il backup dei dati importanti prima di procedere.
- Vai a Impostazioni > Sistema > Opzioni di ripristino > Cancella tutti i dati (ripristino delle impostazioni di fabbrica).
- Confirm your decision. The device will restart and perform the reset.
6. Specifiche
Below are the technical specifications for the Blackview BV7200:
| Caratteristica | Specificazione |
|---|---|
| Marca | Neroview |
| Dimensioni RAM | 6 GB (expandable to 10GB with virtual RAM) |
| Modello CPU | MediaTek Helio G85 |
| Capacità di archiviazione | 128 GB (espandibile fino a 1 TB con scheda TF) |
| Dimensioni dello schermo | 6.1 pollici |
| Risoluzione | 720 x 1560 HD+ |
| Tecnologia cellulare | 4G |
| Tecnologia di rete wireless | GSM, LTE, Wi-Fi |
| Capacità della batteria | 5180 mAh |
| Sistema operativo | Android 12 (Doke OS 3.0) |
| Resistenza all'acqua/polvere | IP68, IP69K |

Immagine: dettagliata view of the MediaTek Helio G85 processor, highlighting its specifications including RAM, ROM, GPU, and expandable storage, emphasizing its strong performance capabilities.

Image: Graphic detailing the Blackview BV7200's 6.1-inch HD+ display specifications, including resolution (720x1560), screen-to-body ratio (83%), brightness (380cd/cm2), and PPI (283), emphasizing its visual quality and durability with Corning Gorilla Glass 3.
7. Garanzia e supporto
For warranty information and technical support, please refer to the warranty card included with your product or visit the official Blackview websito. Conservare la prova d'acquisto per eventuali reclami in garanzia.
Per ulteriore assistenza, puoi contattare Blackview servizio clienti tramite i loro canali ufficiali.