
1. Introduzione
Grazie per l'acquistoasing the Ysametp 5G WiFi Bluetooth Projector. This device is designed to provide a high-quality home theater experience with its native 1080p Full HD resolution, 4K support, and integrated Android system. Please read this manual thoroughly before using the projector to ensure proper operation and to maximize its lifespan.
2. Informazioni sulla sicurezza
Per evitare danni al proiettore e garantire la sicurezza dell'utente, osservare le seguenti precauzioni di sicurezza:
- Alimentazione elettrica: Utilizzare solo l'adattatore di alimentazione specificato. Assicurarsi che la presa di corrente sia carica.tage corrisponde ai requisiti del proiettore.
- Ventilazione: Non ostruire le aperture di ventilazione. Garantire un flusso d'aria adeguato attorno al proiettore per evitare il surriscaldamento.
- Posizionamento: Posizionare il proiettore su una superficie stabile e piana. Evitare di posizionarlo alla luce diretta del sole, vicino a fonti di calore o in ambienti con elevata umidità o polvere.
- Pulizia: Scollegare l'alimentazione prima di pulire. Utilizzare un panno morbido e asciutto. Non utilizzare detergenti liquidi o spray.
- Protezione degli occhi: Non guardare direttamente nell'obiettivo del proiettore quando lamp è acceso, poiché la luce intensa può causare danni agli occhi.
- Riparazioni: Non tentare di riparare il proiettore da soli. Per qualsiasi intervento di assistenza, rivolgersi a personale qualificato.
3. Contenuto della confezione
Verificare che tutti gli articoli siano presenti nel pacco:
- Ysametp 5G WiFi Bluetooth Projector (Model DE-M8-E-An)
- Telecomando
- Power Cable (AC 220V with Schuko plug)
- Cavo HDMI
- Manuale d'uso
4. Prodotto finitoview
Familiarizzare con i componenti e le interfacce del proiettore.
4.1 Front View

Immagine: Frontale view of the Ysametp Projector, highlighting the projection lens and side ventilation grilles.
4.2 Rear and Side Interfaces
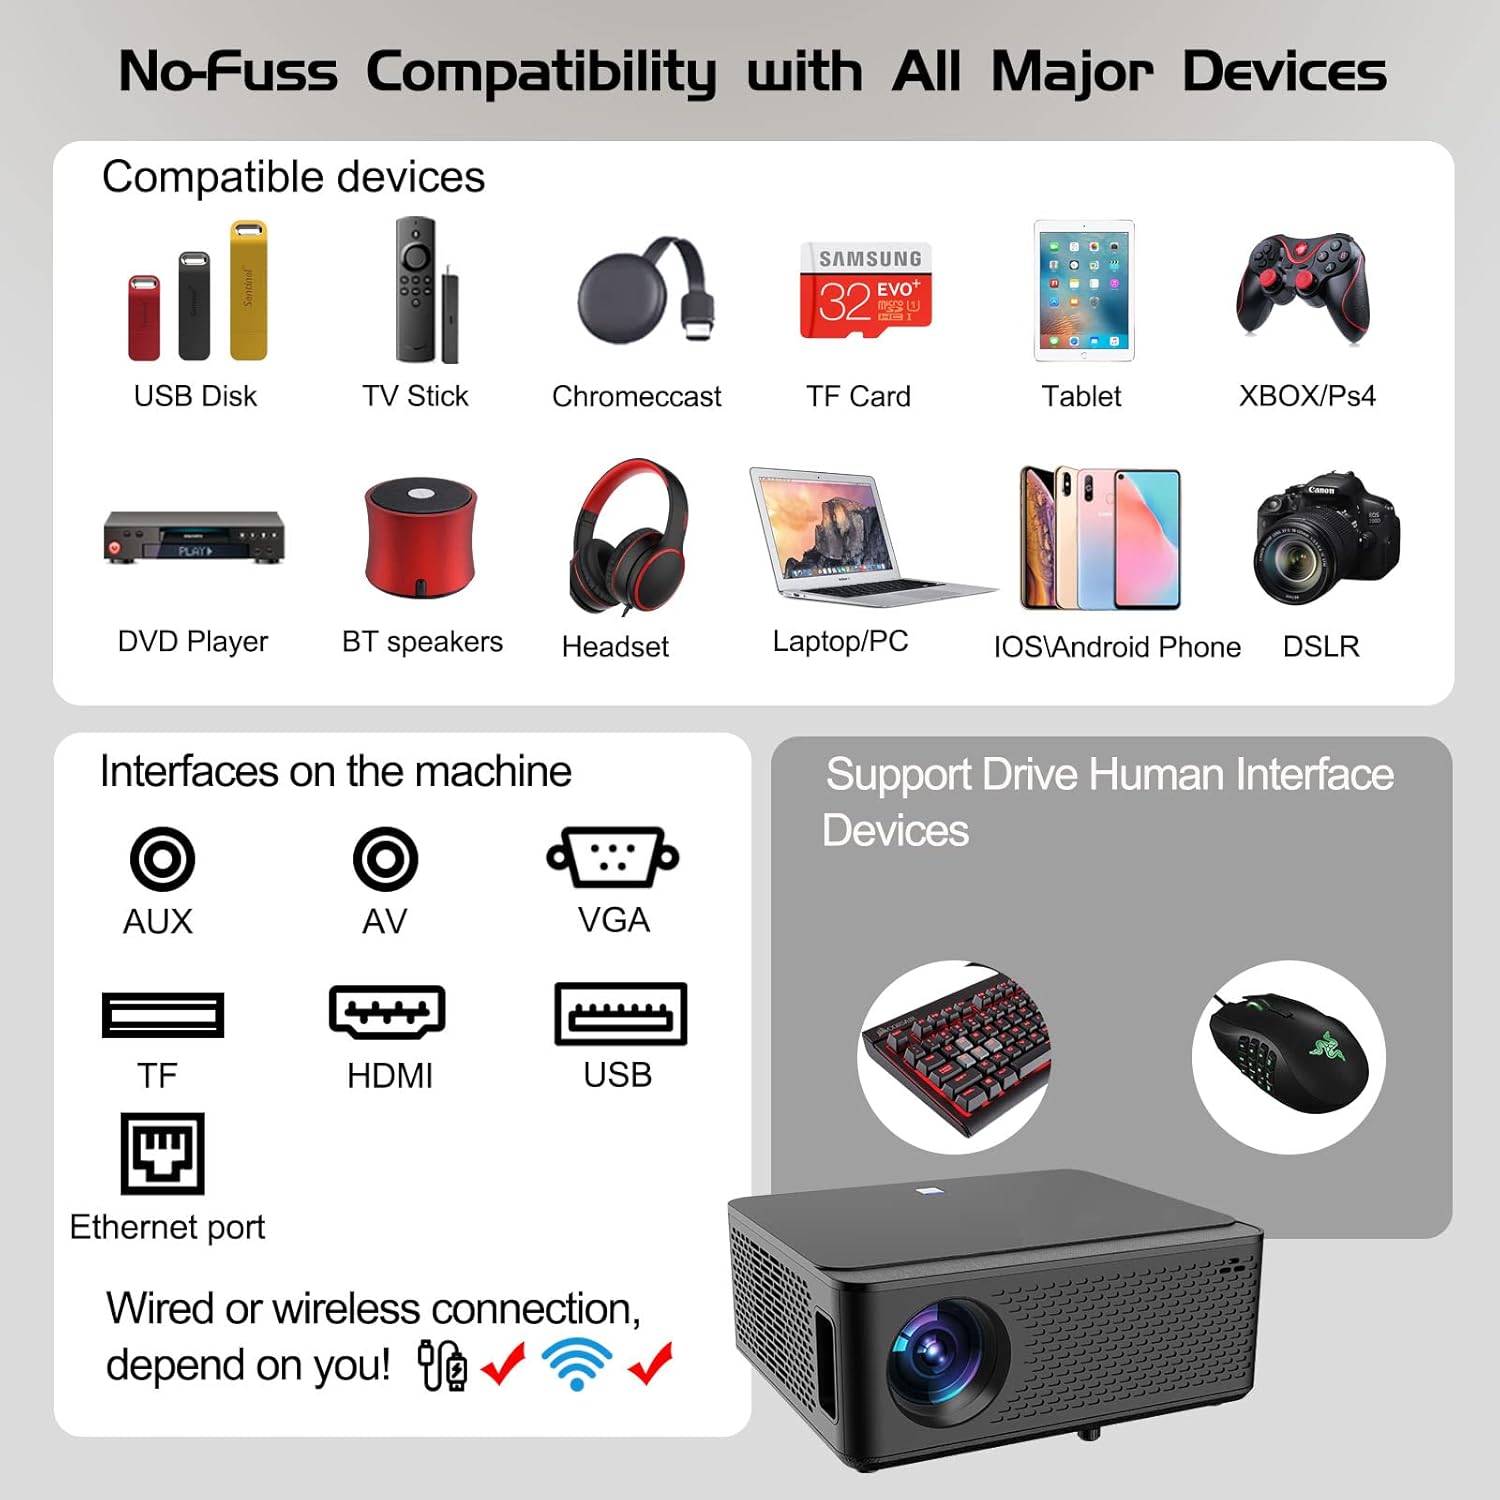
Image: Diagram illustrating the various input and output ports available on the Ysametp Projector, including USB, HDMI, AV, VGA, TF card slot, and Ethernet port.
The projector features a comprehensive set of ports for versatile connectivity:
- Porta Ethernet: Per la connessione internet cablata.
- Porta VGA: For connecting to older computers.
- Porta USB-A: For connecting USB flash drives or external devices.
- Porta HDMI: For high-definition audio and video input from various sources.
- Ingresso AV: For connecting analog audio/video devices.
- Uscita audio da 3.5 mm: Per collegare altoparlanti esterni o cuffie.
- Slot per schede TF: For reading media from Micro SD cards.
- Potenza in ingresso: Per collegare il cavo di alimentazione CA.
4.3 Controlli superiori
The top of the projector includes a power button for basic on/off functionality. Further controls are available via the remote control and the on-screen display.
4.4 Regolazione della messa a fuoco
A mechanical focus adjustment screw is located on the side of the lens for manual image clarity control.
5. Impostazione
5.1 Posizionamento
Position the projector on a stable surface. The projection distance will determine the screen size. For optimal viewing, ensure the projector is perpendicular to the projection surface.
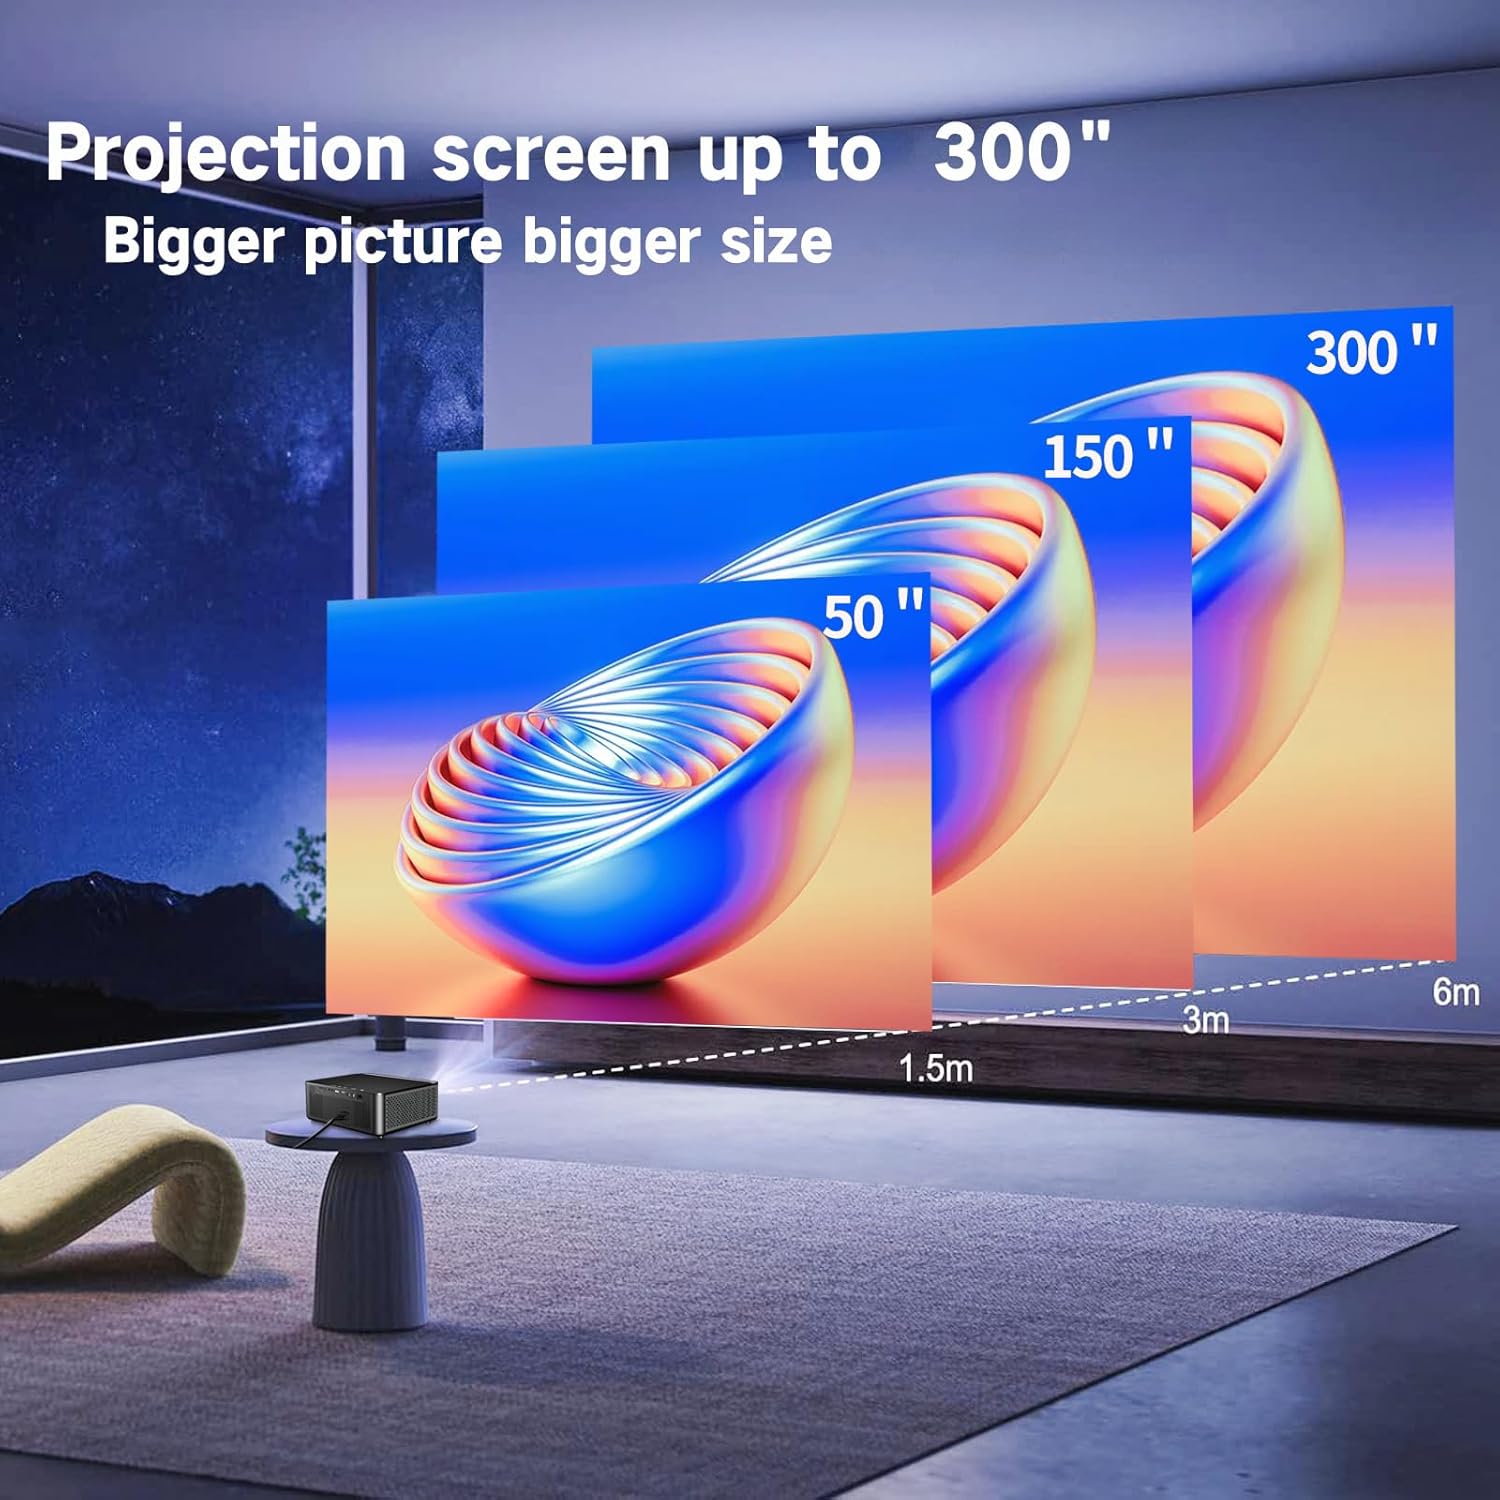
Image: Illustration demonstrating recommended projection distances for achieving screen sizes of 50, 150, and 300 inches.
5.2 Collegamento di alimentazione
- Collegare il cavo di alimentazione all'ingresso di alimentazione del proiettore.
- Collegare l'altra estremità del cavo di alimentazione a una presa elettrica adatta.
5.3 Accensione iniziale
- Premere il pulsante di accensione sul proiettore o sul telecomando per accendere il dispositivo.
- Allow a few moments for the projector to boot up.
5.4 Correzione della messa a fuoco e della distorsione trapezoidale
After powering on, adjust the image for clarity and proper geometry:
- Messa a fuoco: Rotate the mechanical focus adjustment screw near the lens until the image appears sharp and clear.
- Correzione trapezoidale: If the projected image is trapezoidal (wider at the top or bottom), use the 4D keystone correction feature via the on-screen menu to adjust the image corners until it forms a perfect rectangle.

Image: Diagram showing how 4P/4D keystone correction can be used to adjust the corners of a projected image to achieve a rectangular shape.
6. Istruzioni per l'uso
6.1 Collegamento di dispositivi esterni
Il proiettore supporta vari metodi di connessione:
- HDMI: Connect gaming consoles (PS4, Xbox), laptops, or other HDMI-enabled devices using an HDMI cable.
- USB: Insert a USB flash drive into the USB-A port to play media filedirettamente.
- Carta TF: Insert a Micro SD (TF) card into the TF card slot to access media.
- VGA/AV: Use these ports for older devices requiring analog connections.
- Bluetooth: Pair Bluetooth speakers or headphones for enhanced audio.

Image: The projector shown with various compatible devices, including laptops, smartphones, gaming consoles, USB drives, and external speakers, demonstrating its versatile connectivity.
6.2 Using the Integrated Android System
The projector comes with an integrated Android system, allowing access to a wide range of applications.

Image: The projector displaying its Android interface, featuring icons for popular streaming services and apps such as Netflix, YouTube, Prime Video, Hulu, Spotify, and TikTok.
- Connessione di rete: Connect the projector to your home Wi-Fi network via the settings menu or use an Ethernet cable for a wired connection.
- Accesso all'app: Navigate the Android interface using the remote control. You can download and install applications from the Google Play Store.
- Streaming: Enjoy content from pre-installed or downloaded streaming services.
6.3 Mirroring dello schermo WiFi 5G
Mirror your smartphone, tablet, or PC screen wirelessly to the projector.

Image: A family enjoying content mirrored from a smartphone onto the large projected screen, illustrating the 5G WiFi Screen Mirroring feature for iOS, Android, and Windows devices.
- Assicurati che sia il proiettore sia il dispositivo siano connessi alla stessa rete Wi-Fi 5G.
- Select the "Screen Mirroring" option on the projector's menu.
- On your smartphone/tablet/PC, activate its screen mirroring function (e.g., "Smart View" for Android, "AirPlay" for iOS, "Cast" for Windows).
- Selezionare il proiettore dall'elenco dei dispositivi disponibili per stabilire la connessione.
7. Manutenzione
7.1 Pulizia della lente
Pulire delicatamente la lente del proiettore con un panno morbido e privo di lanugine, specificamente progettato per superfici ottiche. Non utilizzare detergenti abrasivi o esercitare una forza eccessiva.
7.2 Pulizia del corpo del proiettore
Utilizzare un panno morbido e asciutto per pulire l'esterno del proiettore. Evitare l'uso di prodotti chimici o solventi aggressivi.
7.3 Optical Engine Protection
The projector features a full-sealed optical engine designed to prevent dust from entering the internal components, reducing the need for frequent internal cleaning and extending the device's lifespan.

Immagine: Un interno view diagram of the projector's full-sealed optical engine, highlighting its design to prevent dust from entering and affecting performance.
7.4 Lamp Vita
The projector utilizes advanced SmarEco technology to minimize energy consumption and extend the lamp's lifespan up to 60,000 hours, providing long-term reliability.

Immagine: Un diagramma dettagliato mostraasing the projector's lamp technology, indicating a lifespan of over 30,000 hours.
8. Risoluzione Dei Problemi
Se riscontri problemi con il proiettore, fai riferimento ai seguenti problemi comuni e alle relative soluzioni:
| Problema | Possibile causa | Soluzione |
|---|---|---|
| Nessuna immagine sullo schermo. | Power cable loose; incorrect input source; device not connected. | Check power connections. Select correct input source (HDMI, AV, etc.). Ensure external device is powered on and connected properly. |
| L'immagine è sfocata. | Messa a fuoco non regolata; proiettore troppo lontano/vicino. | Adjust the focus ring on the lens. Ensure projector is within optimal projection distance. |
| L'immagine è trapezoidale. | Proiettore non perpendicolare allo schermo. | Use the 4D keystone correction feature in the settings menu to adjust the image shape. |
| Nessun suono. | Volume troppo basso; dispositivo audio esterno non collegato; uscita audio selezionata non corretta. | Increase volume. Check external speaker/headphone connection. Ensure correct audio output is selected in settings. |
| Impossibile connettersi al Wi-Fi. | Password errata; fuori portata; problema di rete. | Verificare la password Wi-Fi. Avvicinare il proiettore al router. Riavviare il router e il proiettore. |
9. Specifiche
Key technical specifications for the Ysametp 5G WiFi Bluetooth Projector (Model DE-M8-E-An):
- Marca: Ysametp
- Numero modello: DE-M8-E-An
- Colore: Nero
- Tipo di prodotto: Proiettore portatile
- Tecnologia di connettività: HDMI, USB, Wi-Fi (5G), Bluetooth
- Caratteristiche speciali: Integrated WiFi, Android System, 4D Keystone Correction
- Dispositivi compatibili: Game Consoles, Speakers, Laptops, Smartphones, Tablets
- Risoluzione dello schermo: Nativo 1920 x 1080 (Full HD)
- Risoluzione massima dello schermo: 4096 x 2160 (supporto 4K)
- Tipo di visualizzazione: DLP
- Dimensioni del prodotto: 26L x 23W x 11H centimetri
- Fattore di forma: Portatile
- Tipo di montaggio: Montaggio da tavolo
- Lamp Durata: Fino a 60,000 ore

Image: A visual comparison highlighting the projector's 20,000 Lumens brightness, Native 1080P resolution, and 4K support, contrasting it with a lower specification projector.
10. Garanzia e supporto
The Ysametp Projector comes with a 3-year service warranty. For technical support or warranty claims, please contact Ysametp customer service through your purchase platform or the official Ysametp websito.