
1. Introduzione
This manual provides essential information for the safe and effective installation, operation, and maintenance of your DIHOOL AC DC Circuit Breaker with IP65 Din Box. This device is designed to provide protection for various electrical systems, including photovoltaic solar panel arrays, solar charge controllers, batteries, power inverters, household lighting, and small motor control applications.
The circuit breaker features a robust IP65-rated enclosure, multiple protection mechanisms, and a non-polarized design for simplified wiring. Please read this manual thoroughly before installation and use.

Immagine 1.1: Passoview of the DIHOOL Circuit Breaker Box, highlighting overload protection, short circuit protection, and electrical isolation.
2. Informazioni sulla sicurezza
AVVERTIMENTO: I lavori elettrici devono essere eseguiti solo da personale qualificato. Il mancato rispetto di queste istruzioni di sicurezza può causare scosse elettriche, incendi o lesioni gravi.
- Scollegare sempre l'alimentazione prima di installare o effettuare la manutenzione dell'interruttore automatico.
- Assicurarsi che tutti i cablaggi siano conformi alle normative elettriche locali e nazionali.
- Non superare il volume specificatotage valori nominali di corrente del dispositivo.
- Verify all connections are secure to prevent loose contacts and overheating.
- Keep the enclosure lid closed and sealed to maintain IP65 protection.
- Do not modify the circuit breaker or its enclosure.
3. Caratteristiche del prodotto
- IP65 Circuit Breaker DIN Rail Box: Constructed from durable PC+ABS material, offering high impact resistance, high heat resistance, and excellent dimensional stability. It is V1 grade flame retardant, resistant to acid, alkali, solvents, and UV radiation. The transparent cover allows for easy visual inspection of the circuit breaker status. This 3-way box provides ample space for convenient wiring and installation.
- Interruttore automatico: Features a built-in arc squelching magnet for high arc extinction, a flame-retardant enclosure, silver contacts, and pure copper coils to ensure high quality and reliable performance.
- Protezione multipla: Provides isolation, short circuit protection (for 48-400V DC or 90-400V AC systems), and overload protection with a C-curve trip characteristic and thermal magnetic trip mechanism. It is suitable for systems ranging from 12V-400V DC or 90-400V AC.
- Non-Polarized Design: The circuit breaker does not require polarity distinction, allowing for connection in either direction. This simplifies installation and reduces wiring errors, making it ideal for applications where polarity may reverse, such as reversible motors, battery charge/discharge switching, bidirectional current protection (EV charging/discharging circuits, solar power systems), and industrial reversible drive systems.
- Ampia gamma di cavi: Includes two types of IP68 cable glands. One-hole glands are suitable for 2-conductor wires ranging from 9-16mm (0.35-0.63 inches). Two-hole glands are suitable for wires ranging from 4-6mm (0.15-0.23 inches).

Image 3.1: High-quality housing features, including flame retardancy, UV resistance, and IP65 waterproof rating.

Image 3.2: Comparison of IP44 and IP65 waterproof ratings, showing the enhanced dust-proof and splash-proof design.

Image 3.3: Details on the upgraded shell material (ABS+PC+Flame retardant) for improved outdoor use, UV-proof, impact resistance, and longer service life.

Image 3.4: Illustration of the electromagnetic arc quenching mechanism with built-in magnets for accelerated arc extinction.

Immagine 3.5: Dettagliata view of the circuit breaker's internal components, including the arc extinction chamber, electromagnetic trip, silver alloy contacts, and tunnel type terminal.
4. Contenuto della confezione
Verificare che tutti gli articoli siano presenti nel pacco:
- 1x DIHOOL AC DC Circuit Breaker with IP65 Din Box (10 Amp)
- 2x viti di montaggio
- 4x Crimp Ferrules for wiring
- 4x Rubber Plugs for screw holes
- 1x Insulating Tape
- Cable Glands (quantity and type as per order)
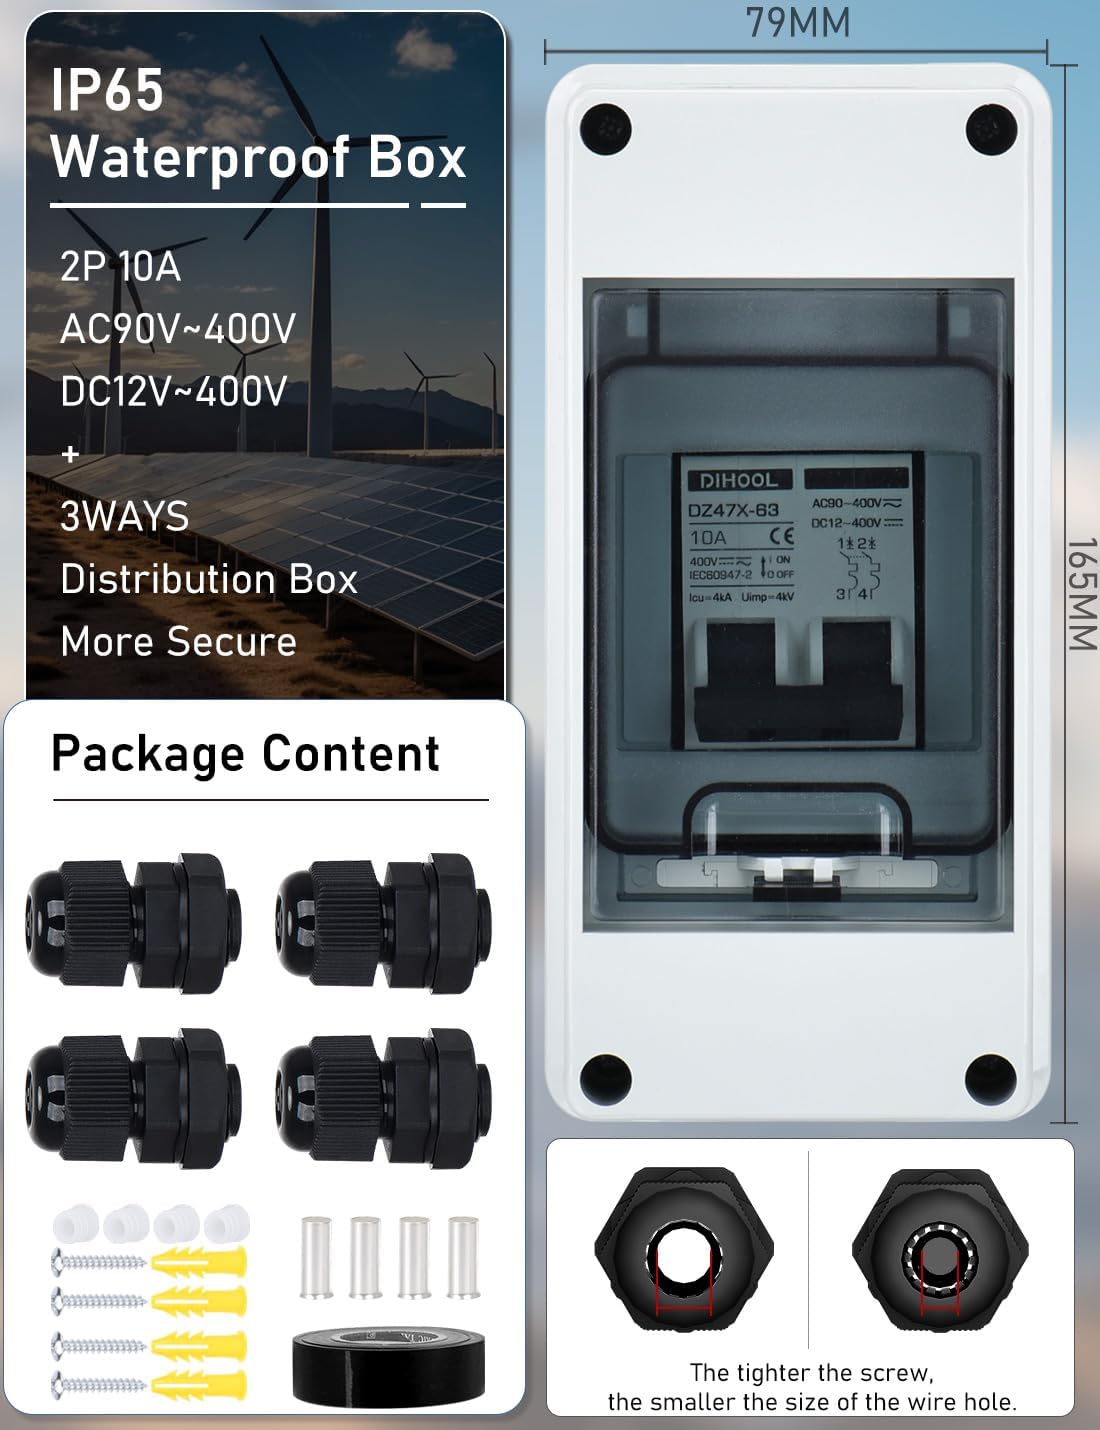
Image 4.1: Visual representation of the package contents, including the circuit breaker box, cable glands, screws, crimp ferrules, and insulating tape. Also shows box dimensions.
5. Specifiche
| Attributo | Valore |
|---|---|
| Marca | DIHOOL |
| Numero di modello | HT3-10A |
| Corrente dell'adattatore CA | 10 Amps |
| Materiale | Acrilonitrile-butadiene-stirene (ABS), Policarbonato (PC) |
| Numero di circuiti | 2 |
| Tipo di fase | Monofase |
| Voltage | 12V - 400V (DC), 90V - 400V (AC) |
| Cosatage | 120 watts (for 12V system) |
| Peso dell'articolo | 1.12 libbre |
| Dimensioni del prodotto | 3.86 x 3.15 x 9.77 pollici |
| Tipo di montaggio | Montaggio a innesto |
| UV Proof Level | High (5 stars) |

Image 5.1: Comparison of installation space between HT3-DZ47X (larger) and HT2-DZ47X (smaller) models, highlighting dimensions and material differences.
6. Configurazione e installazione
Follow these steps for proper installation of your circuit breaker box:
- Preparare la superficie di montaggio: Choose a suitable location for mounting. For outdoor installations, vertical mounting is crucial to prevent water ingress through panel gaps.
- Fori di montaggio del trapano: Open the lid of the waterproof box. Use the box as a template to mark the screw hole positions on the wall. Drill holes with an appropriate drill bit and insert expansion tubes if necessary.
- Mount the Box: Fix the box to the wall using the provided screws.
- Install Cable Glands: Insert the waterproof cable glands into the designated holes on the box. Screw the lock nut tightly from the inside.
- Connessioni dei cavi:
- Strip the insulation from your cables to the appropriate length.
- Insert the cable through the gland and connect it to the circuit breaker terminals. Use the provided crimp ferrules to ensure tight and secure connections.
- If the cable is too thin for the gland, use the provided insulating tape to seal the cable with the gland for a waterproof seal.
- Refer to the wiring diagrams below for AC and DC system connections.
- Fissare il coperchio: After wiring, cover the circuit breaker box with its lid and fix it with the remaining screws. Insert the rubber plugs into the screw holes on the box cover to prevent rust and enhance waterproofing.

Image 6.1: Step-by-step installation method for the 3-way waterproof box, showing wire connection, wall drilling, and lid covering.

Image 6.2: Detailed assembly instructions for the waterproof cable gland, showing insertion, tightening, cable insertion, and sealing.

Image 6.3: Close-up of screw installation and the waterproof rubber ring, along with cable gland details for 2-10mm² cables.

Image 6.4: Important note regarding screw installation: use a manual screwdriver to avoid stripping the plastic lid.

Image 6.5: Illustration emphasizing vertical mounting for outdoor use to prevent water ingress, contrasting with incorrect horizontal mounting.
Schemi elettrici
The non-polarized design allows for flexible wiring. Below are typical wiring configurations for AC and DC systems.
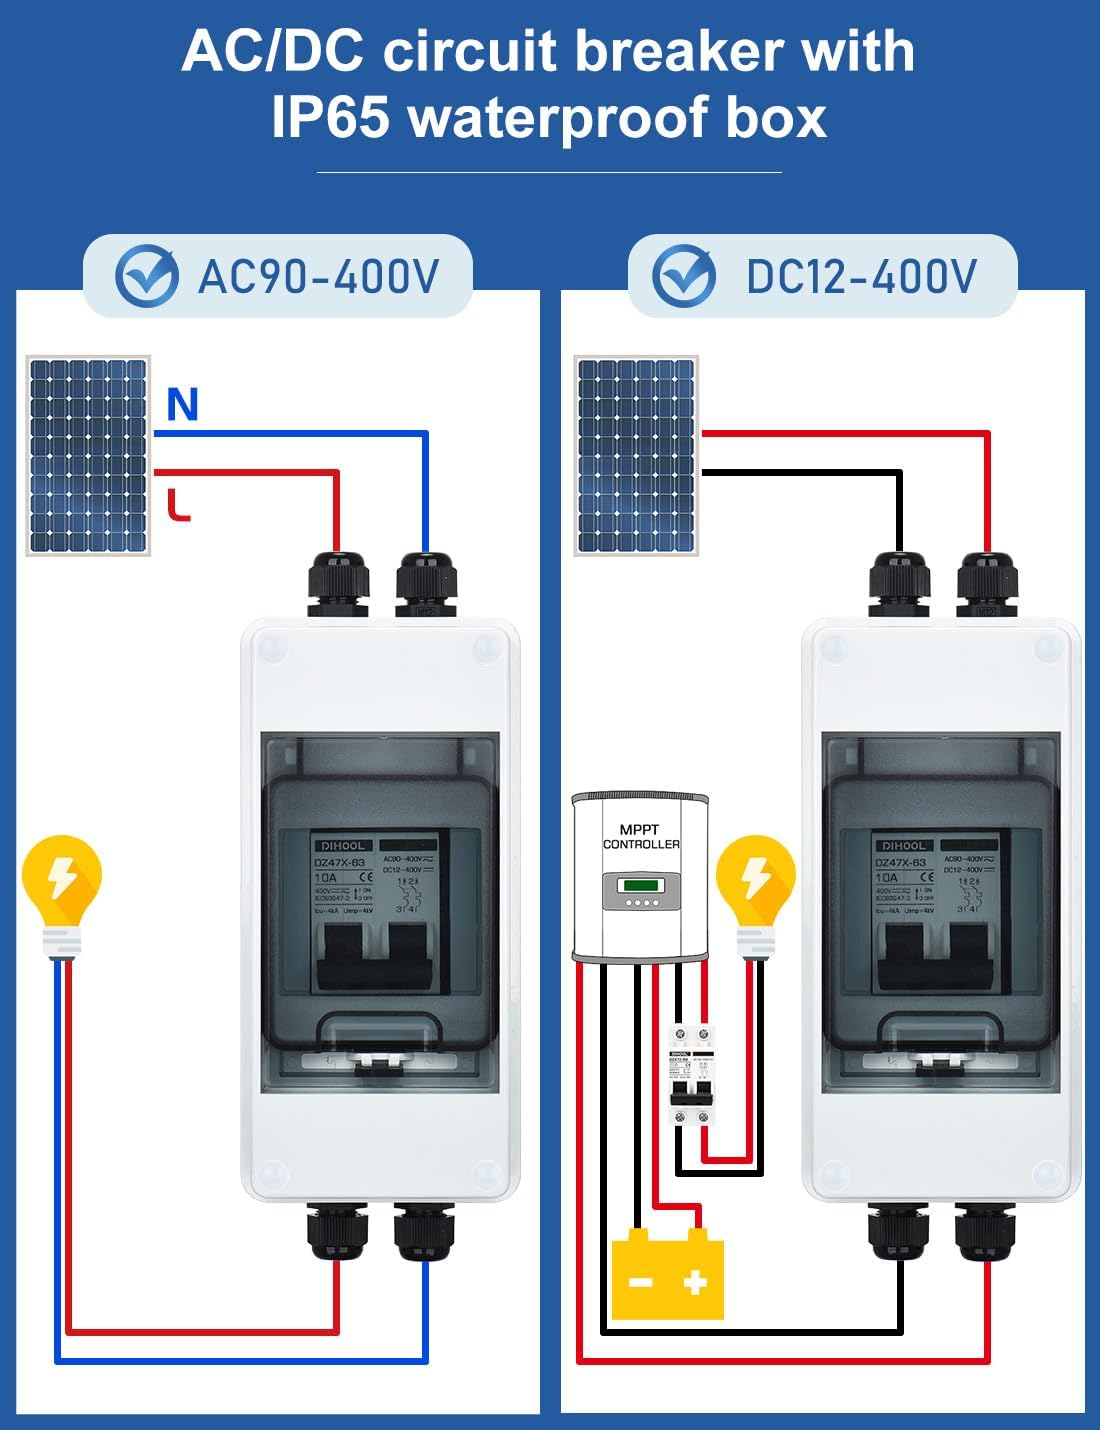
Image 6.6: Wiring diagrams for connecting the circuit breaker in both AC (90-400V) and DC (12-400V) systems, showing connections to solar panels, MPPT controller, battery, and load.
7. Istruzioni per l'uso
The DIHOOL AC DC Circuit Breaker operates as a standard miniature circuit breaker. The toggle switch on the breaker indicates its status:
- SOPRA: Power is flowing through the circuit.
- OFF: Power to the circuit is interrupted.
- INCIAMBULATO: The breaker has automatically switched to the OFF position due to an overload or short circuit.
To restore power after a trip, first identify and resolve the cause of the trip. Then, firmly push the toggle switch to the OFF position before pushing it back to the ON position.
Due to its non-polarized nature, the input and output connections are reversible. This means the left/right polarity sequence and the cable in/out direction can be reversed without affecting functionality, simplifying installation in various setups.

Image 7.1: Illustration demonstrating the non-polar nature of the circuit breaker, allowing for both top-in/bottom-out and bottom-in/top-out wiring configurations.
8. Manutenzione
Regular maintenance helps ensure the longevity and reliable operation of your circuit breaker:
- Ispezione visiva: Periodically inspect the circuit breaker box for any signs of physical damage, cracks, or discoloration. Check the transparent lid for clarity.
- Verifica della connessione: Ensure all wire connections remain tight and secure. Loose connections can lead to overheating and potential hazards.
- Pulizia: Keep the exterior of the box clean and free from dust, dirt, and moisture. Use a soft, dry cloth for cleaning. Do not use abrasive cleaners or solvents.
- Integrità del sigillo: Verify that the cable glands and rubber plugs for the screw holes are properly seated and sealed to maintain the IP65 waterproof rating.
9. Risoluzione Dei Problemi
If you encounter issues with your circuit breaker, consider the following common troubleshooting steps:
- L'interruttore scatta frequentemente:
- Sovraccarico: The connected load may be drawing too much current. Reduce the load or ensure the circuit capacity matches the demand.
- Corto circuito: A direct connection between live and neutral/ground wires. Inspect wiring for damage, loose connections, or faulty appliances.
- Apparecchio difettoso: Disconnect appliances one by one to identify a malfunctioning device.
- Nessuna alimentazione al circuito:
- Breaker in OFF position: Check if the breaker is simply switched off.
- Collegamenti allentati: Inspect all wiring connections within the box and at the load for tightness.
- Problema di alimentazione a monte: Check the main power supply or any upstream breakers/fuses.
- Acqua all'interno della scatola:
- Improper Gland Installation: Ensure cable glands are tightened correctly around the cables.
- Missing Rubber Plugs: Verify all screw holes on the lid have their rubber plugs inserted.
- Horizontal Mounting (Outdoor): If mounted horizontally outdoors, water can ingress. Re-mount vertically.
- Damaged Enclosure: Inspect the box for cracks or damage that could compromise the seal.
If the problem persists after performing these checks, consult a qualified electrician.
10. Informazioni sulla garanzia
This DIHOOL AC DC Circuit Breaker comes with a Garanzia di 2 anno from the date of purchase. This warranty covers defects in materials and workmanship under normal use. It does not cover damage resulting from improper installation, misuse, unauthorized modifications, or acts of nature.
Conservare la prova d'acquisto per eventuali richieste di garanzia.
11. Supporto
For technical assistance, product inquiries, or warranty claims, please contact DIHOOL customer support through the retailer where the product was purchased or visit the official DIHOOL websito per le informazioni di contatto.
When contacting support, please have your product model number (HT3-10A) and purchase details readily available.