
1. Introduzione
Thank you for choosing the ENDORFY Signum 300 Air ATX PC Case. This manual provides essential information for the proper assembly, operation, and maintenance of your new PC case. Please read these instructions carefully before beginning the installation process to ensure optimal performance and longevity of your system.
Caratteristiche principali:
- Flusso d'aria ottimizzato: Features a mesh front panel and support for up to eight fans, including four pre-installed ENDORFY Stratus 120 PWM fans, ensuring efficient cooling.
- Protezione dalla polvere: Equipped with removable magnetic dust filters for easy cleaning and protection against dust accumulation.
- Pannello laterale in vetro temperato: A durable tempered glass side panel provides a clear view dei tuoi componenti interni.
- Interni spaziosi: Accommodates GPUs up to 325mm in length, CPU coolers up to 161mm in height, and liquid cooling radiators up to 360mm (front) or 240mm (top).
- Opzioni di archiviazione: Supports two 3.5-inch hard drives and up to four 2.5-inch drives.
2. Contenuto della confezione
Verificare che tutti i componenti siano presenti nella confezione:
- ENDORFY Signum 300 Air PC Case
- 4x ENDORFY Stratus 120 PWM Fans (pre-installed)
- Scatola degli accessori (viti, fascette, distanziatori, ecc.)
- Manuale dell'utente (questo documento)

Figura 2.1: Esploso view showing all components included with the ENDORFY Signum 300 Air case, including the chassis, panels, fans, and accessory box.
3. Componente suview
Familiarize yourself with the various parts of your ENDORFY Signum 300 Air PC case.

Figura 3.1: Complessivamente view of the ENDORFY Signum 300 Air PC case, showcasing the mesh front panel and tempered glass side panel.

Figura 3.2: Davanti view of the case, highlighting the hexagonal mesh design for optimal airflow.

Figura 3.3: Close-up of the top I/O panel, featuring USB 3.0 ports, audio jacks, and power/reset buttons.
4. Configurazione e installazione
4.1. Preparazione
- Assicuratevi di avere uno spazio di lavoro pulito e ben illuminato.
- Gather necessary tools: Phillips head screwdriver, cable ties (some included).
- Scaricare l'elettricità statica toccando un oggetto metallico collegato a terra prima di maneggiare i componenti.
4.2. Apertura della custodia
- Posizionare la custodia su una superficie piana e stabile.
- Carefully remove the four thumb screws securing the tempered glass side panel.
- Gently lift and remove the tempered glass panel, setting it aside on a soft, non-abrasive surface to prevent scratches.
- Remove the solid metal side panel by unscrewing its two thumb screws and sliding it backward.
4.3. Installazione della scheda madre
- Installare la schermatura I/O nell'apertura posteriore del case.
- Align your motherboard with the pre-installed standoffs. Ensure the motherboard type (Mini ATX, ATX) is compatible.
- Fissare la scheda madre con le viti appropriate presenti nella scatola degli accessori.
4.4. Installazione dell'unità di alimentazione (PSU)
- Posizionare l'alimentatore nell'apposito vano nella parte inferiore posteriore del case.
- Ensure the PSU fan faces downwards (if there's a filtered vent) or upwards, depending on your cooling preference.
- Fissare l'alimentatore con le viti presenti nella scatola degli accessori.
4.5. Installazione dell'unità di archiviazione
The case supports both 3.5-inch HDDs and 2.5-inch SSDs.
- HDD da 3.5 pollici: Install into the drive cage located beneath the PSU shroud. Slide the drive into the tray and secure it.
- 2.5-inch SSDs: Mount SSDs to the dedicated brackets behind the motherboard tray or on top of the PSU shroud. Secure with screws.
4.6. Installazione della scheda grafica (GPU)
- Rimuovere le coperture degli slot PCIe necessari dalla parte posteriore del case.
- Insert your GPU into the appropriate PCIe slot on the motherboard.
- Fissare la GPU con le viti. Il case supporta GPU fino a 325 mm di lunghezza.
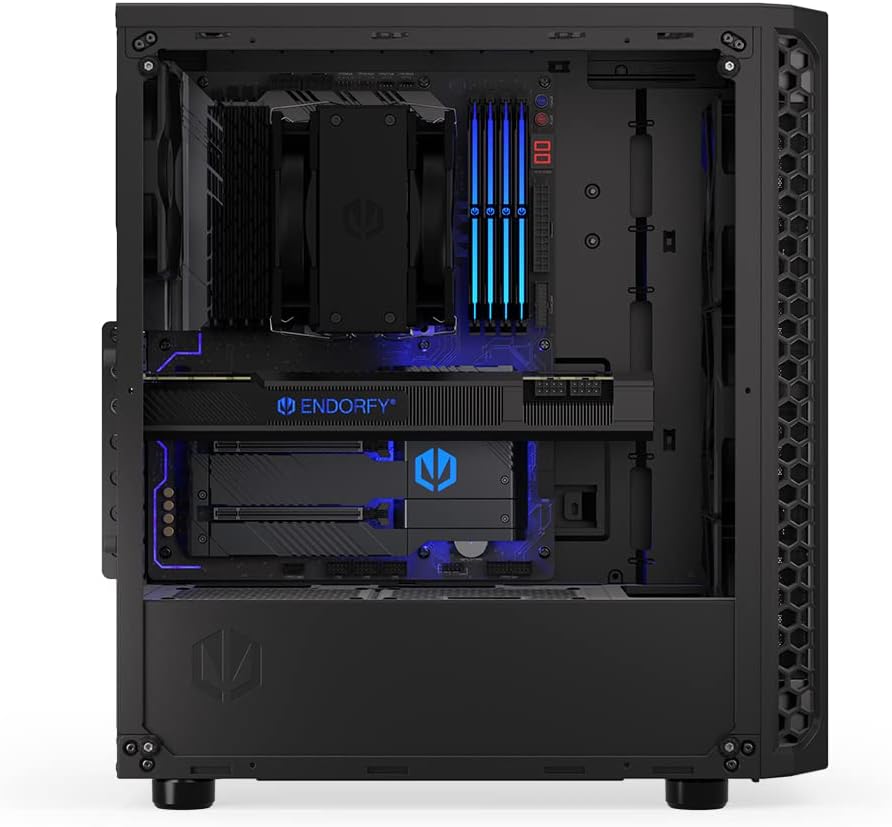
Figura 4.1: Interno view illustrando il ample space for installing a long graphics processing unit (GPU).
4.7. Installazione di ventole e sistemi di raffreddamento
The Signum 300 Air comes with four pre-installed Stratus 120 PWM fans. Additional fans or liquid cooling radiators can be installed.
- Davanti: Supports up to 3x 120mm or 2x 140mm fans, or a 240/360mm radiator.
- Superiore: Supports up to 2x 120mm or 2x 140mm fans, or a 240mm radiator.
- Posteriore: Supports 1x 120mm fan (one pre-installed).

Figura 4.2: Illustration of the pre-installed fans and potential locations for additional cooling components within the case.
4.8. Gestione dei cavi
Utilizzate i fori e i punti di fissaggio dietro il vassoio della scheda madre per instradare e fissare i cavi. Questo migliora il flusso d'aria e l'estetica.

Figura 4.3: View from the rear side, demonstrating the space and routing options for effective cable management.
5. Funzionamento
5.1. Accensione
Once all components are installed and cables are connected, press the power button on the top I/O panel to start your system.
5.2. Considerazioni sul flusso d'aria
The Signum 300 Air is designed for optimal airflow. Ensure that the front mesh panel is unobstructed to allow for maximum air intake. The pre-installed PWM fans adjust their speed based on system temperature, providing a balance between cooling performance and noise levels.

Figura 5.1: Visual representation of the optimal airflow design, illustrating how air moves through the case for efficient cooling.
6. Manutenzione
6.1. Pulizia del filtro antipolvere
The Signum 300 Air features removable magnetic dust filters on the top, front, and bottom. Regular cleaning is crucial for maintaining optimal airflow and preventing dust buildup inside your PC.
- Gently pull off the magnetic dust filters.
- Clean the filters using a soft brush, vacuum cleaner, or by rinsing them with water. Ensure they are completely dry before reattaching.
- Reattach the filters to their respective positions.
6.2. Pulizia generale
- Utilizzare un morbido, damp cloth to wipe down the exterior surfaces of the case. Avoid harsh chemicals.
- Per il pannello in vetro temperato, utilizzare un detergente per vetri e un panno in microfibra per evitare aloni.
- Utilizzare periodicamente aria compressa per eliminare la polvere dai componenti interni e dalle pale della ventola.
7. Risoluzione Dei Problemi
7.1. No Power After Assembly
- Check all power connections: PSU to wall outlet, PSU to motherboard (24-pin and CPU 8-pin), and GPU power cables.
- Assicurarsi che il cavo dell'interruttore di alimentazione del pannello frontale sia collegato correttamente al connettore del pannello frontale della scheda madre.
- Verificare che l'interruttore dell'alimentatore sia in posizione "ON".
7.2. Rumore eccessivo
- Identify the source of the noise (fans, HDD, etc.).
- Ensure all fans are securely mounted and free from cable obstructions.
- Check if fan speeds are set appropriately in your motherboard's BIOS/UEFI or operating system software.
7.3. Overheating Components
- Verify that all case fans are spinning and oriented correctly for optimal airflow (intake at front, exhaust at rear/top).
- Clean any clogged dust filters.
- Ensure CPU cooler and GPU fans are functioning correctly.
8. Specifiche
| Caratteristica | Specificazione |
|---|---|
| Nome del modello | Signum 300 Air |
| Numero modello articolo | EY2A005 |
| Marca | ENDORFIA |
| Tipo di caso | Mid Tower |
| Compatibilità della scheda madre | Mini ATX, ATX |
| Materiale | Metallo, vetro temperato |
| Colore | Nero |
| Dimensioni del prodotto (LxWxH) | 8.5 x 17.6 x 16.26 pollici |
| Peso dell'articolo | 11.55 libbre |
| Liquidazione GPU | Fino a 325 mm |
| Altezza del dispositivo di raffreddamento della CPU | Fino a 161 mm |
| Supporto radiatore (anteriore) | 240 mm / 360 mm |
| Supporto radiatore (superiore) | 240mm |
| Ventole preinstallate | 4x Stratus 120 PWM Fans |
| Dimensioni della ventola | 120 millimetri |
| Alloggiamenti per unità (3.5") | 2 |
| Alloggiamenti per unità (2.5") | Fino a 4 |
| Porte USB 3.0 | 2 |
9. Garanzia e supporto
9.1. Informazioni sulla garanzia
ENDORFY products are manufactured to high-quality standards. For specific warranty terms and conditions, please refer to the warranty card included with your product or visit the official ENDORFY websito. Conservare la prova d'acquisto per eventuali reclami in garanzia.
9.2. Supporto tecnico
If you encounter any issues or have questions regarding your ENDORFY Signum 300 Air PC case, please contact ENDORFY customer support through their official website. Provide your product model number (EY2A005) and a detailed description of the issue for efficient assistance.