1. Prodotto finitoview
The Phanteks Eclipse G500A DRGB is a high-performance mid-tower chassis designed to accommodate modern PC components with excellent airflow and integrated D-RGB lighting. It features an Ultra-fine Performance Mesh on both the front and top panels, ensuring optimal cooling and dust filtration.

Figure 1: Phanteks Eclipse G500A DRGB Mid Tower Case, Matte White.
Caratteristiche principali:
- Design ad alto flusso d'aria: Ultra-fine Performance Mesh on front and top panels for superior cooling and dust filtration.
- Illuminazione D-RGB integrata: Built-in D-RGB lighting on the front and side, controllable via manual buttons or motherboard synchronization.
- Ventole preinstallate: Includes three high-performance M25-140 D-RGB fans.
- Ampio supporto di raffreddamento: Supports up to 420mm radiators in the front and 360mm in the top.
- Interni spaziosi: Accommodates full-length GPUs and offers vertical GPU mounting options (with optional bracket).
- Archiviazione flessibile: Multiple HDD and SSD locations, including dedicated SSD brackets and stackable HDD bays.
- I/O frontale moderno: Features 10Gbps USB-C, 2x USB 3.0, Microphone/Headphone Combo, Power button, and D-RGB controls.
2. Configurazione e installazione
This section provides general guidelines for installing components into your Phanteks Eclipse G500A DRGB chassis. Always refer to your component manuals for specific installation instructions.
2.1 Preparazione del telaio
Before installing components, ensure the chassis is placed on a stable, flat surface. Remove the side panels by gently pulling them open (they are hinged) to access the interior.
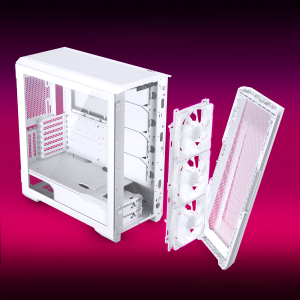
Figure 2: The removable front panel allows for easy installation of fans and radiators.
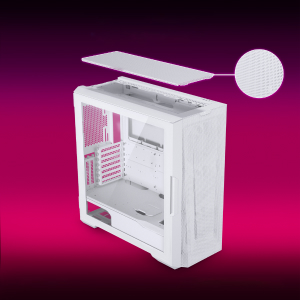
Figure 3: The removable top mesh panel facilitates fan and radiator installation.
2.2 Installazione della scheda madre
The G500A supports ATX, micro-ATX, mini-ITX, and E-ATX motherboards (up to 280mm wide). Install the necessary standoffs for your motherboard form factor, then secure the motherboard with screws.
2.3 Installazione dell'unità di alimentazione (PSU).
Install the PSU at the bottom rear of the chassis. The G500A supports PSUs up to 250mm in length (195mm if all 4 bottom HDD positions are used).
2.4 Installazione del dispositivo di archiviazione
The case offers extensive storage options:
- SSD da 2.5": Up to 9 dedicated 2.5" drive bays are included.
- HDD da 3.5": Two stackable 3.5" HDD bays are included, expandable up to a total of 10 HDD bays.

Figure 4: Multiple storage options for 2.5" and 3.5" drives.
2.5 Installazione della scheda grafica (GPU)
The G500A supports graphics cards up to 435mm in length. For vertical GPU mounting, an optional bracket (PH-VGPUKT4.0_03) or riser cable is required.
2.6 Installazione del sistema di raffreddamento
The chassis supports various fan and radiator configurations:
- Supporto dei fan:
- Front: 3x 120mm or 3x 140mm (3x 140mm pre-installed)
- Superiore: 3x 120mm o 3x 140mm
- Posteriore: 1x 120mm o 1x 140mm
- Liquid Cooling Radiator Support:
- Front: Up to 360mm (120mm radiator) or 420mm (140mm radiator)
- Top: Up to 360mm (120mm radiator) or 280mm (140mm radiator)
- Posteriore: 120mm
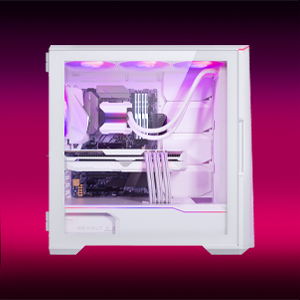
Figure 5: High-end cooling compatibility with various fan and radiator sizes.
2.7 Gestione dei cavi
The G500A provides ample space and Velcro ties for efficient cable management, ensuring a clean interior and optimal airflow. Cover doors help to conceal cables on the backside of the motherboard tray.
2.8 Video di installazione
Video 1: Detailed PC Build Guide in the Phanteks Eclipse G500A (13:33).
Video 2: Another comprehensive PC assembly guide featuring the Phanteks Eclipse G500A (14:01).
3. Istruzioni per l'uso
3.1 Pannello I/O frontale
Il pannello I/O frontale fornisce un comodo accesso alle porte e ai controlli essenziali:
- Pulsante di accensione: Per accendere/spegnere il sistema.
- Porte USB 3.0 (x2): Per collegare dispositivi USB 3.0.
- USB-C Gen2 Port (x1): For high-speed USB-C connectivity.
- Jack combinato microfono/cuffie: Per l'ingresso e l'uscita audio.
- Pulsante modalità D-RGB: Cycles through pre-programmed D-RGB lighting effects.
- Pulsante colore D-RGB: Cambia il colore dell'illuminazione D-RGB.

Figure 6: Front I/O panel with USB-C, USB 3.0, audio, and D-RGB controls.
3.2 Controllo dell'illuminazione D-RGB
The integrated D-RGB lighting can be controlled in two ways:
- Controllo manuale: Use the D-RGB Mode and Color buttons on the front I/O panel to cycle through effects and colors without software.
- Sincronizzazione della scheda madre: Connect the D-RGB controller to a compatible motherboard's D-RGB header to enable software control and synchronization with other D-RGB components.

Figure 7: Integrated D-RGB lighting with included M25-140 D-RGB fans.
4. Manutenzione
Una manutenzione regolare aiuta a garantire prestazioni ottimali e longevità dei componenti del PC.
- Filtrazione della polvere: The Ultra-fine Performance Mesh on the front and top panels acts as a dust filter. Periodically remove these panels and clean the mesh to maintain optimal airflow.
- Pulizia interna: Use compressed air to remove dust from inside the chassis, especially from fans, heatsinks, and other components. Ensure the system is powered off and unplugged before cleaning.
- Pulizia esterna: Pulire le superfici esterne con un panno morbido, damp panno. Evitare detergenti abrasivi o solventi.
5. Risoluzione Dei Problemi
Questa sezione affronta i problemi più comuni che potresti riscontrare con il case del tuo PC.
5.1 Problemi di alimentazione
- Il sistema non si accende:
- Ensure all power cables (24-pin ATX, 8-pin CPU, GPU power) are securely connected to the motherboard and components.
- Verificare che l'interruttore dell'alimentatore sia in posizione "ON".
- Verificare che il cavo dell'interruttore di alimentazione del pannello frontale sia collegato correttamente al connettore F_PANEL della scheda madre.
5.2 D-RGB Lighting Issues
- D-RGB not lighting up or incorrect colors:
- Ensure the D-RGB cables from the fans and LED strips are correctly connected to the integrated D-RGB controller.
- If using motherboard synchronization, ensure the D-RGB controller is connected to the motherboard's D-RGB header and that the motherboard's lighting software is configured correctly.
- Verify the D-RGB controller is receiving power (e.g., via SATA power connector).
- Try cycling through modes and colors using the front I/O buttons to rule out software issues.
5.3 Fan Noise or Malfunction
- Rumore eccessivo della ventola:
- Controllare che sulle pale della ventola non vi sia accumulo di polvere e, se necessario, pulirle.
- Ensure fans are securely mounted and not vibrating against the chassis.
- Verify fan speeds are controlled appropriately by the motherboard or fan controller.
- La ventola non gira:
- Check fan power connections to the motherboard or fan hub.
- Ensure fan headers are enabled in the BIOS/UEFI settings.
6. Specifiche
Detailed technical specifications for the Phanteks Eclipse G500A DRGB Mid Tower Case.
| Caratteristica | Specificazione |
|---|---|
| Nome del modello | Eclipse G500A DRGB, White |
| Numero modello articolo | PH-EC500GA_DMW01A |
| Fattore di forma | Mid Tower |
| Dimensioni (LxWxH) | 19.69 x 9.45 x 20.28 pollici (500 x 240 x 515 mm) |
| Peso dell'articolo | 23.2 libbre |
| Materiale | Telaio in acciaio, vetro temperato |
| Supporto per la scheda madre | ATX, micro-ATX, mini-ITX, E-ATX (fino a 280 mm di larghezza) |
| Slot di espansione | 7 |
| Supporto GPU verticale | Yes (with optional bracket PH-VGPUKT4.0_03 or riser cable) |
| Alloggiamenti per unità interne da 3.5" | 10 (2x included, expandable) |
| Alloggiamenti per unità interne da 2.5" | 9 (9x inclusi) |
| I/O frontale | 2x USB 3.0, USB-C Gen2, Microphone/Headphone Combo, Power Button, D-RGB Mode, D-RGB Color |
| Ventole preinstallate | 3x M25-140 D-RGB (Front) |
| Lunghezza massima della GPU | 435 mm / 17.2 pollici |
| Altezza massima del dissipatore della CPU | 185 millimetri |
| Lunghezza massima dell'alimentatore | 195mm (if all 4 bottom HDD positions used) / 250mm (if 2 bottom HDD used) |
| Metodo di raffreddamento | Ventilatore, Acqua |
7. Garanzia e supporto
Phanteks products are manufactured with high-quality standards. For warranty information and technical support, please refer to the official Phanteks websito o contattare il loro servizio clienti.
Informazioni sui contatti:
- Websito: www.phanteks.com
- Phanteks Taiwan Inc.: 11F., n. 150, Jian 1st Rd., distretto di Zhonghe, Nuova città di Taipei 235
- Importer EU (Axpertec Int B.V.): Sydneystraat 33, 3047 BP Rotterdam, The Netherlands
- Importer US (Axpertec Inc.): 20465 E Walnut Dr. N, City of Industry, California 91789, United States

Figure 8: Phanteks company and importer details, along with compliance markings (CE, UKCA, RoHS).