
1. Introduzione
This manual provides essential instructions for the safe and efficient operation, maintenance, and troubleshooting of your Pretul MOTB-3P Self-Priming Gasoline Water Pump. Please read this manual thoroughly before operating the pump and keep it for future reference.
The Pretul MOTB-3P is a robust 6.5 HP gasoline-powered water pump designed for transferring large volumes of clean water. It is ideal for various applications including irrigation systems, well pumping, agricultural use, and construction sites, especially in areas without easy access to electricity. The pump features an aluminum casing and an iron impeller for durability, and includes a low oil level sensor for engine protection.

Figura 1: Pretul MOTB-3P Self-Priming Gasoline Water Pump. This image shows the complete pump unit with its yellow engine and silver pump housing, encased in a black protective frame.
2. Informazioni sulla sicurezza
Osservare sempre le precauzioni di sicurezza di base per ridurre il rischio di incendi, scosse elettriche e lesioni personali. Il mancato rispetto di queste istruzioni può causare lesioni gravi o mortali.
- Sicurezza del carburante: Gasoline is highly flammable. Always refuel in a well-ventilated area with the engine off and cool. Do not smoke or allow open flames near the pump. Store gasoline in approved containers.
- Fumi di scarico: The engine exhaust contains carbon monoxide, a colorless, odorless, and poisonous gas. Operate the pump only in well-ventilated outdoor areas. Never operate indoors.
- Superfici calde: The engine and muffler become very hot during operation and remain hot for a period after shutdown. Avoid contact to prevent burns.
- Parti mobili: Per evitare lesioni, tenere mani, piedi e indumenti lontani dalle parti in movimento.
- Protezione degli occhi: Always wear appropriate eye protection when operating or servicing the pump.
- Superficie stabile: Operate the pump on a level, stable surface to prevent tipping and fuel spills.
- Solo acqua: This pump is designed for clean water only. Do not pump flammable liquids, corrosive chemicals, or water containing large debris.
- Bambini e animali domestici: Tenere bambini e animali domestici lontani dall'area operativa.
3. Identificazione dei componenti e delle parti
Familiarize yourself with the various components of your water pump using the diagram below.
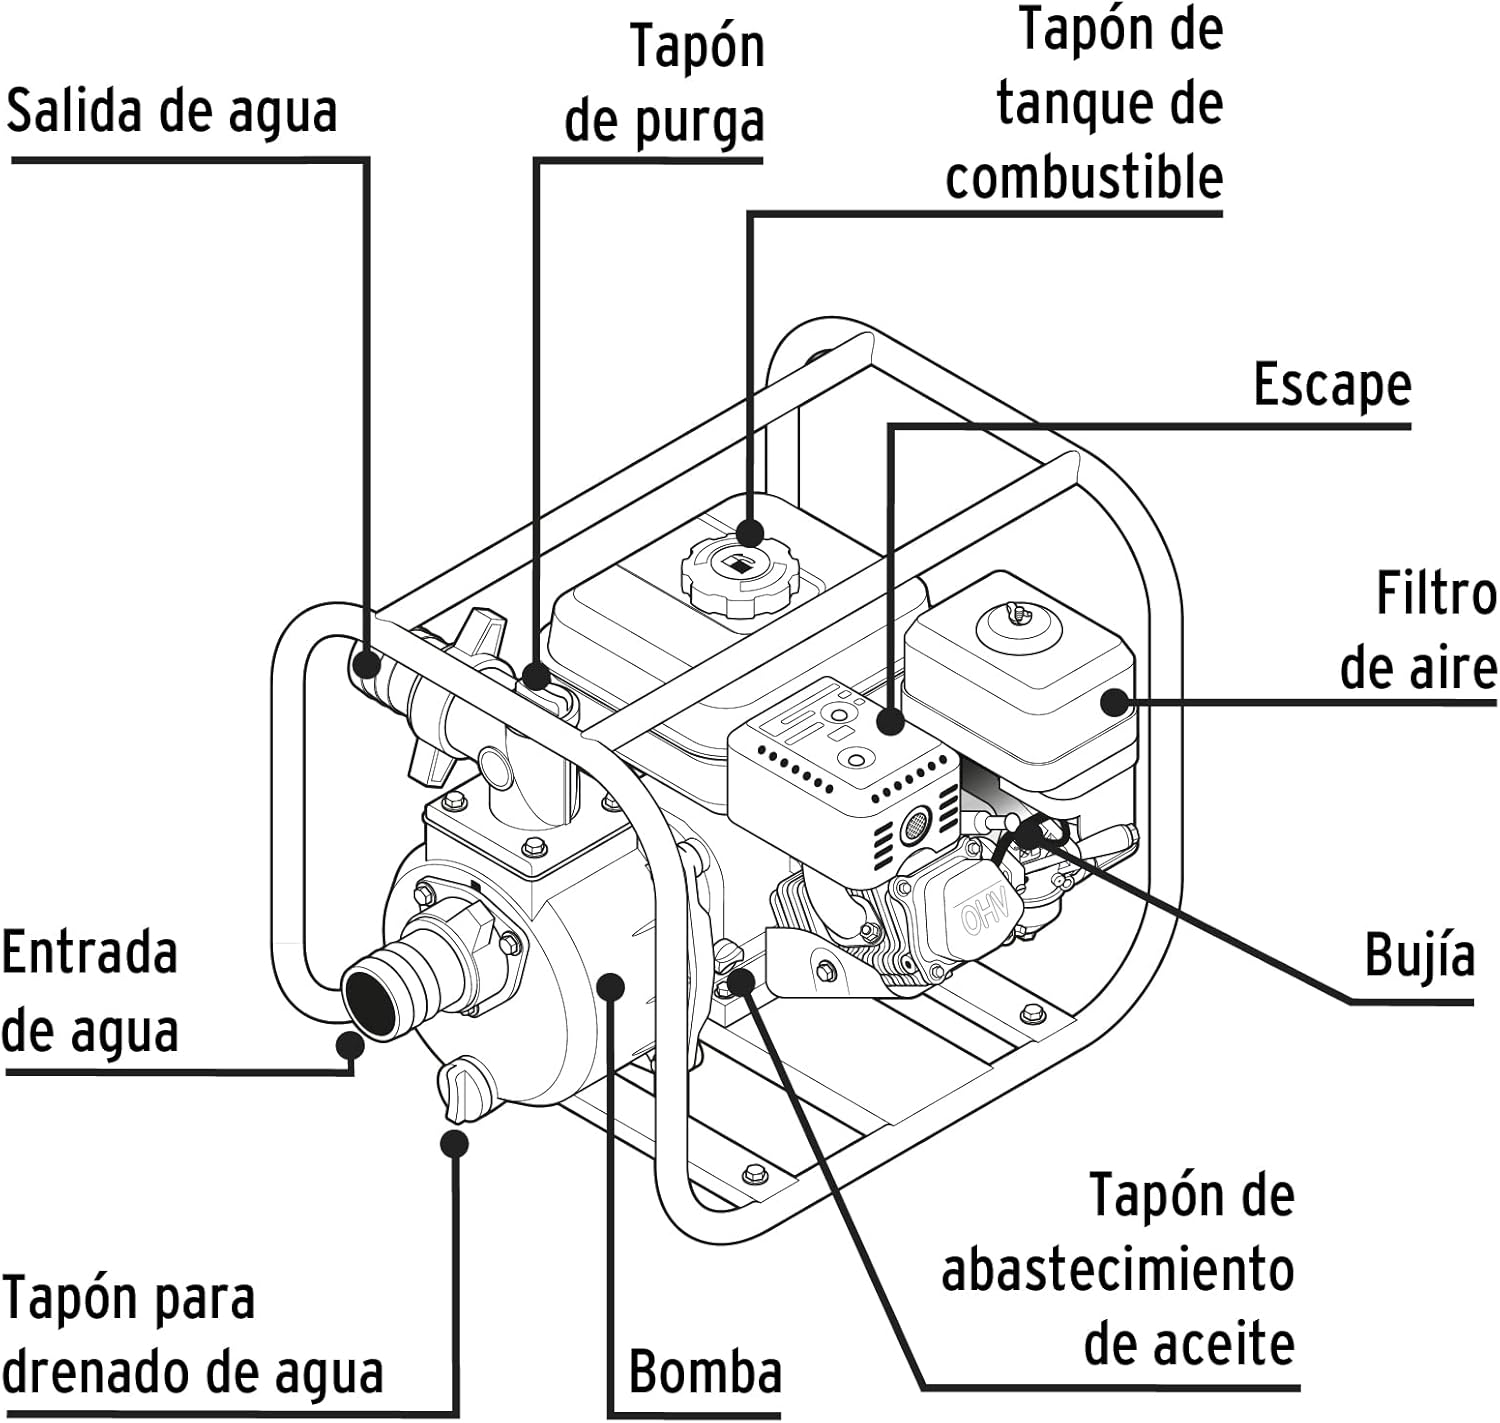
Figura 2: Esploso view diagram identifying key components of the Pretul MOTB-3P water pump. Labels include Water Outlet, Purge Plug, Fuel Tank Cap, Exhaust, Air Filter, Spark Plug, Water Inlet, Water Drain Plug, Pump, and Oil Fill Cap.
- Uscita acqua: Where pumped water exits the unit.
- Purge Plug: Used for priming the pump.
- Tappo del serbatoio del carburante: Access point for adding gasoline.
- Scarico: Discharges engine exhaust gases.
- Filtro dell'aria: Protegge il motore da polvere e detriti.
- Candela: Accende la miscela aria-carburante nel motore.
- Ingresso acqua: Where water enters the pump from the source.
- Tappo di scarico dell'acqua: Utilizzato per drenare l'acqua dall'alloggiamento della pompa.
- Pompa: The main pumping mechanism.
- Tappo di riempimento dell'olio: Access point for adding engine oil.
4. Configurazione e preparazione iniziale
4.1 Disimballaggio e ispezione
Carefully remove the pump from its packaging. Inspect for any damage that may have occurred during shipping. Ensure all components listed in the packaging are present. Refer to Figure 5 for an image of the product packaging.

Figura 5: The retail packaging for the Pretul MOTB-3P water pump, showing key specifications and branding.
4.2 Aggiunta di olio motore
IMPORTANTE: Before starting the engine for the first time, you dovere add 4-stroke engine oil (SAE 10W-30) to the oil reservoir. The engine is shipped without oil. Operating the engine without oil will cause severe damage and void the warranty.
- Posizionare la pompa su una superficie piana.
- Locate the oil fill cap (refer to Figure 2).
- Svitare e rimuovere il tappo di riempimento/astina di livello dell'olio.
- Slowly add SAE 10W-30 4-stroke engine oil until it reaches the upper limit mark on the dipstick or the edge of the oil fill opening. Do not overfill.
- Richiudere saldamente il tappo di riempimento dell'olio.
4.3 Aggiunta di carburante
Utilizzare benzina senza piombo fresca con un numero di ottano pari o superiore a 87. Non utilizzare E85 o carburanti misti.
- Assicurarsi che il motore sia spento e freddo.
- Locate the fuel tank cap (refer to Figure 2).
- Svitare il tappo del serbatoio del carburante.
- Carefully fill the fuel tank, leaving a small air gap at the top to allow for fuel expansion. Do not overfill.
- Richiudere bene il tappo del serbatoio del carburante. Asciugare immediatamente eventuali fuoriuscite di carburante.
4.4 Collegamento dei tubi flessibili
Connect appropriate suction and discharge hoses to the water inlet and outlet ports (refer to Figure 2). Ensure all connections are tight to prevent air leaks, which can affect pump performance. A foot valve with a strainer should be attached to the end of the suction hose to prevent debris from entering the pump and to maintain prime.
4.5 Adescamento della pompa
As a self-priming pump, it still requires initial priming. The pump must be filled with water before starting the engine to create a vacuum for suction.
- Remove the purge plug (priming plug) located on top of the pump housing (refer to Figure 2).
- Slowly fill the pump housing with clean water until it overflows from the priming port.
- Securely replace the purge plug.
5. Funzionamento
5.1 Avviamento del motore
- Ensure the pump is properly primed and hoses are connected.
- Aprire la valvola del carburante (se applicabile).
- Move the choke lever to the "CLOSED" or "START" position (for cold starts).
- Spostare la leva dell'acceleratore in posizione "FAST".
- Tirare la maniglia dell'avviamento a strappo con decisione e dolcezza finché il motore non si avvia. Non lasciare che la corda si ritragga.
- Once the engine starts, gradually move the choke lever to the "OPEN" or "RUN" position as the engine warms up.
5.2 Pompaggio dell'acqua
Once the engine is running smoothly, the pump will begin to draw water. Monitor the water flow and ensure there are no leaks. The pump has a maximum flow rate of 900 L/min, a maximum pumping height of 25 m, and a maximum suction depth of 5 m.
Figura 3: Performance curve illustrating the relationship between pumping height (Altura) and flow rate (Flujo) for the Pretul MOTB-3P. The shaded area indicates the recommended operating range for optimal performance.
5.3 Arresto del motore
- Move the throttle lever to the "SLOW" or "IDLE" position and allow the engine to cool down for a few minutes.
- Portare l'interruttore del motore in posizione "OFF".
- Close the fuel valve (if applicable).
6. Manutenzione
Regular maintenance ensures optimal performance and extends the lifespan of your water pump.
6.1 Controllo e cambio dell'olio motore
- Prima di ogni utilizzo: Controllare il livello dell'olio motore e rabboccare se necessario.
- Prime 20 ore: Cambiare l'olio motore dopo le prime 20 ore di funzionamento.
- Ogni 50 ore o annualmente: Change the engine oil every 50 hours of operation or at least once a year.
6.2 Manutenzione del filtro dell'aria
- Ogni 50 ore o annualmente: Ispezionare e pulire il filtro dell'aria. Sostituirlo se danneggiato o eccessivamente sporco.
6.3 Ispezione della candela
- Ogni 100 ore o annualmente: Inspect the spark plug for wear and proper gap. Clean or replace as needed.
6.4 Pump Housing Drainage
- After each use, especially before storage or in freezing temperatures, drain all water from the pump housing by removing the water drain plug (refer to Figure 2).
6.5 Conservazione
Per la conservazione a lungo termine:
- Svuotare il serbatoio del carburante o aggiungere uno stabilizzatore del carburante.
- Drain the carburetor bowl.
- Cambiare l'olio motore.
- Rimuovere la candela e versare una piccola quantità di olio motore nel cilindro. Tirare l'avviamento a strappo alcune volte per distribuire l'olio, quindi reinstallare la candela.
- Pulire l'esterno della pompa.
- Conservare in un luogo pulito, asciutto e ben ventilato, lontano dalla luce solare diretta e da temperature estreme.
7. Risoluzione Dei Problemi
| Problema | Possibile causa | Soluzione |
|---|---|---|
| Il motore non si avvia | Nessun carburante Basso livello dell'olio Strozzatore non impostato correttamente Problema con la candela Valvola del carburante chiusa | Aggiungi carburante fresco Aggiungere olio motore Regolare la leva dello starter Ispezionare/pulire/sostituire la candela Aprire la valvola del carburante |
| La pompa non si adesca o ha un flusso basso | Pump not filled with water Air leaks in suction hose/connections Suction hose too long or too high Valvola di fondo ostruita Girante danneggiata | Fill pump with water Controllare e serrare tutti i collegamenti Reduce suction lift or hose length Clean foot valve/strainer Contatta il centro di assistenza |
| Engine runs, but no water flow | Pompa non adescata Suction hose blocked Fonte d'acqua vuota | Adescare la pompa Check and clear suction hose Verify water source |
| Vibrazione eccessiva | Pump not on level surface Bulloni allentati Squilibrio della girante | Disporre su una superficie piana Controllare e serrare tutti i bulloni Contatta il centro di assistenza |
8. Specifiche

Figura 4: Dimensions of the Pretul MOTB-3P water pump, showing a height of 40 cm, base width of 37 cm, and depth of 47 cm.
| Caratteristica | Dettaglio |
|---|---|
| Modello | MOTB-3P (26063) |
| Marca | prezzo |
| Tipo di motore | OHV Gasoline Engine, 4-stroke |
| Potenza | 6.5 CV |
| Energia | 4.9 kW |
| Diametro ingresso / uscita | 3 pollici (75 mm) |
| Portata massima | 900 litri al minuto |
| Maximum Pumping Height | 25 metri |
| Massima profondità di aspirazione | 5 metri |
| Materiale | Alluminio (casing), Iron (impeller) |
| Tipo di carburante | Benzina senza piombo |
| Tipo di olio motore | SAE 10W-30 4-stroke engine oil |
| Dimensioni (L x P x A) | 47 cm x 37 cm x 40 cm (approximate, from image) |
| Peso | 24.22 kg |
| Caratteristiche speciali | Low oil level sensor, Heavy duty full frame protection |
9. Garanzia e supporto
For warranty information and customer support, please refer to the documentation included with your product or visit the official Pretul websito. Potresti anche considerare l'acquistoasing extended protection plans for accidental damage, such as those offered by Assurant.
- Piani di protezione: Options for 2, 3, or 4 years of accidental damage coverage are available.
- Produttore: Truper SA de CV (as listed in specifications).
- Pretul Brand Store: Visit the Pretul Store on Amazon