1. Introduzione
This manual provides detailed instructions for the setup, operation, and maintenance of your TOMLOV DM209 Digital Microscope. This device is designed for detailed observation and analysis, featuring a 7-inch IPS display, 2K HDMI output, and a 26MP Sony CMOS sensor, offering up to 1200x magnification. Please read this manual thoroughly before using the microscope to ensure proper function and longevity.
2. Informazioni sulla sicurezza
- Assicurarsi che il microscopio sia posizionato su una superficie stabile e piana per evitare che si ribalti.
- Non esporre il dispositivo a temperature estreme, umidità o luce solare diretta.
- Keep the microscope away from water and other liquids.
- Utilizzare esclusivamente l'adattatore di alimentazione fornito.
- Avoid touching the lens directly with your fingers. Use a soft, lint-free cloth for cleaning.
- Non tentare di smontare o riparare il microscopio da soli. Contattare l'assistenza clienti per assistenza.
3. Contenuto della confezione
Verificare che tutti gli articoli siano presenti nel pacco:
- TOMLOV DM209 Digital Microscope Unit
- Supporto regolabile
- Telecomando
- Cavo USB
- Cavo HDMI
- Adattatore di alimentazione
- Righello di calibrazione
- Manuale dell'utente (questo documento)
- Scheda MicroSD da 32 GB (preinstallata o inclusa separatamente)
4. Prodotto finitoview
The TOMLOV DM209 Digital Microscope consists of a main microscope unit with an integrated 7-inch IPS display, a sturdy metal stand, and a base with adjustable LED lights. Key components include the focus wheel, magnification adjustment, lens, and various ports for connectivity.

Figure 4.1: Fully assembled TOMLOV DM209 Digital Microscope with its stand and adjustable lights.
5. Impostazione
- Montare il supporto: Attach the microscope unit to the adjustable stand. Ensure all screws are tightened securely.
- Connetti alimentazione: Plug the power adapter into the microscope's DC input port and then into a power outlet.
- Inserire la scheda MicroSD: If not already inserted, gently push the 32GB MicroSD card into the designated slot until it clicks.
- Posizionamento: Place the object to be observed on the base plate. Adjust the height of the microscope unit using the stand's adjustment knob to get a preliminary focus.
6. Istruzioni per l'uso
6.1 Accensione/Spegnimento
Press and hold the power button on the microscope unit for a few seconds to turn it on. Repeat the action to turn it off.
6.2 Regolazione dell'ingrandimento e della messa a fuoco
Rotate the focus wheel on the side of the microscope unit to achieve a clear image. The DM209 offers a magnification range from 2X to 1200X. Adjust the distance between the lens and the object for optimal magnification and clarity.

Figure 6.1: Illustration of the microscope's 2X-1200X zoom capability, showing magnified views of a fabric texture and a coin.
6.3 Using the 7-inch IPS Monitor
The integrated 7-inch IPS monitor provides a clear and wide viewing angle for direct observation. Use the buttons below the screen to navigate menus and adjust settings.
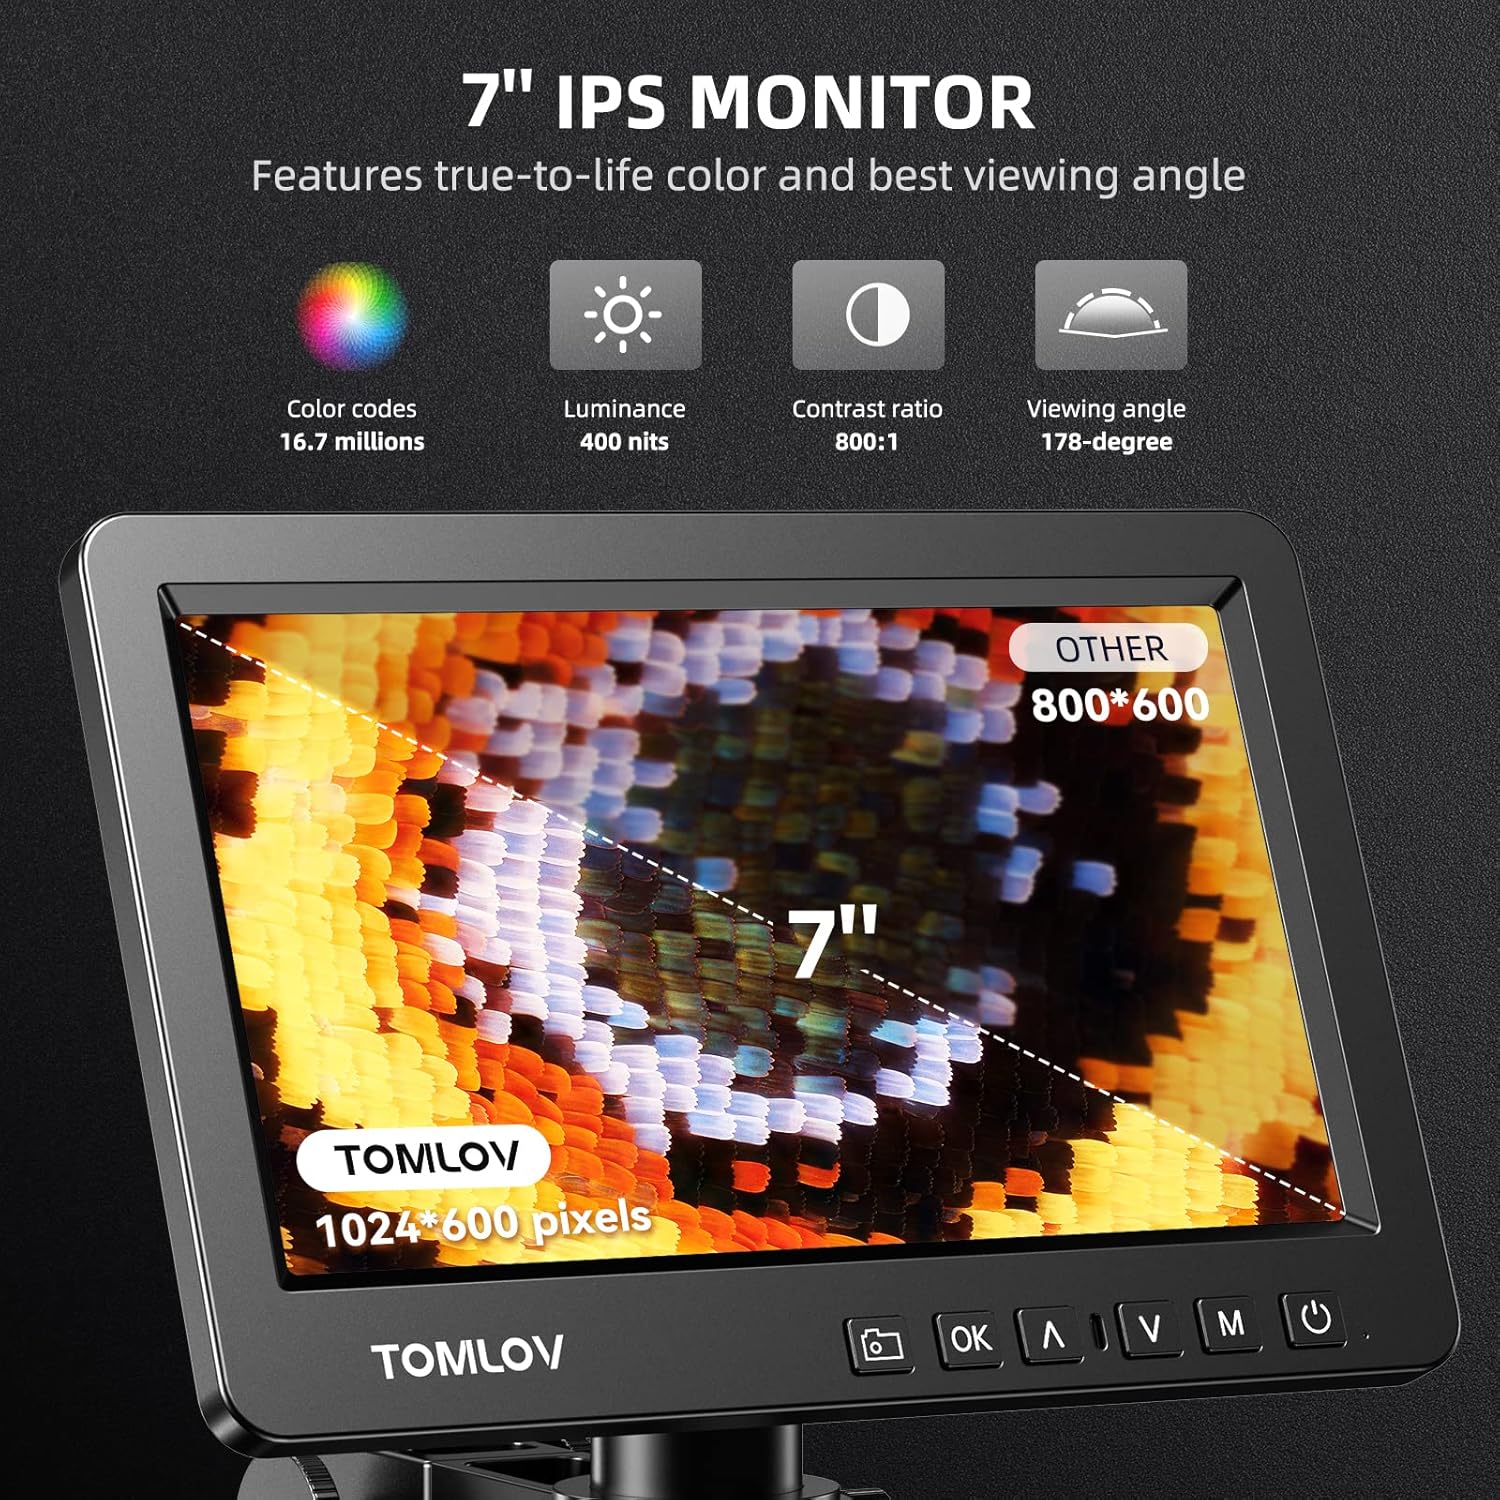
Figure 6.2: Close-up of the 7-inch IPS monitor displaying a magnified butterfly wing, highlighting its color, luminance, contrast, and viewing angle specifications.
6.4 Funzioni del telecomando
The included remote control allows for convenient operation without touching the microscope, reducing vibrations. Functions include digital zoom, image flip, taking pictures/videos, and freezing the screen.

Figure 6.3: A hand holding the remote control for the microscope, with icons for digital zoom, image flip, capture, and freeze screen functions.
6.5 HDMI Output to External Display
Connect the microscope to a larger monitor or TV using the provided HDMI cable for a wider view and collaborative observation. Ensure both devices are powered off before connecting the HDMI cable, then power them on.

Figure 6.4: Microscope connected to an external monitor via HDMI, displaying a magnified circuit board.
6.6 USB Output for PC View
For advanced analysis and larger screen viewing on a computer, connect the microscope to your PC using the USB cable. The microscope is compatible with Windows operating systems. Install any necessary drivers or software as prompted by your computer.

Figura 6.5: Un utente viewing the microscope's output on a larger PC monitor via USB connection, demonstrating Windows compatibility.
6.7 Acquisizione di immagini e video
Use the dedicated capture button on the microscope unit or the remote control to take still images or record videos. Files are saved directly to the inserted MicroSD card.
6.8 Trinocular Compatibility
The DM209 features C-mount compatibility, allowing it to be integrated into trinocular microscope setups for comprehensive and direct viewing, facilitating sharing and advanced applications.
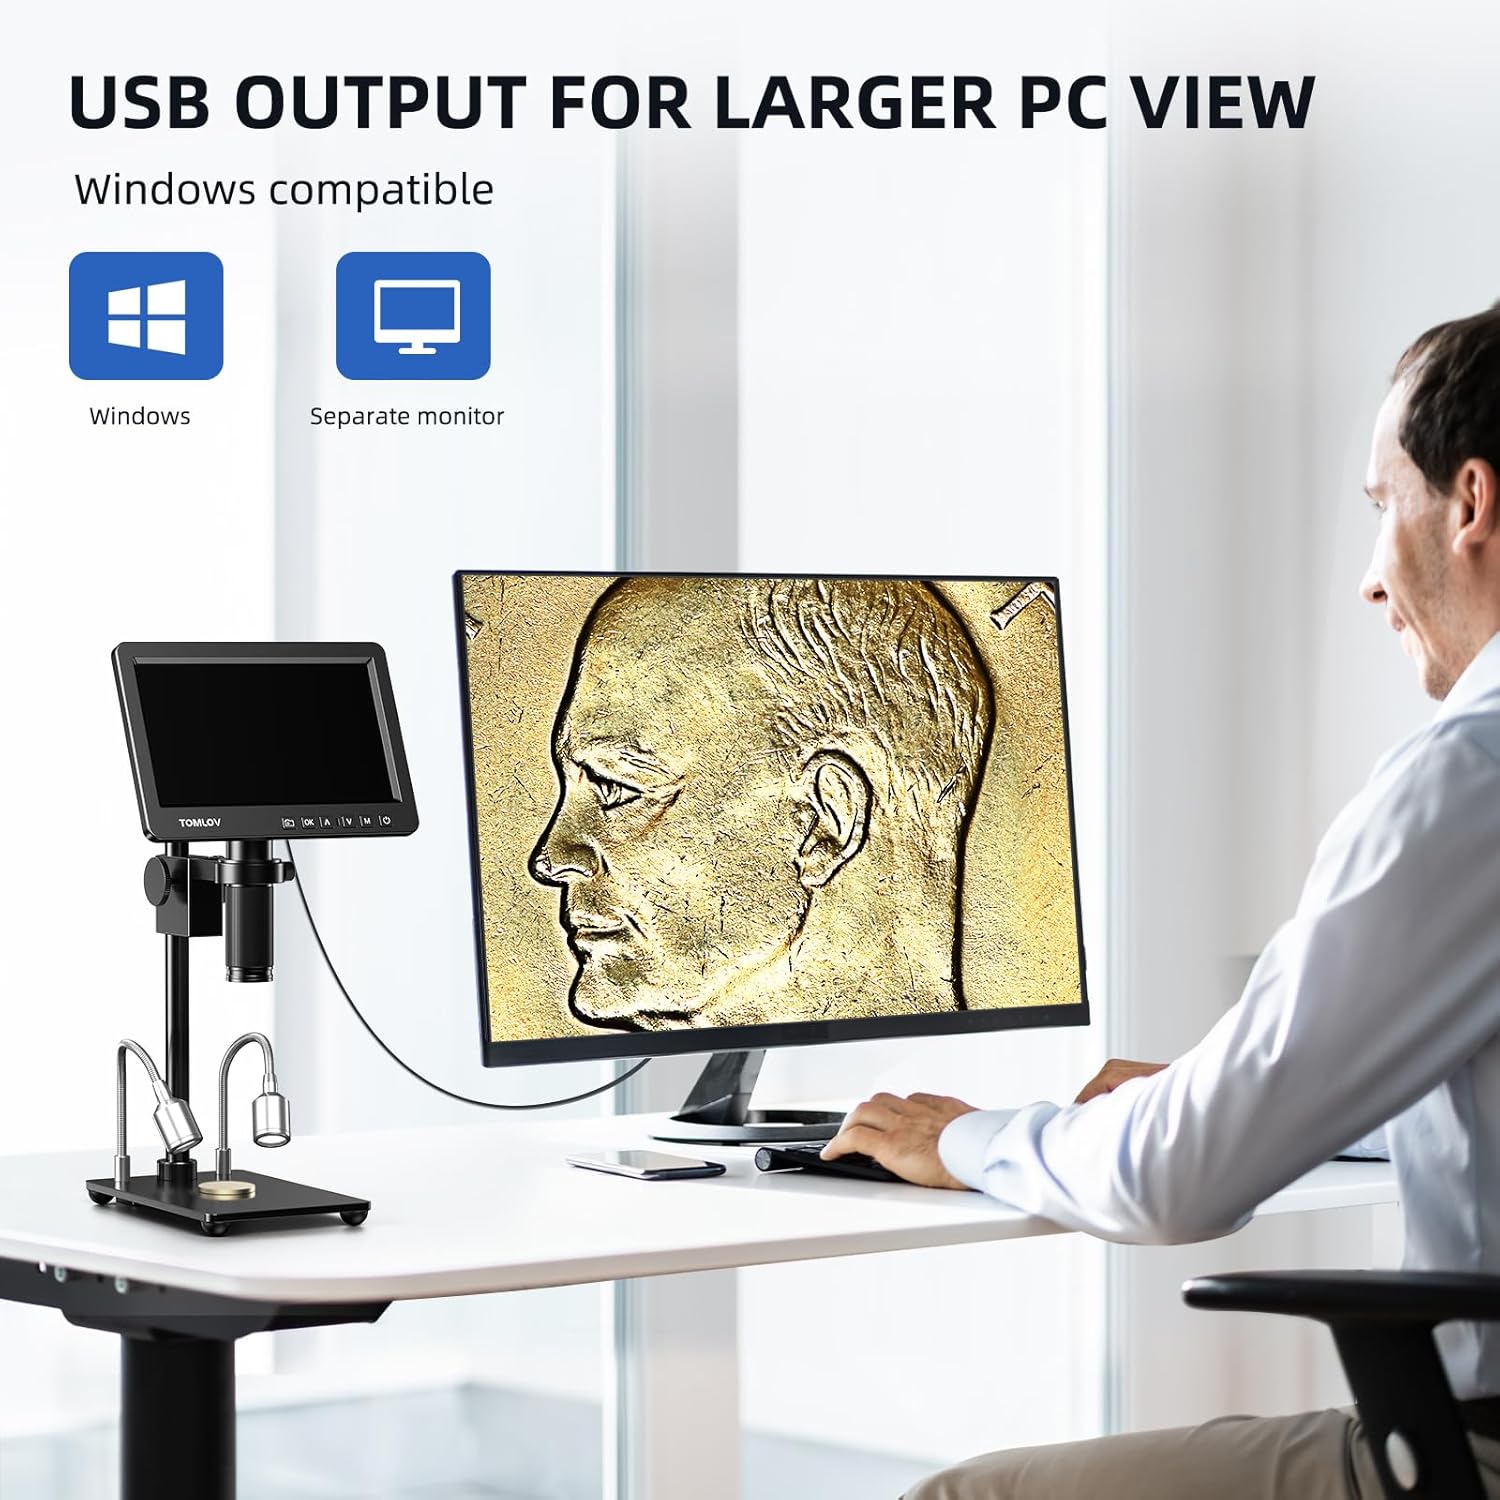
Figure 6.6: The microscope's screen displaying a magnified plant cell structure, illustrating its trinocular compatibility for comprehensive viewing e condivisione.
7. Manutenzione
- Pulizia della lente: Utilizzare un panno morbido e privo di lanugine, specificamente progettato per lenti ottiche. Per le macchie ostinate, è possibile applicare una piccola quantità di soluzione detergente per lenti sul panno (non direttamente sulla lente).
- Pulizia del corpo: Wipe the microscope body with a soft, dry cloth. Do not use abrasive cleaners or solvents.
- Magazzinaggio: When not in use, store the microscope in a clean, dry, and dust-free environment. Use a dust cover if available.
- Cura della batteria (se applicabile): If the device has an internal battery, avoid fully discharging it frequently to prolong its lifespan.
8. Risoluzione Dei Problemi
| Problema | Possibile causa | Soluzione |
|---|---|---|
| Nessun potere | Adattatore di alimentazione non collegato; presa di corrente difettosa. | Controllare i collegamenti elettrici; provare una presa diversa. |
| Immagine sfocata | Focus not adjusted; object too far/close; lens dirty. | Adjust focus wheel; adjust object distance; clean lens. |
| Nessuna immagine sul monitor esterno | Cavo HDMI allentato o difettoso; ingresso selezionato errato sul monitor. | Check HDMI connection; select correct input source on external monitor. |
| Impossibile salvare immagini/video | MicroSD card full, faulty, or not inserted correctly. | Check MicroSD card insertion; format or replace card. |
| Il telecomando non funziona | Batteries low or depleted; obstruction between remote and microscope. | Replace remote control batteries; ensure clear line of sight. |
9. Specifiche
| Caratteristica | Dettaglio |
|---|---|
| Modello | Modello DM209 |
| Marca | TOMLOV |
| Display | Schermo IPS da 7 pollici |
| Sensore | Sony CMOS IMX 26MP |
| Ingrandimento | 2X - 1200X |
| Uscita video | 2K HDMI, USB |
| Materiale | Metal (lens, stand) |
| Dimensioni (L x P x A) | Dimensioni: 26 x 16 x 18 cm |
| Peso | 1.41 chilogrammi |
| Voltage | 240 Volt |
| Magazzinaggio | Supporta la scheda MicroSD (inclusa da 32 GB) |
10. Garanzia e supporto
For warranty information and technical support, please refer to the warranty card included with your product or visit the official TOMLOV websito. Non tentare di riparare il dispositivo da soli, poiché ciò potrebbe invalidare la garanzia.