Introduzione
This user manual provides comprehensive instructions for the setup, operation, and maintenance of your Odokee Digital Dual Alarm Clock. Please read this manual thoroughly before using the product to ensure proper function and longevity.
Caratteristiche del prodotto
- Easy-to-set controls with clearly labeled buttons.
- Large 1.6-inch red LED display with 0-100% adjustable dimmer.
- Customizable dual alarms with 7-5-2 alarm modes (Every day, Weekdays, Weekend).
- 5 selectable alarm tones: Beep, Birds Chirping, Buzzer, Soft Music, Siren.
- Volume dell'allarme regolabile da 30 dB a 110 dB.
- Funzione snooze di 9 minuti.
- Integrated USB charging port for mobile devices.
- Battery backup (3 AAA batteries, not included) for time and settings retention during power outages.
- Compact and space-saving design (5.3"x2.9"x1.95").
- 12 or 24-hour time display option.
Contenuto della confezione
- Odokee Digital Dual Alarm Clock
- Power Adapter (Cord Length: 4.92ft)
- Manuale d'uso
Prodotto finitoview

Davanti view of the Odokee Digital Dual Alarm Clock, displaying the time and day of the week. The large red LED digits are clearly visible.

Posteriore view of the alarm clock, highlighting the control buttons for alarm sound, 12/24HR format, day of week, time set, alarm 1 set, and alarm 2 set. Also visible are the dimmer and volume dials, USB port, and power input.
Impostare
1. Collegamento elettrico
Connect the provided power adapter to the DC 5V input port on the back of the alarm clock and plug the adapter into a standard AC outlet. The clock display will light up.

The alarm clock connected to a power outlet via its adapter, illustrating the primary power source.
2. Installazione della batteria di backup (facoltativa)
For battery backup functionality during power outages, insert 3 AAA batteries (not included) into the battery compartment on the bottom of the clock. This will preserve time and alarm settings, and allow alarms to function during a power interruption. Note: USB charging will not work on battery power.
3. Impostazione iniziale dell'ora
- Premere e tenere premuto il tasto IMPOSTAZIONE DELL'ORA pulsante sul retro dell'orologio. Le cifre delle ore inizieranno a lampeggiare.
- Utilizzare il ORA E MINIMO buttons on the top of the clock to adjust the hour and minute respectively.
- Premere IMPOSTAZIONE DELL'ORA di nuovo per confermare l'ora.
- Premere il tasto 12/24 ore button to switch between 12-hour (with AM/PM indicator) and 24-hour formats.
- Premere il tasto GIORNO DELLA SETTIMANA button to set the current day.
Istruzioni per l'uso
1. Impostazione degli allarmi (allarme 1 e allarme 2)
The clock features two independent alarms (Alarm 1 and Alarm 2) that can be set for different times and modes.
- Premere e tenere premuto il tasto ALLARME 1 INSERITO or ALLARME 2 INSERITO button on the back. The alarm hour digits will flash.
- Utilizzare il ORA E MINIMO buttons on the top to adjust the desired alarm time.
- Premere ALLARME 1 INSERITO or ALLARME 2 INSERITO di nuovo per selezionare la modalità di allarme:
- LUN-VEN (Weekdays)
- SAB-DOM (Weekends)
- LUN-DOM (All 7 days)
- Premere ALLARME 1 INSERITO or ALLARME 2 INSERITO one more time to confirm the alarm setting. The corresponding alarm icon (1 or 2) will appear on the display.

Illustration of the dual alarm feature with different alarm modes for weekdays and weekends.
2. Selecting Alarm Sound
L'orologio offre 5 diversi suoni di allarme.
- Premere il tasto SUONO ALLARME button on the back of the clock to cycle through the available sounds: Beep, Birds Chirping, Buzzer, Soft Music, Siren.
- The selected sound will play briefly for preview.

Visual representation of the five distinct alarm sounds available on the clock.
3. Regolazione del volume della sveglia
Utilizzare il VOLUME dial on the left side of the clock to adjust the alarm volume from 30dB (low) to 110dB (high).
4. Funzione snooze
Quando suona la sveglia, premere il tasto grande POSTICIPARE button on the top of the clock to temporarily silence the alarm for 9 minutes. The alarm will sound again after 9 minutes.

A user's hand activating the snooze function by pressing the prominent SNOOZE button.
5. Turning Alarms On/Off
Per disattivare un allarme sonoro, premere il tasto corrispondente ACCESO/SPENTO button located on the front sides of the clock (one for Alarm 1, one for Alarm 2). To disable an alarm completely, press the ACCESO/SPENTO finché l'icona dell'allarme non scompare dal display.
6. Regolazione della luminosità del display
Utilizzare il DIMENSIONATORE dial on the right side of the clock to adjust the display brightness from 0% (fully dark) to 100% (very bright).
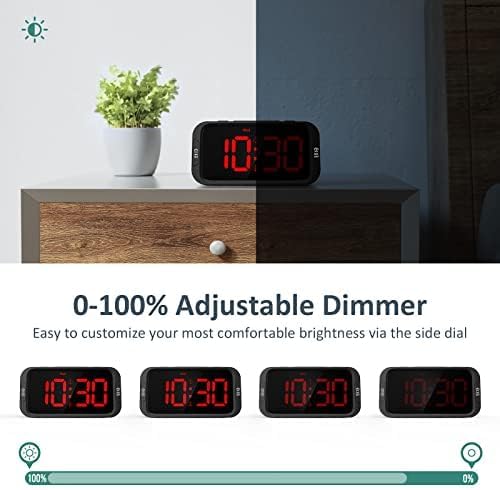
Demonstration of the 0-100% adjustable dimmer, showing the clock display from maximum brightness to completely off.
7. Porta di ricarica USB
The USB port on the back of the clock can be used to charge your mobile devices. Simply connect your device's USB charging cable to the port. Note: This port is for charging only and does not transfer data. USB charging requires the clock to be powered by the AC adapter.

The alarm clock charging a smartphone via its integrated USB port.
Manutenzione
- Pulire l'orologio con un panno morbido e asciutto. Non utilizzare detergenti abrasivi o solventi.
- Evitare di esporre l'orologio a temperature estreme, alla luce solare diretta o a elevata umidità.
- Do not disassemble the clock. This will void the warranty.
- If using battery backup, replace batteries annually or when the display shows signs of dimming during a power outage.
Risoluzione dei problemi
| Problema | Possibile causa | Soluzione |
|---|---|---|
| Il display dell'orologio è spento. | Nessuna connessione di alimentazione o alimentazione fuoritage. | Ensure the power adapter is securely plugged into the clock and a working outlet. Check for power outages. If using battery backup, check battery level. |
| L'allarme non suona. | Sveglia non attivata, volume troppo basso o ora/modalità della sveglia errata. | Ensure the alarm icon is visible on the display. Adjust alarm volume. Verify alarm time and mode settings. Check battery backup if on battery power. |
| La ricarica USB non funziona. | Clock not connected to AC power, or device cable issue. | Ensure the clock is plugged into an AC outlet. Verify the USB cable is functional and properly connected to both the clock and your device. |
| Schermo troppo luminoso/scurato. | L'impostazione del dimmer necessita di regolazione. | Regolare il DIMENSIONATORE dial on the right side of the clock to your preferred brightness level. |
Specifiche
- Modello: UE218-Red
- Tipo di visualizzazione: LED digitale (rosso)
- Dimensioni dello schermo: 1.6 inches (digit height)
- Dimensioni del prodotto: 5.3" (L) x 2.9" (L) x 1.95" (A)
- Fonte di energia: Elettrico con cavo (AC100-240V, 50/60Hz)
- Potenza in ingresso: DC 5V, 1A
- Batteria di backup: 3 batterie AAA (non incluse)
- Alarm Volume Range: 30 dB - 110 dB
- Materiale: Acrilonitrile Butadiene Stirene (Plastica)
- Peso dell'articolo: 6.3 once (178.6 grammi)
- Codice UPC: 768461974727
Garanzia e supporto
Odokee products come with a hassle-free 18-month warranty. For any product inquiries, technical support, or warranty claims, please contact Odokee customer service:
- E-mail: odokeeshop@outlook.com
- Negozio online: Negozio Odokee su Amazon
Conservare la ricevuta d'acquisto per la convalida della garanzia.
Informazioni sulla sicurezza
- Non esporre il prodotto all'acqua o a umidità eccessiva.
- Tenere fuori dalla portata dei bambini.
- Utilizzare esclusivamente l'adattatore di alimentazione fornito.
- Do not place near heat sources or in direct sunlight for extended periods.