
JENSEN JCR-375 Orologio digitale stereo con doppia sveglia, lettore CD a caricamento dall'alto, sintonizzatore FM, porta di ricarica USB e batteria di backup - Manuale di istruzioni
Modello: JCR-375
1. Introduzione
This manual provides detailed instructions for the operation and maintenance of your JENSEN JCR-375 Stereo Digital Dual-Alarm Clock Radio with CD Player. This versatile device is designed for use on a nightstand or in various locations within your home, offering multiple audio playback options and convenient features.
2. Caratteristiche principali
- Multifunction 0.9-inch White LED display with high/low dimmer control.
- Built-in stereo speakers for audio output.
- Stereo headphone output for private listening.
- Top-loading CD player compatible with standard audio CDs, MP3 CDs, and CD-R/CD-RW discs.
- CD playback controls include skip/search (forward and back), repeat (1 or all tracks), and programmable memory.
- Digital FM radio tuner with up to 20 programmable presets.
- Auxiliary input (3.5mm) for connecting external audio devices.
- 2.1-amp USB port for charging smartphones and other compatible devices.
- Dual-alarm clock radio with sleep and snooze functions.
- Wake options: radio, CD, or alarm tone.
- Battery backup for clock settings (requires 2 'A' batteries, sold separately).
3. Prodotto finitoview

Figura 3.1: Fronte view of the JCR-375 highlighting key features such as the top-loading CD player, built-in speaker, AUX-in jack, and 2.1 Amp Porta di ricarica USB.

Figura 3.2: Dall'alto verso il basso view of the JCR-375 with the CD compartment open, showing a disc inserted. This illustrates the top-loading CD player design.

Figura 3.3: Fronte view of the JCR-375, showcasing the clear white LED digital clock display and control buttons.

Figura 3.4: lato view of the JCR-375, highlighting the convenient USB charging port located on the side panel.

Figura 3.5: Posteriore view of the JCR-375, displaying the power input and other rear connections.
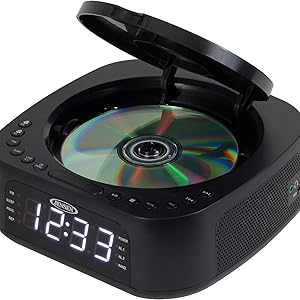
Figure 3.6: Diagram illustrating the compact dimensions of the JCR-375, measuring approximately 7.3 inches in length and width, and 2.8 inches in height.
4. Controlli e indicatori
Familiarize yourself with the various controls and indicators on your JCR-375 unit:
- Display a LED: Shows time, alarm settings, FM frequency, and CD track information.
- Pulsante SNOOZE: Disattiva temporaneamente l'allarme per un breve periodo.
- Pulsante di accensione: Accende o spegne l'unità.
- Pulsante IMPOSTAZIONE ORA: Usato per impostare l'ora corrente.
- ALARM 1 / ALARM 2 Buttons: Used to set and activate individual alarms.
- Pulsante DIMMER: Regola la luminosità del display LED.
- Tasto SONNO: Attiva la funzione del timer di spegnimento.
- CD/FM/AUX Function Button: Selects the desired audio source (CD, FM radio, Auxiliary input).
- TUNING / SKIP Buttons (<< / >>):
- In FM mode: Tunes the radio frequency.
- In CD mode: Skips to the previous or next track.
- Pulsante RIPRODUCI/PAUSA: Avvia o mette in pausa la riproduzione del CD.
- Pulsante STOP: Interrompe la riproduzione del CD.
- Pulsante PROG (Programma): Used for programming CD tracks or FM presets.
- Pulsante MODE: Changes playback modes (e.g., repeat, random for CD).
- Controllo del volume: Regola il livello di uscita audio.
- Porta di ricarica USB: (Located on the side) For charging external devices.
- Presa AUX-IN: (Located on the side) For connecting external audio sources.
- Jack per cuffie: (Located on the side) For private listening.
5. Impostazione
5.1 Collegamento di alimentazione
- Unpack the JCR-375 unit and place it on a stable, flat surface.
- Collegare il cavo di alimentazione CA alla presa AC IN sul retro dell'unità.
- Plug the other end of the AC power cord into a standard 120V AC wall outlet.
- L'unità si accenderà e il display si illuminerà.
5.2 Installazione della batteria di backup
The JCR-375 requires 2 'A' batteries (not included) for battery backup. This feature ensures that clock and alarm settings are retained during a power outage.
- Individuare il vano batterie nella parte inferiore dell'unità.
- Aprire il coperchio del vano batterie.
- Insert 2 'A' batteries, observing the correct polarity (+ and -) as indicated inside the compartment.
- Chiudere saldamente il coperchio del vano batterie.
Note: Battery backup only maintains clock and alarm settings; the unit will not operate during a power outage without AC power.
6. Istruzioni per l'uso
6.1 Impostazione dell'orologio
- Premere e tenere premuto il tasto IMPOSTAZIONE DELL'ORA pulsante. Le cifre dell'ora lampeggeranno.
- Premere il tasto TUNING / SKIP (<< or >>) pulsanti per regolare l'ora. Osservare l'indicatore PM per la corretta impostazione AM/PM.
- Premere il tasto IMPOSTAZIONE DELL'ORA nuovamente il pulsante. Le cifre dei minuti lampeggeranno.
- Premere il tasto TUNING / SKIP (<< or >>) pulsanti per regolare i minuti.
- Premere il tasto IMPOSTAZIONE DELL'ORA nuovamente il pulsante per confermare e uscire dalla modalità di impostazione dell'ora.
6.2 Setting the Alarms (Alarm 1 / Alarm 2)
The JCR-375 features two independent alarms.
- Premere e tenere premuto il tasto ALLARME 1 or ALLARME 2 pulsante. Le cifre dell'ora della sveglia lampeggeranno.
- Premere il tasto TUNING / SKIP (<< or >>) pulsanti per regolare l'ora della sveglia.
- Premere il tasto selezionato ALLARME nuovamente il pulsante. Le cifre dei minuti della sveglia lampeggeranno.
- Premere il tasto TUNING / SKIP (<< or >>) pulsanti per regolare i minuti della sveglia.
- Premere il tasto selezionato ALLARME button again to select the wake source (CD, FM, or Buzzer). The corresponding indicator will light up.
- Premere il tasto selezionato ALLARME ancora una volta per confermare e uscire dalla modalità di impostazione della sveglia.
To activate/deactivate an alarm, briefly press the corresponding ALLARME button. The alarm indicator (AL.1 or AL.2) on the display will show its status.
6.3 Funzionamento del lettore CD
- Aprire il coperchio del vano CD sulla parte superiore dell'unità.
- Place a CD (audio CD, MP3 CD, CD-R/RW) onto the spindle with the label side facing up.
- Chiudere il coperchio del vano CD.
- Premere il tasto CD/FM/AUX Function ripetutamente il pulsante fino a selezionare "CD".
- Premere il tasto RIPRODUCI/PAUSA pulsante per iniziare la riproduzione.
- Utilizzare il TUNING / SKIP (<< or >>) buttons to skip tracks. Press and hold to fast forward/rewind within a track.
- Premere il tasto FERMARE per interrompere la riproduzione.
- Premere il tasto MODALITÀ button to cycle through repeat modes (Repeat 1, Repeat All, Random).
- To program tracks: While in STOP mode, press PROG. Select desired track with TUNING / SKIP, quindi premere PROG again to add. Repeat for up to 20 tracks. Press RIPRODUCI/PAUSA to play programmed sequence.
6.4 Funzionamento della radio FM
- Premere il tasto CD/FM/AUX Function button repeatedly until "FM" is selected.
- Premere il tasto TUNING / SKIP (<< or >>) pulsanti per sintonizzarsi manualmente sulla stazione desiderata.
- Per eseguire la scansione automatica delle stazioni, tenere premuto il tasto TUNING / SKIP (<< or >>) buttons. The radio will stop at the next strong station.
- To preset stations: Tune to the desired station, then press and hold the PROG finché il numero preimpostato non lampeggia. Utilizzare TUNING / SKIP per selezionare un numero preimpostato (P01-P20), quindi premere PROG di nuovo per salvare.
- To recall presets: Briefly press the PROG pulsante per scorrere le stazioni salvate.
6.5 Utilizzo dell'ingresso ausiliario
- Connect one end of a 3.5mm audio cable (not included) to the AUX-IN jack on the side of the JCR-375.
- Collegare l'altra estremità del cavo alla presa delle cuffie o all'uscita audio del dispositivo audio esterno (ad esempio, smartphone, lettore MP3).
- Premere il tasto CD/FM/AUX Function button repeatedly until "AUX" is selected.
- Avvia la riproduzione sul tuo dispositivo audio esterno.
- Adjust the volume using the volume control on the JCR-375 and/or your external device.
6.6 Ricarica USB
The JCR-375 features a 2.1-amp USB charging port for convenient charging of your mobile devices.
- Connect your device's USB charging cable (not included) to the USB port on the side of the JCR-375.
- Connect the other end of the cable to your smartphone or other compatible USB-powered device.
- La ricarica inizierà automaticamente.
Note: This port is for charging only and does not support data transfer or audio playback from USB drives.
6.7 Funzioni di sospensione e snooze
- Sveglia: Premere il tasto SONNO button repeatedly to set a sleep timer (e.g., 90, 60, 30, 15 minutes, OFF). The unit will automatically turn off after the selected time.
- Posticipa: Quando suona un allarme, premere il tasto POSTICIPARE pulsante per silenziare temporaneamente la sveglia per circa 9 minuti. La sveglia suonerà di nuovo dopo il periodo di ripetizione.
- Interruzione dell'allarme: To turn off a sounding alarm completely until the next day, press the ENERGIA pulsante.
7. Manutenzione
7.1 Pulizia dell'unità
- Scollegare l'unità dalla fonte di alimentazione prima di pulirla.
- Utilizzare un morbido, damp panno per pulire le superfici esterne. Non utilizzare detergenti abrasivi o solventi.
- Per la lente del CD, utilizzare un disco detergente per lenti del CD specifico oppure un panno morbido e privo di lanugine, studiato appositamente per lenti ottiche.
7.2 Sostituzione della batteria
Replace the backup batteries when the clock display starts to flicker or if the time is lost frequently during minor power interruptions. Refer to Section 5.2 for installation instructions.
8. Risoluzione Dei Problemi
| Problema | Possibile causa | Soluzione |
|---|---|---|
| L'unità non si accende. | Cavo di alimentazione non collegato correttamente. | Ensure the AC power cord is firmly connected to the unit and the wall outlet. |
| Il CD non viene riprodotto o salta. | Il CD è sporco, graffiato o inserito in modo errato. | Clean the CD with a soft cloth. Check for scratches. Ensure the CD is placed correctly with the label side up. |
| Scarsa ricezione FM. | Antenna non estesa o posizionata correttamente. | Extend the FM wire antenna fully and adjust its position for better reception. |
| L'allarme non suona. | Sveglia non impostata o disattivata. Volume troppo basso. | Verify alarm time and ensure the alarm indicator (AL.1/AL.2) is lit. Increase the volume. |
| L'orologio perde l'ora durante lo spegnimentotage. | Le batterie di riserva sono scariche o non installate. | Install new 'A' batteries or replace existing ones. |
| La ricarica USB non funziona. | Dispositivo non compatibile o cavo difettoso. | Assicurati che il tuo dispositivo sia compatibile con la ricarica USB. Prova un cavo USB diverso. |
9. Specifiche
| Caratteristica | Dettaglio |
|---|---|
| Numero di modello | JCR-375 |
| Fonte di alimentazione | 120 V CA |
| Batteria di backup | 2 x 'A' batteries (not included) |
| Display | LED bianco da 0.9 pollici |
| Uscita di ricarica USB | 2.1 Amp |
| Connettività | Ingresso ausiliario (3.5 mm), uscita cuffie (3.5 mm) |
| Dimensioni del prodotto (L x P x A) | 7.32 x 1.5 x 7.32 pollici (circa) |
| Peso dell'articolo | 1.7 libbre |
| Produttore | Gensen-Giuseppe |
10. Garanzia e supporto
Questo prodotto è coperto da a Garanzia limitata di 1 anno valid in the USA only. For warranty service or technical support, please contact Jensen customer service.
For further assistance, please visit the official Jensen websito o fare riferimento alle informazioni di contatto fornite al momento dell'acquisto.
Avvertenza sulla Proposta 65: questo prodotto potrebbe contenere sostanze chimiche che lo Stato della California ritiene possano causare cancro, difetti alla nascita o altri danni riproduttivi.