1. Introduzione
The Depusheng KA2 USB Audio Interface is a compact and versatile device designed for high-quality audio recording and streaming. It features 24-bit/96 kHz resolution, XLR inputs with 48V phantom power, and real-time monitoring capabilities, making it suitable for musicians, vocalists, podcasters, and producers using PC, Windows, or Mac systems.
This manual provides detailed instructions for setting up, operating, and maintaining your KA2 USB Audio Interface to ensure optimal performance and longevity.
2. Prodotto finitoview
2.1 Caratteristiche principali
- Registrazione di qualità da studio: Capture audio with high fidelity, reproducing original sound sources accurately.
- Alimentazione Phantom 48V: Supports condenser microphones for professional-grade recordings.
- Monitoraggio in tempo reale: Direct, delay-free monitoring allows musicians to hear their performance clearly without latency.
- Uscita stereo/mono: Offers flexible output options for recording and playback through left and right channels.
- Doppio interruttore di alimentazione: Can be powered via USB 2.0 from a PC/iOS device or an external 5V DC power adapter/mobile battery for stable power.
- Design portatile: Small and durable, suitable for various recording and production environments, including on the go.
- Alta Samptasso di ling: Built-in high-precision converter supports up to 24-bit/192kHz sampprecisione.
2.2 Identificazione dei componenti
Familiarize yourself with the front and rear panels of the KA2 USB Audio Interface.

Figura 2.2.1: Pannello frontale sopraview with typical connections.

Figura 2.2.2: Pannello posteriore sopraview with typical connections.
3. Impostazione
3.1 Alimentazione del dispositivo
- Alimentazione USB: Connect the USB 2.0 cable from the KA2 interface to your PC or iOS device. The interface will draw power directly from the connected device.
- External 5V DC Power: If connecting to an iOS device or if bus power is insufficient, switch the 'Power Source' toggle on the rear panel to '5V DC'. Connect a standard USB power adapter or an external USB mobile battery to the 5V DC port. This ensures a stable power supply.

Figure 3.1.1: Connecting 5V DC external power.
3.2 Collegamento degli ingressi
- Microfoni: Connect your microphone to either Input 1 or Input 2 using an XLR cable. For condenser microphones requiring phantom power, ensure the +48V switch on the rear panel is set to 'ON'.
- Strumenti: Connect instruments like guitars to Input 1 or Input 2 using a 6.35mm (1/4-inch) TS/TRS cable. If using a high-impedance instrument (e.g., electric guitar), press the 'HI-Z' button for the corresponding input.

Figure 3.2.1: Input connector types (XLR and 6.35mm).

Figure 3.2.2: +48V Phantom Power Switch.
3.3 Collegamento delle uscite
- Cuffie: Connect your headphones to the 'PHONES' jack on the front panel.
- Relatori: Connect your studio monitors or speakers to the 'OUTPUT' jacks (1L and 2R) on the rear panel using 6.35mm (1/4-inch) TS/TRS cables.
4. Istruzioni per l'uso
4.1 Regolazione del guadagno in ingresso
Use the 'GAIN' knobs for Input 1 and Input 2 to adjust the input level of your microphone or instrument. The 'SIG' (signal) and 'PK' (peak) indicators will help you set appropriate levels, avoiding clipping (red 'PK' light).
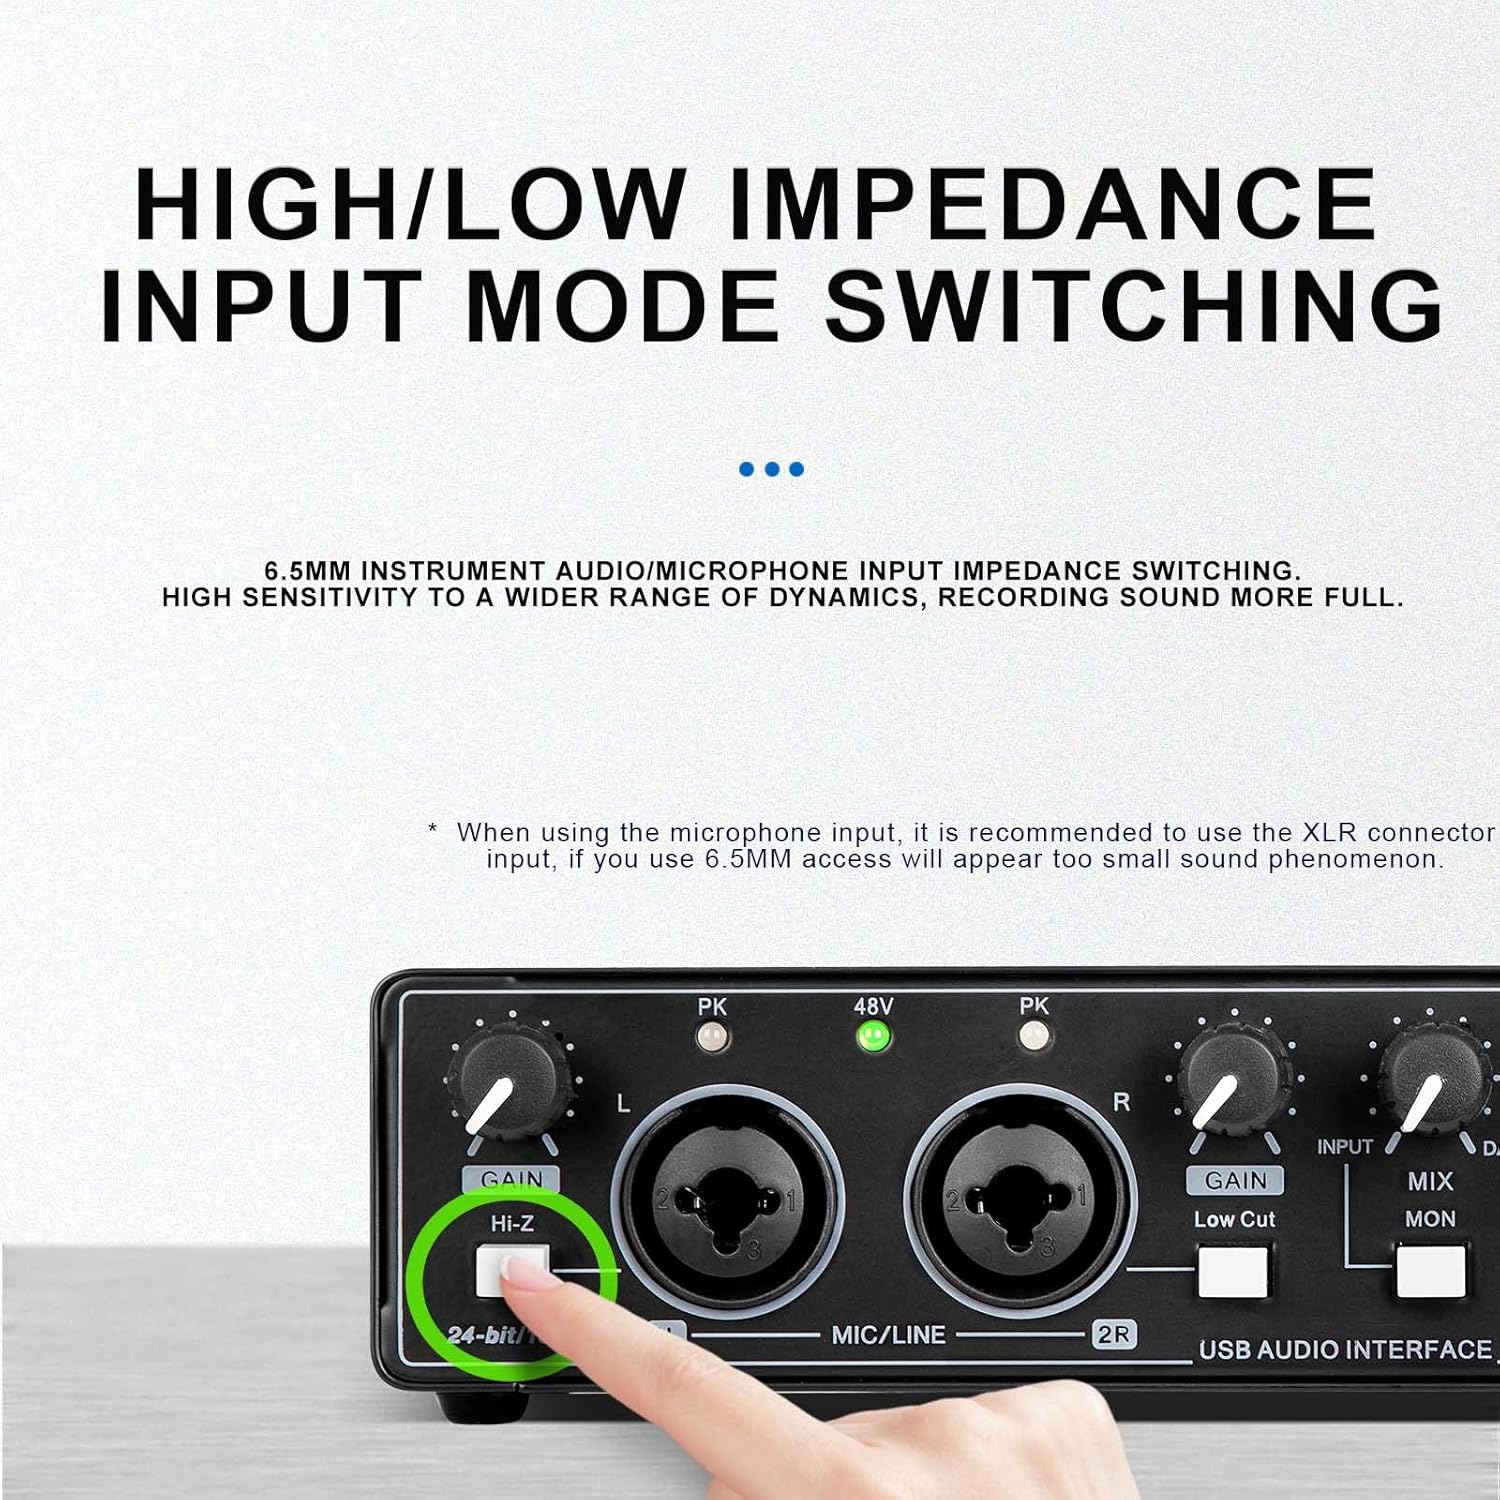
Figure 4.1.1: High/Low Impedance Input Mode Switching.
4.2 High/Low Impedance Switching (HI-Z)
Press the 'HI-Z' button for Input 1 when connecting high-impedance instruments like electric guitars or basses. This optimizes the input for these devices, ensuring a full and clear sound. For microphones, it is recommended to use the XLR connector; using a 6.5mm access for microphones may result in a low signal level.
4.3 Filtro taglia basso
The 'Low Cut' button for Input 2 activates a high-pass filter, reducing unwanted low-frequency rumble or noise from your input signal. This is useful for vocal recordings or instruments where excessive bass is not desired.
4.4 Monitoring and Mix Control
The 'MIX' knob allows you to blend the direct input signal ('INPUT') with the playback signal from your computer ('DAW').
- Monitoraggio diretto: Turn the 'MIX' knob towards 'INPUT' to hear your live input signal with zero latency.
- DAW Monitoring: Turn the 'MIX' knob towards 'DAW' to hear the playback from your computer.
The 'MON' button switches between stereo and mono monitoring. In stereo mode, inputs 1 and 2 are heard as separate left and right channels. In mono mode, both inputs are summed to the center.

Figure 4.4.1: Mix, Monitor, and LoopBack Controls.
4.5 LoopBack Function
The 'LoopBack' button enables the interface to send the combined input and playback audio back to your computer. This is useful for live streaming, podcasting, or recording computer audio along with your microphone/instrument inputs.
4.6 Uscita cuffie
Adjust the 'PHONES' gain knob to control the volume of your headphones. This is independent of the main output volume.

Figure 4.6.1: Headphone Output Jack.
4.7 Compatibilità software
The Depusheng KA2 is compatible with various popular recording software (DAWs) on PC, Windows, and Mac operating systems. Ensure your DAW is configured to recognize the KA2 as its audio input and output device.

Figura 4.7.1: Compatibilità software.
5. Manutenzione
- Pulizia: Utilizzare un panno morbido e asciutto per pulire l'esterno del dispositivo. Evitare detergenti liquidi o materiali abrasivi.
- Magazzinaggio: Conservare l'interfaccia in un luogo fresco e asciutto, lontano dalla luce solare diretta e da temperature estreme.
- Gestione: Maneggiare il dispositivo con cura per evitare di danneggiare manopole, interruttori e connettori.
6. Risoluzione Dei Problemi
- Nessun potere: Ensure the USB cable is securely connected or the 5V DC power adapter is properly plugged in and the 'Power Source' switch is set correctly.
- Nessun suono dal microfono: Check microphone connection, ensure 'GAIN' is turned up, and if using a condenser mic, verify +48V phantom power is 'ON'.
- Low Input Signal: Adjust the 'GAIN' knob. For instruments, ensure 'HI-Z' is engaged if applicable.
- Latency during Monitoring: Use the direct monitoring feature by adjusting the 'MIX' knob towards 'INPUT'. Disable software monitoring in your DAW.
- Nessun suono dalle cuffie/altoparlanti: Check volume knobs ('PHONES' and main output in DAW), ensure cables are connected correctly, and verify the interface is selected as the output device in your computer's sound settings and DAW.
7. Specifiche
| Caratteristica | Specificazione |
|---|---|
| Numero modello articolo | KA2 V12 |
| Samptasso di ling | 24-bit/96 kHz (up to 192 kHz) |
| Potenza fantasma | 48V |
| Interfaccia Hardware | USB 2.0 |
| Dispositivi compatibili | Personal Computer (PC/Mac), iOS devices |
| Sistema operativo | Finestre, Mac |
| Peso dell'articolo | 4.62 libbre (circa 2.1 kg) |
| Dimensioni del pacco | 17.09 x 8.62 x 4.76 pollici |

Figura 7.1.1: Dimensioni e peso del prodotto.
8. Video ufficiale del prodotto
Watch this video for a visual guide on the features and connectivity of the Depusheng KA2 USB Audio Interface.
Video 8.1.1: Depusheng KA2 USB Audio Interface Overview. This video demonstrates the features and connectivity of the Depusheng KA2 USB Audio Interface, including input gain, low cut, monitoring, and power options.
9. Garanzia e supporto
Per informazioni sulla garanzia e supporto tecnico, fare riferimento alla documentazione inclusa con l'acquisto o visitare il sito ufficiale Depusheng websito. Conservare la prova d'acquisto per eventuali reclami in garanzia.