
Introduzione
This manual provides essential information for setting up, operating, and maintaining your GEEKOM Mini PC AS5. Please read these instructions carefully before using the device to ensure optimal performance and longevity. The GEEKOM Mini PC AS5 is a compact and powerful computing solution designed for various applications, from home entertainment to professional tasks.
Contenuto della confezione
Prima di procedere con la configurazione, verifica che tutti gli elementi elencati di seguito siano inclusi nella confezione:
- GEEKOM Mini PC AS5
- Adattatore di alimentazione
- Supporto VESA (con viti)
- Viti di montaggio SSD
- Viti di montaggio HDD
- Guida veloce
- Manuale dell'utente (questo documento)
- Cavo da USB-C a USB-C

Figura 1: Contents of the GEEKOM Mini PC AS5 package.
Guida all'installazione
1. Collegamento di periferiche
Connect your monitor, keyboard, and mouse to the GEEKOM Mini PC AS5. Refer to the port diagram below for correct connections.
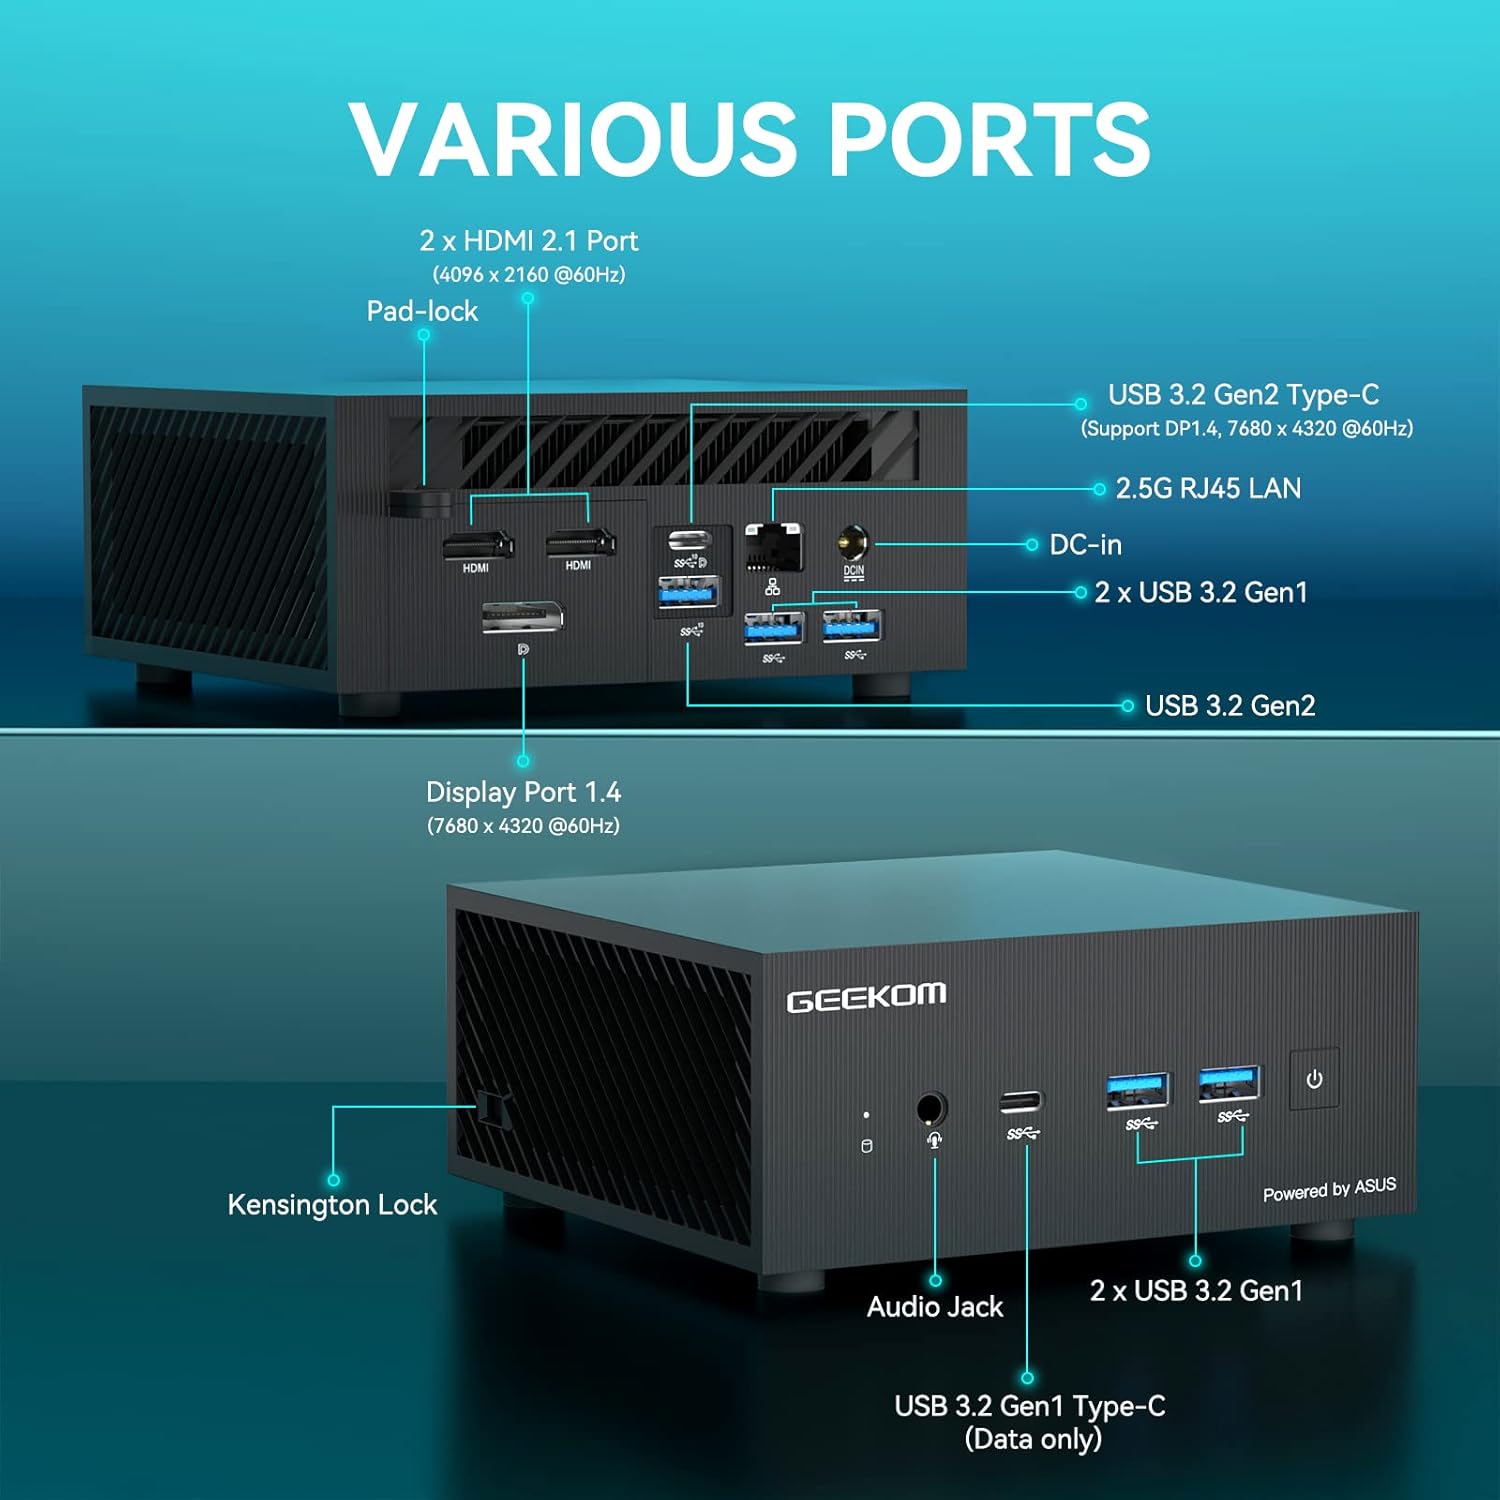
Figura 2: Sopraview of available ports on the GEEKOM Mini PC AS5.
- Connessione display: Use an HDMI cable to connect your monitor to one of the two HDMI 2.1 ports, or a DisplayPort cable to the Display Port 1.4. The USB 3.2 Gen2 Type-C port also supports DisplayPort 1.4 for video output.
- Dispositivi USB: Connect your keyboard, mouse, and other USB devices to the available USB 3.2 Gen1 and Gen2 ports.
- Connessione di rete: For a wired network connection, connect an Ethernet cable to the 2.5G RJ45 LAN port. For wireless, ensure your Wi-Fi network is available.
- Audio: Connect headphones or speakers to the Audio Jack.
2. Collegamento elettrico
Connect the power adapter to the DC-In port on the Mini PC, then plug the power adapter into a wall outlet.
3. Accensione iniziale
Press the power button located on the front of the Mini PC. The system will boot up, and you will see the operating system loading on your connected display.
4. Configurazione del sistema operativo
Follow the on-screen instructions to complete the initial setup of Windows 10 Pro, including language selection, network configuration, and user account creation.
Istruzioni per l'uso
Funzionamento di base
- Accensione/spegnimento: Premere il pulsante di accensione per accendere il dispositivo. Per spegnerlo, utilizzare l'opzione di arresto di Windows o tenere premuto il pulsante di accensione per 5 secondi.
- Ricomincia: Utilizzare l'opzione di riavvio all'interno del sistema operativo Windows.
- Modalità risparmio: The system will enter sleep mode after a period of inactivity. Press any key or move the mouse to wake it up.
Configurazione dello schermo
The GEEKOM Mini PC AS5 supports multiple displays, including up to four 4K displays or ultra-realistic 8K visuals.

Figura 3: The GEEKOM Mini PC AS5 supports ultra-realistic 8K visuals.

Figura 4: Multitasking across four 4K displays with the GEEKOM Mini PC AS5.
To configure multiple displays, right-click on the desktop, select "Display settings," and arrange your monitors as desired.
Network Connectivity (Wi-Fi 6E)
The Mini PC supports Wi-Fi 6E, offering enhanced wireless performance. To connect to a Wi-Fi network:

Figura 5: GEEKOM Mini PC AS5 featuring Wi-Fi 6E support for faster, lower-latency wireless connectivity.
- Fare clic sull'icona Wi-Fi nella barra delle applicazioni.
- Seleziona la rete desiderata dall'elenco.
- Immettere la password di rete se richiesta.
- Fare clic su "Connetti".
Manutenzione
Pulizia
- Assicurarsi che il dispositivo sia spento e scollegato prima della pulizia.
- Utilizzare un panno morbido e asciutto per pulire la parte esterna del Mini PC.
- Per segni ostinati, leggermente dampLavare il panno con acqua. Evitare prodotti chimici aggressivi o detergenti abrasivi.
- Keep ventilation openings clear of dust and debris using compressed air.
Aggiornamenti software
Regularly update your Windows operating system and drivers to ensure optimal performance and security. You can check for updates via Windows Update settings.
Gestione dell'archiviazione
Periodically check your storage usage and remove unnecessary files to maintain system speed. The Mini PC supports additional storage expansion (SSD/HDD) if needed.
Risoluzione dei problemi
- Nessun potere:
- Assicurarsi che l'adattatore di alimentazione sia collegato saldamente sia al Mini PC sia a una presa di corrente funzionante.
- Verificare che la presa di corrente funzioni collegandovi un altro dispositivo.
- Nessuna visualizzazione:
- Verificare che il monitor sia acceso e che sia selezionata la sorgente di ingresso corretta.
- Ensure the HDMI or DisplayPort cable is securely connected to both the Mini PC and the monitor.
- Se possibile, provare un cavo o un monitor diverso.
- Nessuna connessione internet:
- Per le connessioni cablate, controllare lo stato del cavo Ethernet e del router.
- Per quanto riguarda il Wi-Fi, assicurati che il Wi-Fi sia abilitato nelle impostazioni di Windows e che tu sia connesso alla rete corretta con la password corretta.
- Riavvia il router e il Mini PC.
- Rallentamento del sistema:
- Chiudere le applicazioni non necessarie in esecuzione in background.
- Controlla e installa eventuali aggiornamenti di Windows in sospeso.
- Eseguire una pulizia e deframmentazione del disco (per gli HDD) o TRIM (per gli SSD).
- Eseguire la scansione per rilevare malware o virus.
Specifiche
| Nome del modello | AS5 |
| Processore | AMD Ryzen™ 9 5900HX (8 Cores, 16 Threads, Max Turbo Frequency 4.60 GHz, 16MB Cache, cTDP 35W) |
| Sistema operativo | Windows 10 Pro |
| Memoria RAM | 32 GB di memoria DDR4 SDRAM |
| Magazzinaggio | 1 TB (PCIE x 2 interface) |
| Grafica | AMD Radeon™ Vega 8 Graphics (supports 8K visuals) |
| Connettività wireless | Wi-Fi 6E |
| Porti |
|
| Dimensioni | Dimensioni: 13 x 12 x 5.8 cm |

Figura 6: AMD Ryzen™ 9 5900HX Processor details.
Garanzia e supporto
Informazioni sulla garanzia
GEEKOM products typically come with a standard manufacturer's warranty. Please refer to the warranty card included in your package or visit the official GEEKOM webVisita il sito per i termini e le condizioni di garanzia dettagliati specifici per la tua regione e la data di acquisto. Conserva la prova d'acquisto per eventuali reclami in garanzia.
Assistenza clienti
For technical assistance, troubleshooting beyond this manual, or warranty inquiries, please contact GEEKOM customer support. You can usually find contact information on the official GEEKOM website or in the quick guide provided with your product.
GEEKOM Ufficiale Websito: www.geekompc.com