1. Introduzione
This manual provides detailed instructions for the setup, operation, maintenance, and troubleshooting of your Volcora 80mm Thermal Receipt Printer. This printer is designed for Point-of-Sale (POS) applications, offering fast and efficient thermal printing with an auto-cutter. It supports USB and Ethernet connectivity and is compatible with Android, Windows, and Linux operating systems.
2. Informazioni sulla sicurezza
- Assicurarsi che la stampante sia collegata a una presa di corrente dotata di messa a terra.
- Non esporre la stampante all'acqua o a umidità eccessiva.
- Evitare di posizionare la stampante alla luce diretta del sole o vicino a fonti di calore.
- Utilizzare solo l'adattatore di alimentazione fornito con la stampante.
- Tenere la stampante lontano dalla portata dei bambini.
- Non tentare di smontare o riparare la stampante da soli. Contattare l'assistenza clienti per ricevere assistenza.
3. Contenuto della confezione
Verificare che tutti gli articoli siano presenti nel pacco:
- Volcora 80mm Thermal Receipt Printer
- Cavo di alimentazione
- Cavo USB
- Test Paper Roll
- CD di installazione

Figure 3.1: Package Contents. The image displays the Volcora Thermal Receipt Printer along with its accessories: a power cord, a USB cable, a roll of test paper, and an installation CD.
4. Prodotto finitoview
4.1. Porte e pulsanti
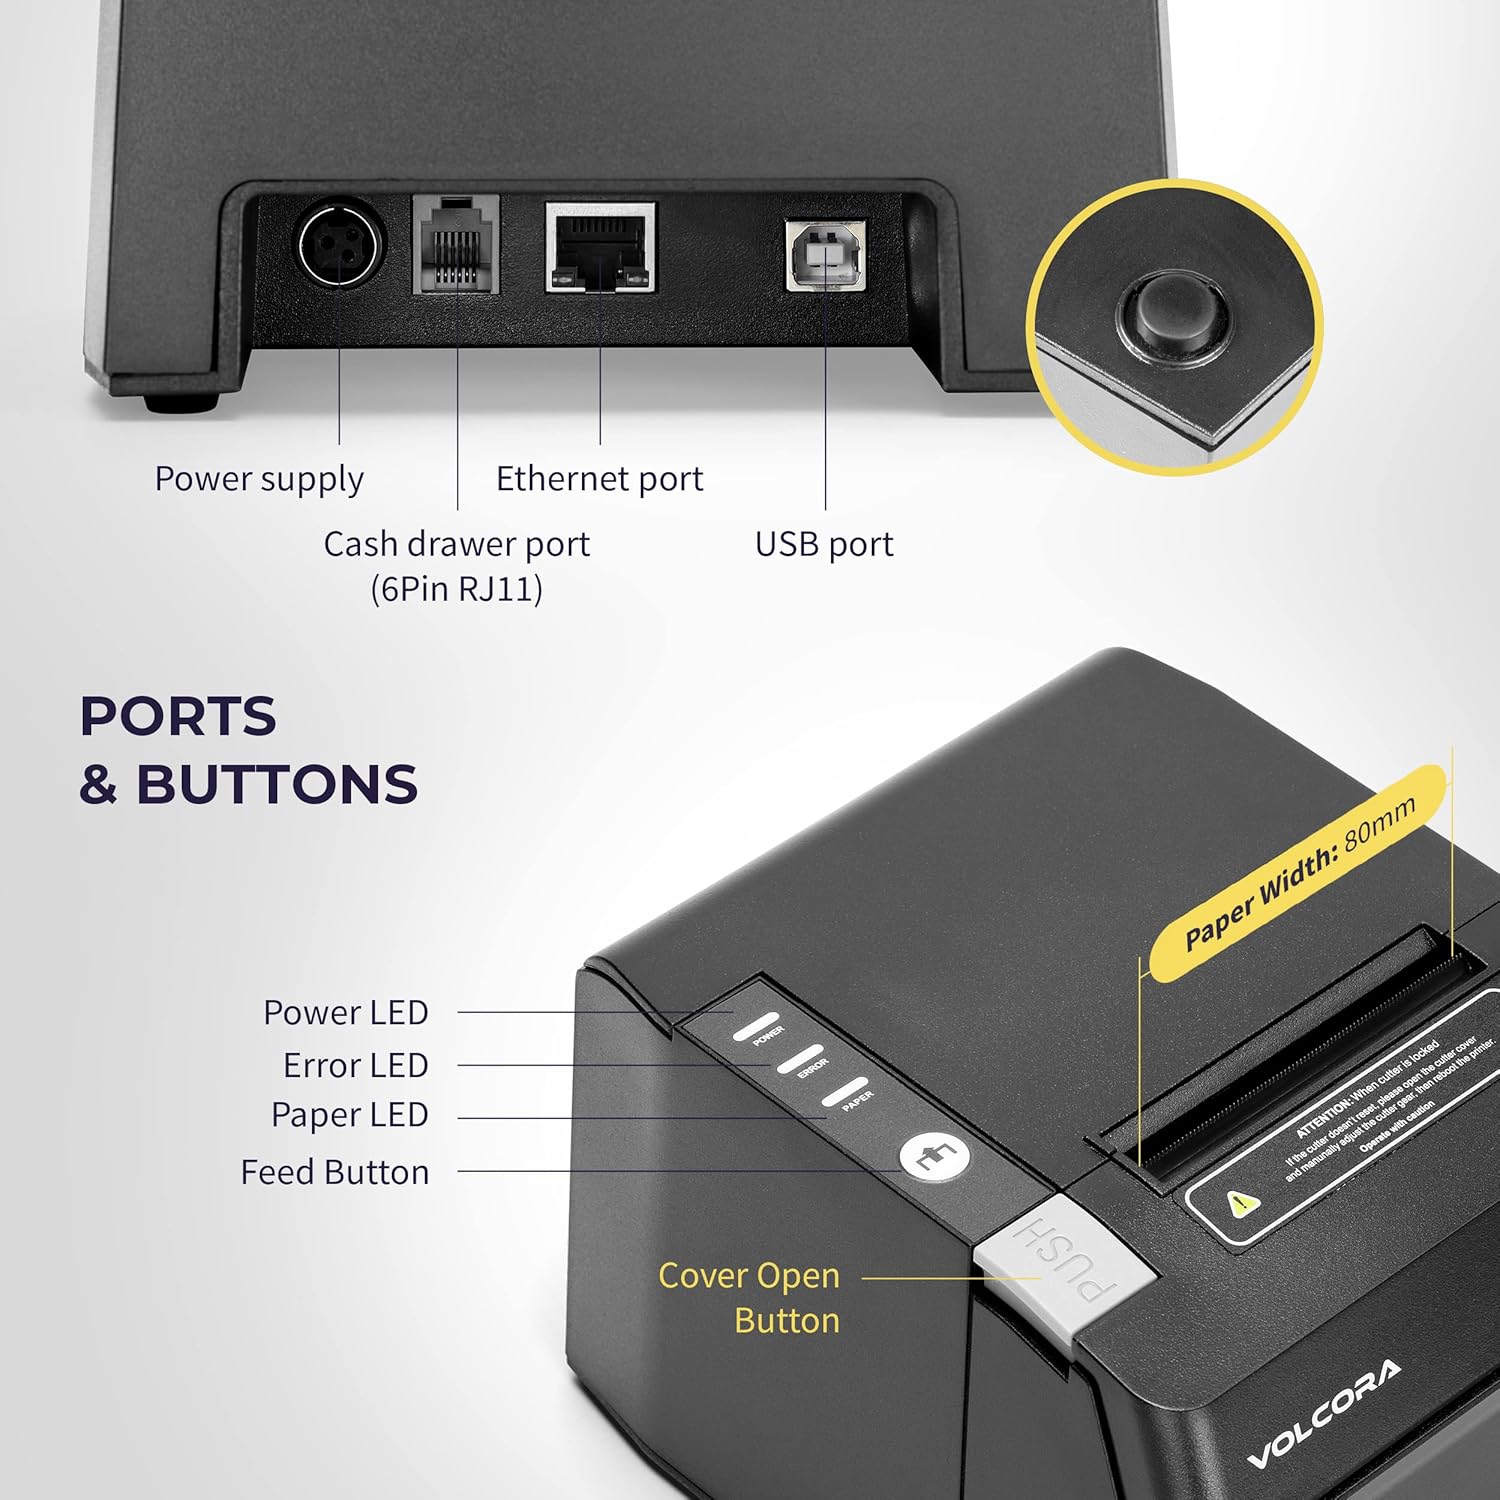
Figure 4.1: Printer Ports and Buttons. This image illustrates the rear ports including Power Supply, Ethernet Port, Cash Drawer Port (6Pin RJ11), and USB Port. It also shows the front panel with Power LED, Error LED, Paper LED, Feed Button, and Cover Open Button.
- Porta di alimentazione: Si collega all'alimentatore.
- Porta Ethernet: For network connectivity (LAN).
- Cash Drawer Port (6Pin RJ11): Si collega al cassetto portadenaro.
- Porta USB: Per la connessione diretta a un computer.
- LED di potenza: Indica lo stato dell'alimentazione.
- LED di errore: Indicates printer errors.
- LED di carta: Indicates paper status (e.g., low paper).
- Pulsante di alimentazione: Alimenta manualmente la carta.
- Pulsante di apertura del coperchio: Releases the printer cover to access the paper roll.

Figura 4.2: Multiplo views of the Volcora Thermal Receipt Printer, showing its compact design and various connection points.
5. Impostazione
5.1. Unboxing and Connecting
- Disimballare la stampante e rimuovere tutti i materiali di imballaggio.
- Collegare l'adattatore di alimentazione alla stampante e poi a una presa di corrente.
- Connect the printer to your Windows PC using the provided USB cable.
Video 5.1: Getting Started with Volcora Thermal Receipt Printer. This video demonstrates the unboxing, connecting the printer to power and a Windows PC via USB, and performing a self-test.
5.2. Installazione del rotolo di carta
- Press the Cover Open Button to open the printer cover.
- Inserire il rotolo di carta termica con il lato di stampa rivolto verso l'alto.
- Tirare un piccolo pezzo di carta oltre la taglierina.
- Chiudere saldamente il coperchio della stampante finché non scatta in posizione.
5.3. Installazione del driver (Windows)
- Download the latest driver for Windows from the Volcora support websito: volcora.com/support.
- Decomprimi il file scaricato file ed eseguire il programma di installazione del driver.
- Follow the on-screen prompts, agreeing to the license and selecting your printer model (e.g., 500108).
- Ensure the printer is connected via USB during installation.
- After successful installation, the printer should be recognized in your computer's "Printers & scanners" settings.

Figure 5.2: Easy Installation Steps. This diagram outlines the four main steps: Download drivers, Install drivers, Connect the printer, and Test print.
5.4. Network Configuration (Ethernet)
If you are using the Ethernet connection, you may need to configure the printer's IP address to match your network's subnet. This can be done using the Setting Tool software.
- First, identify your PC's IP address and subnet mask.
- Perform a printer self-test (see Section 6.2) to get the printer's current IP address.
- If the printer's IP is not in the same subnet as your PC, you will need to adjust either the PC's IP or the printer's IP.
- Open the Setting Tool software (available from volcora.com/support).
- Select the printer model and choose 'NET' for the port type.
- Enter the printer's current IP address and click 'Get Param' to retrieve its network settings.
- Modify the IP address, subnet mask, and gateway to align with your network configuration.
- Click 'Set' to apply the new settings to the printer.
- Perform another self-test to confirm the IP address has been updated.
Video 5.2: How to Modify LAN IP Address of Volcora Receipt Printer. This video guides you through identifying current IP addresses, changing PC host IP, and using the Setting Tool to configure the printer's IP address for Ethernet connectivity.
5.5. Opzioni di posizionamento

Figure 5.3: Multiple Use & Placement. The printer can be wall-mounted for kitchen use or placed on a counter for receipt printing.
6. Istruzioni per l'uso
6.1. Stampa di base
Once the printer is connected and drivers are installed, you can print receipts from your POS software or any application that supports printing. The printer features a 203 dpi resolution for clear prints and an auto-cutter for efficient receipt handling.

Figure 6.1: Efficient Printing. This image highlights the printer's fast print speed, low noise operation, and clear 203 dpi output, showing a receipt with a QR code and a barcode.
The printer supports various barcode types including UPC-A, UPC-E, EAN13, EAN8, CODE39, ITF25, CODABAR, CODE93, CODE128, QRCODE, PDF417, and Data matrix.
6.2. Printer Self-Test
A self-test prints the printer's configuration, including its IP address (if connected via Ethernet), and confirms basic functionality.
- Assicurarsi che la stampante sia spenta.
- Premere e tenere premuto il pulsante "Feed".
- Tenendo premuto il pulsante "Feed", accendere la stampante.
- Continue holding the "Feed" button for approximately 5 seconds until the self-test page begins to print.
6.3. Compatibilità
The Volcora Thermal Receipt Printer is compatible with various POS systems and operating environments. It supports ESC/POS commands.

Figure 6.2: Printer Compatibility. This chart lists compatible POS systems such as Loyverse, SumUp, Gloria Food, FoodZaps, TabShop POS, POSAPP.vn POS, Olsera POS, and KaHero POS. It also lists systems that are not compatible, including Square, Toast, Ubereats, Grubhub, Doordash, Postmates, Clover, and Shopify.
Sistemi operativi compatibili: Android, Windows, Linux. (Note: A software development kit (SDK) is required for custom application development on Ethernet-supported systems, including Windows, Linux, and MAC.)
Non compatibile con: Delivery platforms or POS applications such as Ubereats, Grubhub, Doordash, Postmates, Square, Clover, or Shopify. Does not offer Bluetooth or WiFi printing options.

Figure 6.3: Detailed Compatibility Table. This table shows compatibility for USB and Serial connections across various operating systems (Windows, Mac OS, Linux, Android, iOS) and notes about SDK and ESC/POS commands.
7. Manutenzione
7.1. Pulizia
- Pulire regolarmente l'esterno della stampante con un panno morbido eamp stoffa.
- To clean the thermal print head, use an alcohol swab. Ensure the printer is off and cool before cleaning.
- Rimuovere eventuali residui o polvere di carta dal percorso della carta.
8. Risoluzione Dei Problemi
8.1. Problemi comuni e soluzioni
| Problema | Possibile causa | Soluzione |
|---|---|---|
| La stampante non risponde | Power issue, loose cable, driver not installed. | Check power connection. Ensure USB/Ethernet cable is securely connected. Verify driver installation (Section 5.3). |
| Blank pages or faint print | Thermal paper loaded incorrectly, print head dirty. | Reload paper with the thermal side facing up. Clean the thermal print head (Section 7.1). |
| Inceppamento della carta | Incorrect paper loading, foreign object. | Open the cover, remove jammed paper, and ensure proper loading. Remove any obstructions. |
| Problemi di connessione Ethernet | Incorrect IP address configuration. | Perform a self-test to check the printer's IP. Use the Setting Tool to configure the IP address to match your network (Section 5.4). |
| Printer not compatible with POS software | Software not supported. | Refer to the compatibility list (Section 6.3). Contact your POS software provider for compatibility information. |
For further assistance, refer to the Volcora support center or contact customer service.
9. Specifiche
| Caratteristica | Dettaglio |
|---|---|
| Marca | Volcora |
| Numero di modello | 500108 |
| Tecnologia di stampa | Termico |
| Velocità di stampa | Fino a 220 mm/s |
| Risoluzione di stampa | 203 dpi |
| Larghezza della carta | 80 mm (3 1/8") |
| Larghezza di stampa | 72mm |
| Interfaccia | USB, Ethernet (LAN), Cash Drawer (RJ11) |
| Durata della taglierina automatica | 1.5 milione di tagli |
| Potenza in ingresso | CA 110 V/240 V, 50-60 Hz |
| Potenza di uscita | CC 24V/2A |
| Dimensioni del prodotto | 7"D x 6"W x 4.5"H (approx. 16 x 4 x 16 inches as per some specs) |
| Peso dell'articolo | 3.76 libbre |
| Codici a barre supportati | UPC-A, UPC-E, EAN13, EAN8, CODE39, ITF25, CODABAR, CODE93, CODE128, QRCODE, PDF417, Data matrix |
| Comando stampante | ESC/POS |
10. Garanzia
This Volcora Thermal Receipt Printer comes with a Garanzia limitata. Please refer to the warranty card included in your package or visit the Volcora support websito per termini e condizioni dettagliati.
11. Assistenza clienti
For additional assistance, troubleshooting, or to download drivers and tools, please use the following resources:
- Volcora Help Portal: https://help.volcora.com
- Centro di supporto per il download: https://volcora.com/support
- Email dell'assistenza clienti: support@volcora.com
Our U.S. based customer support team is available to assist with any integration issues.