
1. Introduzione
This user manual provides essential information for the safe and efficient operation of your HYCHIKA 3.6V Cordless Electric Rechargeable Screwdriver Drill Set. Please read this manual thoroughly before first use and keep it for future reference.
The HYCHIKA 3.6V Cordless Electric Screwdriver is designed for various screwing and light drilling tasks around the home. It features a maximum torque of 6 N-m, a 6.35 mm quick-change chuck, and a versatile design that allows for both pistol and straight grip configurations.
2. Istruzioni di sicurezza
Quando si utilizzano utensili elettrici, osservare sempre le precauzioni di sicurezza di base per ridurre il rischio di incendi, scosse elettriche e lesioni personali.
- Sicurezza dell'area di lavoro: Mantenete l'area di lavoro pulita e ben illuminata. Aree disordinate o buie possono favorire incidenti. Non utilizzate utensili elettrici in atmosfere esplosive, ad esempio in presenza di liquidi, gas o polveri infiammabili.
- Sicurezza elettrica: Evitare il contatto del corpo con superfici messe a terra o collegate a terra, come tubi, termosifoni, cucine e frigoriferi. Non esporre gli elettroutensili alla pioggia o all'umidità.
- Sicurezza personale: Always wear eye protection. Use safety glasses, goggles, or a face shield. Wear hearing protection when operating noisy tools. Dress properly; avoid loose clothing or jewelry.
- Uso e cura dello strumento: Non forzare l'utensile elettrico. Utilizzare l'utensile elettrico corretto per l'applicazione desiderata. Scollegare la spina dalla fonte di alimentazione e/o rimuovere la batteria prima di effettuare qualsiasi regolazione, sostituire accessori o riporre l'utensile elettrico.
- Uso e cura della batteria: Ricaricare solo con il caricabatterie specificato dal produttore. Non utilizzare le batterie con altri utensili elettrici. Quando la batteria non è in uso, tenerla lontana da altri oggetti metallici.
3. Contenuto della confezione
Verifica che tutti gli articoli elencati di seguito siano inclusi nel pacco. Se alcuni articoli risultano mancanti o danneggiati, contatta l'assistenza clienti.
- 1 x HYCHIKA 3.6V Cordless Screwdriver
- 19 x Punte cacciavite
- Barra 1 x Extension
- 1 x adattatore di ricarica
- 1 x Manuale utente

Figure 3.1: Contents of the HYCHIKA 3.6V Cordless Screwdriver package, including the screwdriver, various bits, and charging adapter.
4. Caratteristiche e componenti del prodotto
Familiarize yourself with the different parts of your cordless screwdriver.

Figure 4.1: Key components of the screwdriver, including the magnetic chuck, PUSH button, front LED light, On/Off switch, LED charger indicator, 3.5mm charger port, and forward & reverse button.
- Magnetic Chuck: 1/4 inch (6.35mm) quick-change chuck for easy bit installation and removal.
- Luce LED anteriore: Illumina l'area di lavoro per una migliore visibilità in ambienti bui.
- Interruttore On/Off: Activates and deactivates the screwdriver.
- Forward & Reverse Button: Controls the rotation direction for screwing and unscrewing.
- LED Charger Indicator: Provides status of battery charging.
- 3.5mm Charger Port: Connection point for the charging adapter.
- Premi il bottone: Used to adjust the grip configuration from pistol to straight.
5. Impostazione
5.1 Caricamento della batteria
The screwdriver is powered by a 3.6V 2000 mAh Lithium-Ion battery. Before first use, fully charge the battery.
- Connect the charging adapter to the 3.5mm charger port on the screwdriver.
- Collegare l'adattatore di ricarica a una presa elettrica standard.
- The LED charger indicator will illuminate during charging. Once fully charged, the indicator may change color or turn off depending on the model.
- Una volta completata la ricarica, scollegare il caricabatterie.

Figure 5.1: The screwdriver connected to its charging adapter, indicating a full charge.
The screwdriver is designed to maintain full power output even when the battery is low, ensuring consistent performance until the battery is depleted.
5.2 Installazione delle punte del cacciavite
The screwdriver features a 1/4 inch (6.35mm) magnetic quick-change chuck for easy bit installation.
- Seleziona la punta del cacciavite appropriata per il tuo compito.
- Insert the bit into the magnetic chuck until it is securely seated. The magnetic chuck will hold the bit firmly in place.
- To remove a bit, simply pull it out of the chuck. Bits with grooves are designed for easier removal.

Figure 5.2: Visual guide for inserting a bit into the magnetic chuck and removing it.
6. Istruzioni per l'uso
6.1 Adjusting Grip Configuration
The screwdriver can be used in two grip configurations: pistol grip or straight grip, for enhanced versatility and comfort.
- To change the grip, press and hold the "PUSH" button located at the top of the screwdriver.
- While holding the button, rotate the handle ninety degrees to switch between pistol and straight configurations.
- Release the "PUSH" button once the desired configuration is achieved. The handle will lock into place.
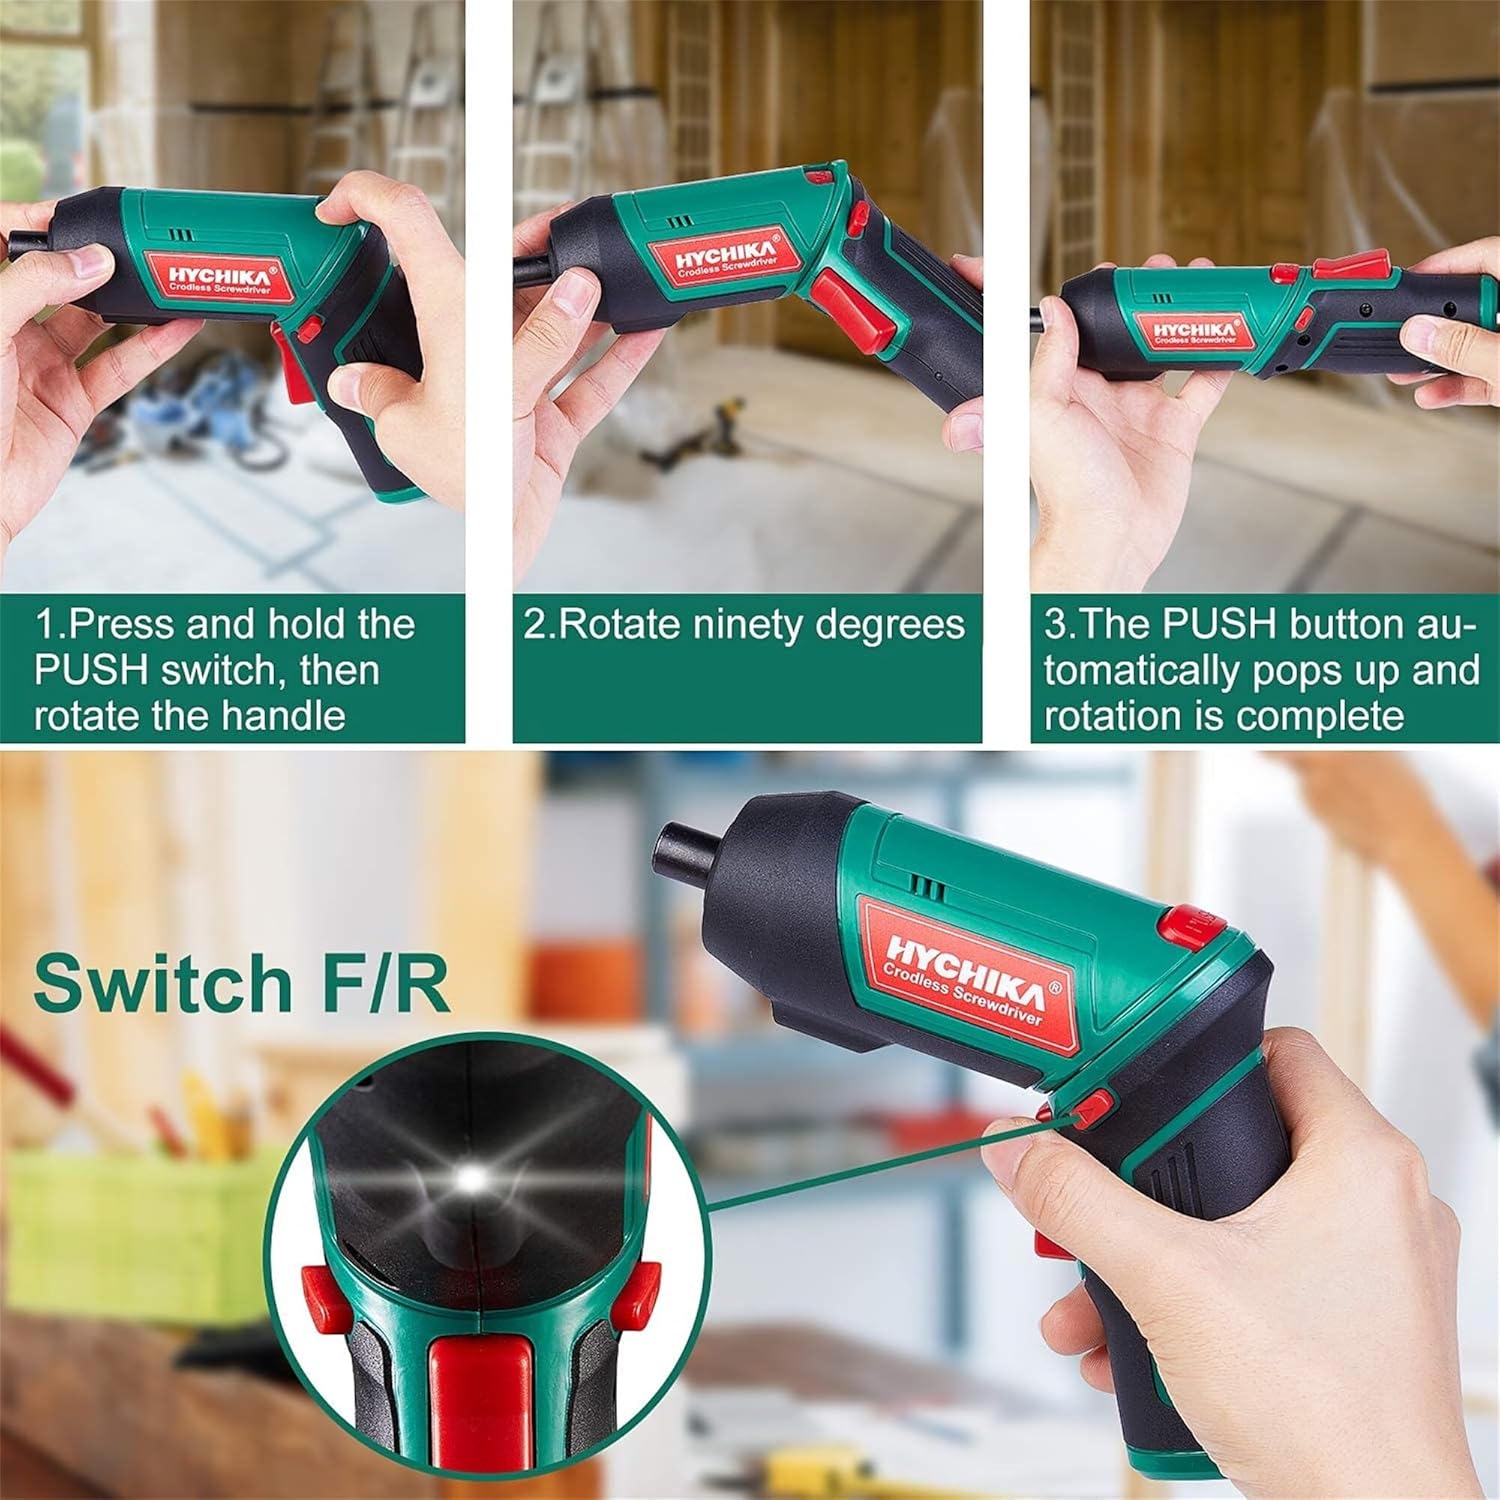
Figure 6.1: Demonstrates the process of transforming the screwdriver's grip by pressing the PUSH button and rotating the handle.
6.2 Funzionamento in avanti e indietro
The forward/reverse button controls the direction of rotation for screwing and unscrewing.
- To drive screws (forward rotation), push the forward/reverse button to the left (when viewed dalla parte posteriore dell'utensile).
- To remove screws (reverse rotation), push the forward/reverse button to the right.
- When the button is in the center position, the tool is locked, preventing accidental activation.
6.3 Utilizzo della luce di lavoro a LED
The built-in LED light automatically illuminates when the screwdriver is in operation, providing visibility in dimly lit areas.

Figure 6.2: The integrated LED light provides clear illumination for working in dark environments.
7. Manutenzione
Regular maintenance ensures the longevity and optimal performance of your screwdriver.
- Pulizia: Mantenere le aperture di ventilazione pulite e libere da polvere. Utilizzare un panno morbido eamp panno per pulire l'utensile casing. Non utilizzare prodotti chimici aggressivi o detergenti abrasivi.
- Cura dei bit: Clean screwdriver bits after use. Store them in the provided case to prevent loss and damage.
- Conservazione della batteria: If storing the tool for an extended period, ensure the battery is partially charged (around 50%) and store it in a cool, dry place. Recharge the battery every 3-6 months to maintain its health.
- Ispezione generale: Periodically check for any loose screws, damaged cords, or worn parts. Do not use the tool if any damage is observed.
8. Risoluzione Dei Problemi
This section addresses common issues you might encounter with your screwdriver.
| Problema | Possibile causa | Soluzione |
|---|---|---|
| Il cacciavite non si accende. | La batteria è scarica. L'interruttore avanti/indietro è in posizione centrale (bloccato). | Caricare completamente la batteria. Spingere l'interruttore avanti/indietro verso sinistra o verso destra. |
| Screwdriver loses power quickly. | Batteria non completamente carica. Battery life degraded. | Assicurarsi che la batteria sia completamente carica prima dell'uso. If battery life is significantly reduced, contact customer support for replacement options. |
| Bits are not held securely in the chuck. | Bit is not fully inserted. Chuck is dirty or damaged. | Push the bit firmly into the chuck until it clicks into place. Clean the chuck area. If damage is visible, contact customer support. |
Se il problema persiste dopo aver provato queste soluzioni, contattare l'assistenza clienti.
9. Specifiche
| Caratteristica | Specificazione |
|---|---|
| Marca | Overstock (HYCHIKA) |
| Numero di modello | c131a012-0da9-4306-aeab-b1d9ff5cd4b7 |
| Voltage | 3.6 Volt |
| Fonte di alimentazione | Alimentato a batteria |
| Velocità | 180 giri al minuto |
| Articolo Coppia | 6 Newton Meters (6 N-m) |
| Tipo di batteria | Ioni di litio |
| Capacità della batteria | 2000 mAh |
| Dimensioni del mandrino | 1/4 di pollice (6.35 mm) |
| Materiale | Plastica, gomma |
| Colore | Verde |
| Codice UPC | 616859793583 |
10. Garanzia e supporto
Overstock offers lifetime after-sales service for this product. For any questions, concerns, or technical assistance, please contact our customer support team.
Please have your model number (c131a012-0da9-4306-aeab-b1d9ff5cd4b7) and purchase information ready when contacting support.