
1. Introduzione
The Apitor Robot E STEM Kit is an educational construction set designed to introduce children aged 6-12 to fundamental principles of science, technology, engineering, and mathematics. This kit allows for the construction of 14 different mechanical models using 218 pieces and a motor, fostering hands-on learning and problem-solving skills. The models demonstrate various physics concepts, including gravity, levers, and gear mechanisms.

Image 1.1: The Apitor Robot E STEM Kit, certified as an educational product by STEM.ORG.

Image 1.2: A collection of various mechanical models that can be constructed using the Apitor Robot E STEM Kit.
2. Informazioni sulla sicurezza
Si prega di leggere e comprendere tutte le istruzioni di sicurezza prima del montaggio e dell'uso.
- Rischio di soffocamento: This kit contains small parts and is not suitable for children under 3 years of age. Keep all components away from infants and young children who may place inedible objects in their mouths.
- Sicurezza della batteria: The kit requires AA batteries (not included). Ensure batteries are inserted with correct polarity. Do not mix old and new batteries, or different types of batteries. Remove batteries if the kit will not be used for an extended period.
- Supervisione degli adulti: Adult supervision is recommended during assembly and play, especially for younger users, to ensure proper construction and safe handling of components.
- Sicurezza dei materiali: All building blocks are made from high-quality ABS material. Do not attempt to modify or ingest any parts.
3. Cosa c'è nella scatola
The Apitor Robot E STEM Kit includes the following components:
- 218 pezzi da costruzione
- 1 Unità Motoria
- Learning Materials Manual
- Detailed Step-by-Step Picture Instructions
- Sorting Tray for components
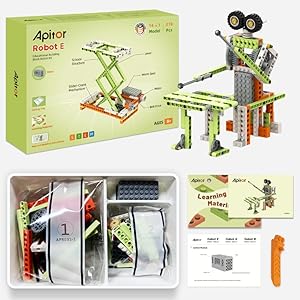
Immagine 3.1: Un dettaglio view of the Apitor Robot E STEM Kit contents, showing the box, sorted pieces, motor, and instruction manuals.
4. Installazione e assemblaggio
The Apitor Robot E kit allows for the construction of 14 distinct mechanical models. Follow the provided instructions carefully for each model.
4.1. Required Materials (Not Included)
- AA Batteries (quantity may vary per model, typically 2-4)
4.2. Processo di assemblaggio
- Disimballare i componenti: Carefully remove all pieces from the packaging. Utilize the included sorting tray to organize smaller components.
- Consultare le istruzioni: Refer to the detailed step-by-step picture instructions provided in the manual. Each model has its own specific assembly guide.
- Istruzioni digitali: For additional building models and interactive guides, download the "Apitor Kit" app. The app provides instructions for all 14 models.
- Installazione della batteria: Install the required AA batteries into the motor unit, ensuring correct polarity (+/-).
- Collegare il motore: Integrate the motor unit into your chosen model as indicated in the instructions.

Image 4.1: A child using a tablet to view digital building instructions from the Apitor Kit app.

Image 4.2: Children engaging with the kit, illustrating the application of gravity and lever principles in mechanical models.
5. Istruzioni per l'uso
Once a model is successfully assembled and batteries are installed, it is ready for operation. The specific operation will depend on the model built.
- Accensione: Locate the power switch on the motor unit or the assembled model (if applicable) and switch it to the "ON" position.
- Osserva il movimento: Watch how the gears, levers, and other mechanical components interact to create movement.
- Sperimentare: The kit encourages experimentation. Users can observe how changes in design or component placement affect the model's function.
- Materiali didattici: Refer to the included Learning Materials manual for explanations of the scientific principles demonstrated by each model.
Video 5.1: Demonstration of various Apitor STEM kit models in motion, showcasing their mechanical functions.

Image 5.1: An illustration detailing 17 different types of mechanical knowledge that can be explored with the kit, such as levers, gears, and pulleys.
6. Manutenzione
Proper maintenance ensures the longevity and functionality of your Apitor Robot E STEM Kit.
- Pulizia: Wipe components with a dry, soft cloth. Avoid using water or chemical cleaners, as these can damage the plastic or electronic components.
- Magazzinaggio: Store all pieces in a cool, dry place away from direct sunlight. Use the provided sorting tray or a similar container to keep pieces organized and prevent loss.
- Rimozione della batteria: Always remove batteries from the motor unit when the kit is not in use for extended periods to prevent leakage and damage.
- Ispezione: Periodically inspect all pieces for wear or damage. Replace any broken or severely worn parts if possible.
7. Risoluzione Dei Problemi
If you encounter issues with your Apitor Robot E STEM Kit, refer to the following common troubleshooting steps:
| Problema | Possibile causa | Soluzione |
|---|---|---|
| Model does not move or motor is unresponsive. |
|
|
| I pezzi non si incastrano. |
|
|
| Model is unstable or falls apart. |
|
|
8. Specifiche
| Caratteristica | Dettaglio |
|---|---|
| Numero di modello | APR031 |
| Dimensioni del prodotto | 10.43 x 7.48 x 2.36 pollici |
| Peso dell'articolo | 1.17 libbre |
| Età consigliata | 6 - 12 anni |
| Numero di pezzi | 218 |
| Fonte di alimentazione | Batterie AA (non incluse) |
| Materiale | Plastica ABS di alta qualità |
9. Garanzia e supporto
For warranty information, product support, or to report missing/damaged parts, please contact Apitor customer service directly. Refer to the packaging or the official Apitor websito per i contatti.
Produttore: Apitore