1. Introduzione
Thank you for choosing the FLYLINKTECH BD10 6000A 12V Car Jump Starter and Power Bank. This device is designed to provide emergency jump-starting for vehicles and serve as a portable power bank for various electronic devices. Please read this manual thoroughly before use to ensure safe and optimal operation.

Image 1.1: The FLYLINKTECH BD10 Jump Starter unit with its smart battery clamps.
2. Informazioni sulla sicurezza
Osservare sempre le seguenti precauzioni di sicurezza per evitare lesioni o danni al dispositivo o al veicolo:
- Non tentare di avviare una batteria congelata.
- Assicurarsi che la polarità sia corretta (contatto rossoamp a positivo, nero clamp a negativo). L'inversione di polarità può causare danni.
- Non consentire la smart clampnon devono toccarsi quando sono collegati all'avviatore di emergenza.
- Tenere il dispositivo lontano dalla portata dei bambini.
- Non esporre il dispositivo a temperature estreme (superiori a 60°C / 140°F o inferiori a -20°C / -4°F) o alla luce solare diretta per periodi prolungati.
- Non smontare o modificare il dispositivo.
- Utilizzare solo lo smart cl fornitoampe cavi di ricarica.
- Se il dispositivo diventa eccessivamente caldo durante l'uso, scollegarlo immediatamente.

Image 2.1: The jump starter incorporates multiple safety features such as spark-proof, reverse polarity, overvoltage, short circuit, overload, and high-temperature protection.
3. Contenuto della confezione
Verificare che tutti gli articoli siano presenti nel pacco:
- FLYLINKTECH BD10 Jump Starter Unit
- Batteria intelligente Clamps
- Cavo da USB-C a USB-C
- Cavo da USB-A a USB-C
- Adattatore per caricabatteria da auto a 12 V CC
- Manuale d'uso
- Custodia di stoccaggio

Image 3.1: The complete package includes the jump starter, smart clamps, various cables, user manual, and a protective storage case.
4. Configurazione e ricarica
4.1 Addebito iniziale
Before first use, fully charge the jump starter. The device features a 26800mAh battery capacity.
- Connect the provided USB-C cable to the jump starter's USB-C input port.
- Connect the other end of the cable to a compatible USB wall charger (not included). For fastest charging, use a PD 45W charger.
- The LED screen will display the charging status and battery percentage.
4.2 Tempi di ricarica
| Valutazione del caricatore | Tempo di carica approssimativo |
|---|---|
| 5W | 18 ore |
| 18W | 7 ore |
| 45W | 2 ore |
Note: A 45W wall charger is not included in the package.

Image 4.1: The device supports PD 45W fast charging, significantly reducing recharge time when using a compatible charger.
5. Istruzioni per l'uso
5.1 Avviamento di emergenza di un veicolo
The FLYLINKTECH BD10 is capable of jump-starting all gas engines and diesel engines up to 12.0L.
- Assicurare una carica sufficiente: Check the jump starter's LED screen to ensure it has at least 50% charge.
- Connetti Smart Clamps: Inserire la spina blu dello smart clamps into the jump starter's 12V output port. Ensure a firm connection.
- Collegamento alla batteria dell'auto:
- Allega il rosso (+) clamp al terminale positivo della batteria del veicolo.
- Allega il Nero (-) clamp al terminale negativo della batteria del veicolo.
- Indicatore di controllo: L'intelligente clamp indicator light should turn solid green, indicating a correct connection. If it flashes or shows red, check connections and battery status.
- Press BOOST (if needed): If the vehicle battery is extremely low or completely dead, press the 'BOOST' button on the jump starter. Wait for the indicator light on the smart clamps to turn solid green.
- Avviare il veicolo: Attempt to start your vehicle. If it doesn't start on the first try, wait 30 seconds before trying again. Do not attempt more than 3 consecutive starts.
- Rimuovere Clamps: Una volta avviato il veicolo, rimuovere immediatamente la chiave intelligenteampdalla batteria dell'auto, quindi scollegarli dall'avviatore di emergenza.

Image 5.1: The jump starter connected to a car battery, ready for operation. It supports 6000A peak current, 12V output, and is suitable for a wide range of engines.

Image 5.2: Visual guide illustrating the four steps to jump-start a vehicle: connect the plug, attach clamps, press boost, and start the engine.
5.2 Funzione Power Bank
The BD10 can charge multiple electronic devices via its USB-A and USB-C ports.
- Uscita USB1: Fino a 18 W (max)
- Uscita USB2: Fino a 18 W (max)
- Uscita USB-C: Fino a 45 W (PD)
Connect your device using the appropriate USB cable to the desired output port. The LED screen will show 'OUT' and the wattage being drawn.

Image 5.3: The jump starter functioning as a power bank, simultaneously charging a smartphone and a tablet via its USB ports.
Torcia elettrica 5.3 LED
The built-in LED flashlight offers three modes: constant light, SOS signal, and strobe light.
- Press and hold the flashlight button to turn on the constant light.
- Press the button again to cycle through SOS and strobe modes.
- Premere e tenere premuto nuovamente per spegnere.

Image 5.4: The integrated LED flashlight provides illumination, an SOS signal, and a strobe function for emergency situations.
5.4 Informative LED Screen
The 6.0-inch LED screen provides real-time information about the device's status:
- Livello della batteria: Visualizza la percentuale residua della batteriatage.
- IN/OUT Indicator: Indica se il dispositivo è in carica (IN) o in scarica (OUT).
- Cosatage Visualizzazione: Indicates the power (W) being drawn or supplied.
- Avvisi di errore: Displays specific error codes or symbols if an issue occurs.
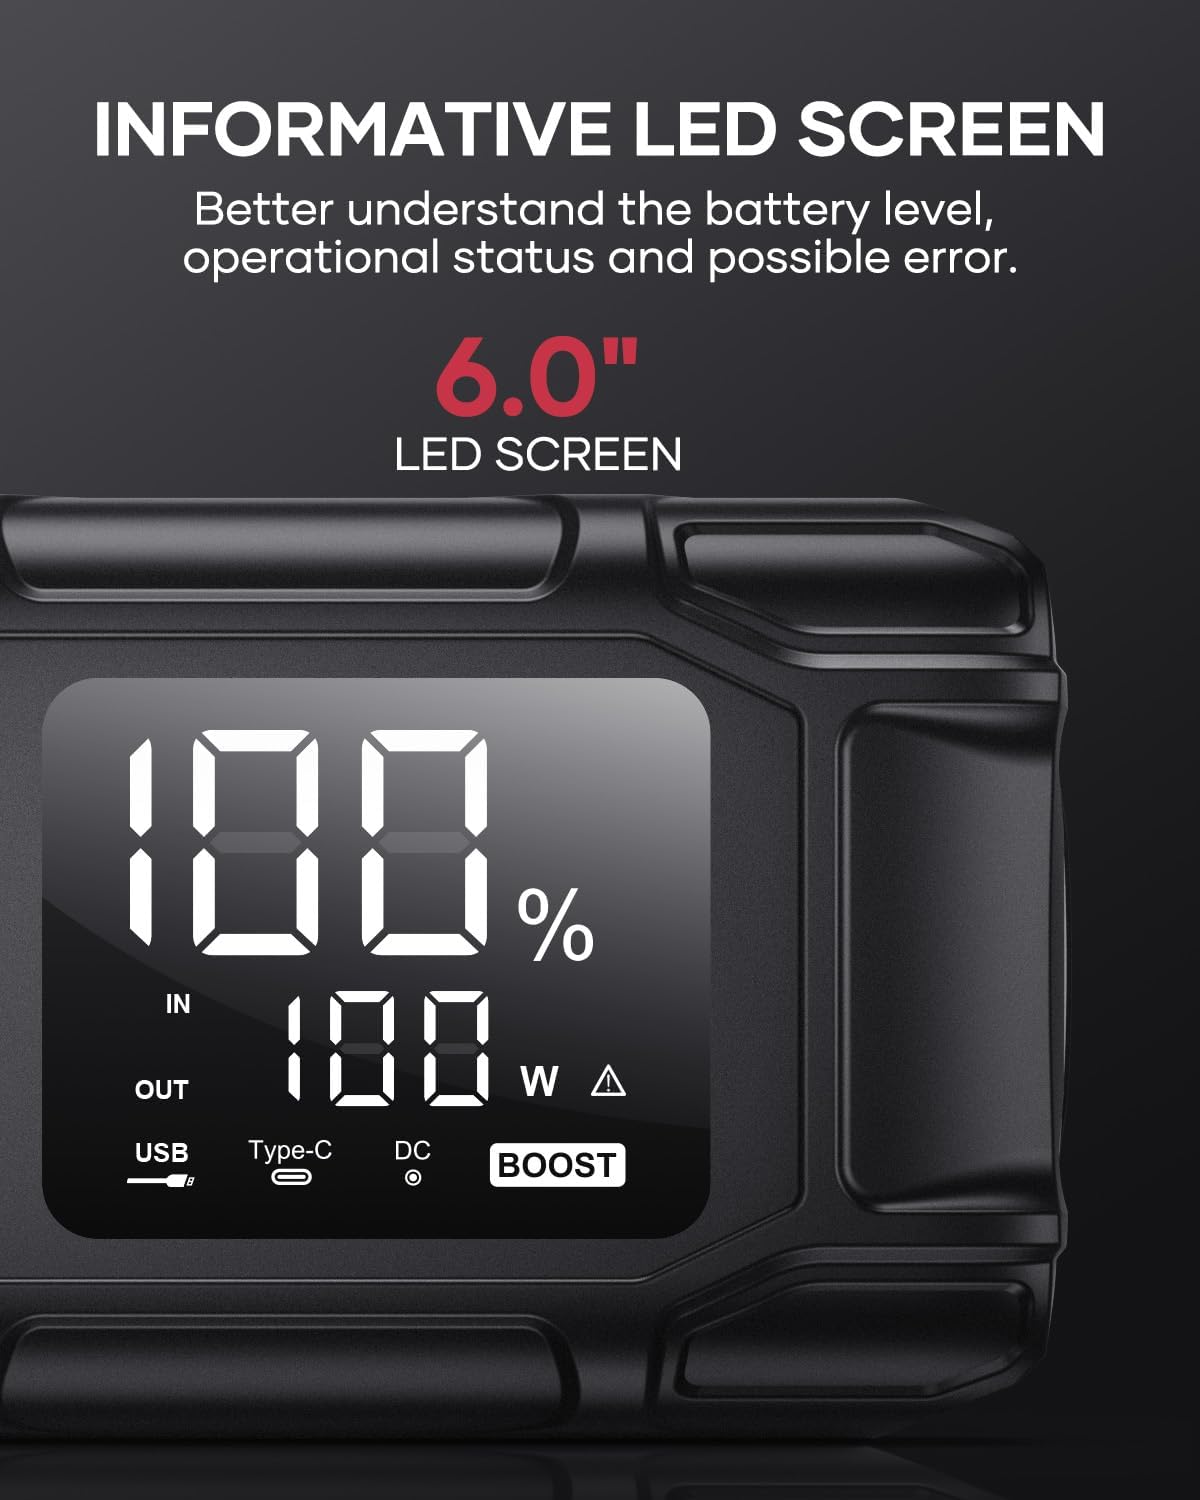
Image 5.5: The 6.0-inch LED screen provides clear information on battery percentage, input/output status, and power consumption.
6. Manutenzione
- Ricaricare regolarmente: Per prolungare la durata della batteria, ricaricare l'avviatore di emergenza ogni 3-6 mesi, anche se non lo si utilizza.
- Magazzinaggio: Store the device in its protective case in a cool, dry place, away from direct sunlight and moisture.
- Pulizia: Pulisci il dispositivo con un panno morbido e asciutto. Non utilizzare prodotti chimici aggressivi o materiali abrasivi.
- Clamp Cura: Assicurare la classe intelligenteampsiano puliti e privi di corrosione prima e dopo ogni utilizzo.
7. Risoluzione Dei Problemi
The device features multiple alarm situations indicated by audible signals and screen displays:
- Basso volumetage Protezione: Audible signal "3". Recharge the device.
- Volume esternotage Exceeds Vehicle Voltage: Audible signal "4". Check vehicle battery voltage.
- Protezione da cortocircuito: Audible signal "5". Check clamp connections for short circuits.
- Safety Mode Activated: Audible signal "6". Device has entered safety mode due to an issue.
- Protezione da sovracorrente: Audible signal "7". Reduce load or check connections.
- Allarme alta/bassa temperatura: Audible signal "8". Allow device to return to operating temperature range (-20°C to 60°C).
- Collegamento inverso: Audible signal "9". Correct the clamp polarità.

Immagine 7.1: Passoview of the device's multi-alarm system, indicating various protection states with unique audible signals.
Se i problemi persistono dopo aver seguito questi passaggi, contattare l'assistenza clienti.
8. Specifiche
| Caratteristica | Specificazione |
|---|---|
| Marca | TECNOLOGY DI FLYLINK |
| Modello | BD10 |
| Corrente di uscita di picco | 6000 Ampqui |
| Capacità della batteria | 26800mAh |
| Volume di uscitatage | 12V |
| Ingresso/uscita USB-C | PD 45 W |
| Uscita USB-A | 18 W (massimo) |
| Tipi di motore applicabili | Tutto a gas, fino a 12.0 l diesel |
| Temperatura di esercizio | -20°C a 60°C (-4°F a 140°F) |
| Dimensioni del prodotto | Dimensioni: 23.95 x 10 x 5.69 cm |
| Peso dell'articolo | 920 grammi |

Image 8.1: The device is designed to operate reliably in extreme climates, from -20°C (-4°F) to 60°C (140°F).
9. Garanzia e supporto
FLYLINKTECH is committed to providing high-quality products. For any questions, technical assistance, or warranty claims, please refer to the contact information provided with your purchase or visit the official FLYLINKTECH websito. Si prega di conservare la prova d'acquisto ai fini della garanzia.