1. Introduzione
This manual provides detailed instructions for the installation, operation, and maintenance of your PCCOOLER Master IE200 E-ATX Tempered Glass Mesh Case IE200S. Designed for high-performance computing, this case combines robust construction with optimized airflow and aesthetic appeal. Please read this manual thoroughly before beginning any installation to ensure proper setup and safe usage.
2. Informazioni sulla sicurezza
- Scollegare sempre l'alimentazione dalla presa a muro prima di eseguire qualsiasi operazione di installazione, manutenzione o pulizia.
- Handle the tempered glass side panel with extreme care. Tempered glass is fragile and can shatter if dropped or struck with force.
- Be aware of sharp edges inside the case during installation to prevent injury.
- Tenere la custodia lontana da acqua, umidità e temperature estreme.
- Garantire una messa a terra adeguata per evitare rischi elettrici.
3. Contenuto della confezione
Verifica che tutti i componenti elencati di seguito siano presenti nel tuo pacchetto:
- PCCOOLER Master IE200 E-ATX Tempered Glass Mesh Case IE200S
- Manuale dell'utente (questo documento)
- Accessory Kit (screws, zip ties, various mounting brackets)
4. Specifiche
| Caratteristica | Descrizione |
|---|---|
| Marca | PCCOOLER |
| Nome del modello | IE200 |
| Compatibilità della scheda madre | E-ATX |
| Tipo di caso | Mid Tower |
| Slot di espansione | 7+3 (Supports GPU vertical installation) |
| Porte USB 2.0 | 2 |
| Porte USB 3.0 | 1 |
| Peso dell'articolo | 21.3 libbre |
| Dimensioni del prodotto (LxWxH) | 17 x 8.86 x 19.49 pollici |
| Colore | Nero |
| Materiale | Vetro temperato |
| Tipo di montaggio dell'alimentatore | Montaggio inferiore |
| Metodo di raffreddamento | Aria |
| Supporto per le dimensioni della ventola | Up to 9 fans, 360mm AIO on Front/Top |
5. Configurazione e installazione
5.1. Caso finitoview
The PCCOOLER Master IE200 features a tempered glass side panel for showcasing your build and mesh panels for optimal airflow. The case is designed for E-ATX motherboards and supports extensive cooling solutions.

Figura 1: Lato anteriore view of the PCCOOLER Master IE200 case, showcasing the tempered glass side panel and mesh front.
5.2. Accesso all'interno
The tempered glass side panel features an 'oven door handle' design for convenient access to the interior components. Gently pull the handle to open the side panel.
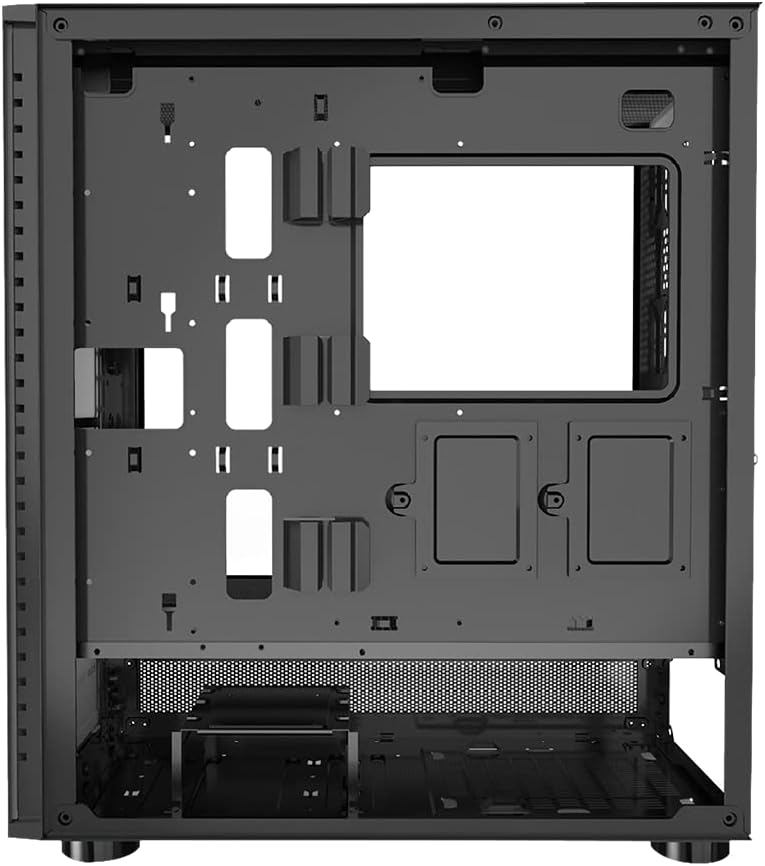
Figura 2: Interno view of the PCCOOLER Master IE200 case, illustrating the spacious layout for component installation.
5.3. Installazione della scheda madre
The case supports E-ATX motherboards. Align your motherboard with the standoffs on the motherboard tray and secure it using the provided screws from the accessory kit.
5.4. Installazione dell'alimentatore
The power supply unit (PSU) is mounted at the bottom of the case. Secure your ATX PSU using the provided screws.
5.5. Installazione del sistema di raffreddamento
The IE200 case supports up to 9 fans and 360mm AIO liquid cooling radiators on both the front and top panels. This design facilitates vertical airflow for strong heat dissipation.

Figura 3: Fronte view of the case with the mesh panel detached, showing the fan mounting locations.
5.6. Installazione GPU
The case offers 7+3 expansion slots, supporting both standard horizontal and vertical GPU installations. Utilize the provided brackets for vertical GPU mounting if desired.
5.7. Collegamenti del pannello frontale
Connect the front panel I/O cables (USB 2.0, USB 3.0, audio, power, reset, RGB control) to their corresponding headers on your motherboard. The front panel includes 2x USB 2.0 ports and 1x USB 3.0 port.

Figura 4: Interno view showing the front panel I/O connections and cable routing options.
5.8. Gestione dei cavi
Utilize the cable routing cutouts and tie-down points on the motherboard tray to manage cables effectively. Proper cable management improves airflow and aesthetics.

Figura 5: Interno posteriore view, illustrating the space and features for cable management.
6. Istruzioni per l'uso
6.1. Accensione/spegnimento
Press the power button located on the front I/O panel to turn your system on or off. A short press typically initiates power-on or sleep mode, while a long press (4-5 seconds) forces a shutdown.
6.2. Controllo dell'illuminazione RGB
If your fans or other components feature RGB lighting, use the dedicated RGB control button on the front I/O panel to cycle through lighting modes or connect to your motherboard's RGB software for advanced customization.
7. Manutenzione
7.1. Pulizia dei filtri antipolvere
Regularly clean the mesh panels and any removable dust filters to maintain optimal airflow and prevent dust buildup inside the case. Dust filters can typically be removed, cleaned with water or compressed air, and reinstalled.
7.2. Cura del vetro temperato
Clean the tempered glass panel with a soft, lint-free cloth and a non-abrasive glass cleaner. Avoid harsh chemicals or abrasive materials that could scratch or damage the glass.
8. Risoluzione Dei Problemi
8.1. Nessun potere
- Ensure the power supply is properly connected to the wall outlet and the motherboard.
- Check that the power switch on the PSU is in the 'ON' position.
- Verificare che il cavo del pulsante di accensione del pannello frontale sia collegato correttamente al connettore della scheda madre.
8.2. Surriscaldamento
- Ensure all case fans are spinning and properly oriented for optimal airflow (intake/exhaust).
- Clean any dust filters and internal components to prevent airflow obstruction.
- Verify that CPU and GPU coolers are correctly installed and making proper contact.
9. Garanzia e supporto
For warranty information, technical support, or further assistance, please refer to the official PCCOOLER webo contattare il servizio clienti. Conservare la prova d'acquisto per eventuali reclami in garanzia.