
1. Introduzione
The Crestron HD-CONV-USB-300 is a versatile USB converter designed to seamlessly integrate HDMI and analog audio sources into a USB stream. This device facilitates the capture and conversion of high-definition video and audio signals for various applications, including conferencing, streaming, and recording. This manual provides essential information for the proper installation, operation, and maintenance of your HD-CONV-USB-300 converter.
2. Informazioni sulla sicurezza
Please read and understand all safety instructions before operating this device to prevent injury or damage.
- Energia: Use only the power adapter supplied with the unit. Ensure the power source matches the voltage requisiti.
- Ventilazione: Do not block ventilation openings. Install the device in a location with adequate airflow.
- Umidità: Non esporre l'unità alla pioggia, all'umidità o immergerla in acqua.
- Calore: Tenere l'unità lontana da fonti di calore quali termosifoni, bocchette di ventilazione, stufe o altri apparecchi che producono calore.
- Pulizia: Disconnect power before cleaning. Use a dry cloth only. Do not use liquid cleaners or aerosol sprays.
- Manutenzione: Non tentare di riparare questo prodotto da soli. Affidare tutte le operazioni di manutenzione a personale di assistenza qualificato.
3. Contenuto della confezione
Verifica che tutti gli articoli siano presenti nel tuo pacco:
- 1x Crestron HD-CONV-USB-300 USB Converter
- 1x adattatore di alimentazione
- 1x USB Cable (Type A to Type B)
- 1x Quick Start Guide (or similar documentation)
4. Prodotto finitoview
The HD-CONV-USB-300 features multiple input and output ports for flexible connectivity.
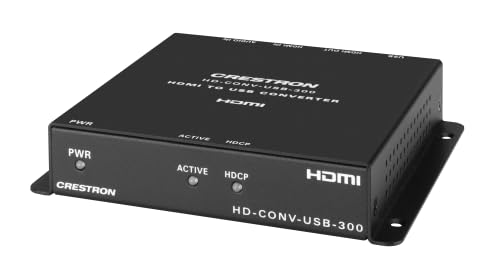
Figura 1: Fronte view of the Crestron HD-CONV-USB-300 USB Converter. This image shows the compact design and the Crestron branding on the device.
4.1. Pannello frontale
- LED di stato: Indica l'alimentazione e lo stato operativo.
- Pulsante di selezione ingresso: Toggles between HDMI and Analog audio inputs.
4.2. Pannello posteriore
- Ingresso HDMI: Connect your HDMI video and audio source here.
- Analog Audio Input (3.5mm): Connect analog audio sources.
- USB Output (Type B): Connect to your computer for data transfer.
- Ingresso alimentazione (CC 5V): Collegare l'adattatore di alimentazione in dotazione.
5. Impostazione
Follow these steps to set up your Crestron HD-CONV-USB-300 converter:
- Collegare la sorgente HDMI: Connect an HDMI cable from your video source (e.g., camera, media player) to the Ingresso HDMI port on the HD-CONV-USB-300.
- Connect Analog Audio Source (Optional): If using an analog audio source, connect a 3.5mm audio cable from your audio device to the Ingresso audio analogico porta.
- Connessione al computer: Collegare il cavo USB in dotazione dal USB Output (Type B) port on the converter to an available USB port on your computer.
- Connetti alimentazione: Collegare l'adattatore di alimentazione in dotazione alla presa Ingresso alimentazione (DC 5 V) port on the converter, then plug the adapter into a power outlet. The Status LED should illuminate.
- Installazione del driver: The HD-CONV-USB-300 is typically plug-and-play and does not require specific drivers for most operating systems (Windows, macOS, Linux). It will be recognized as a standard USB Video Class (UVC) and USB Audio Class (UAC) device.
- Configurazione software: Open your preferred video conferencing, streaming, or recording software (e.g., OBS Studio, Zoom, Microsoft Teams). In the software's settings, select the Crestron HD-CONV-USB-300 as your video and audio input device.
6. Istruzioni per l'uso
Once the device is set up, follow these steps for operation:
- Accensione: Ensure the converter is powered on and connected to your computer. The Status LED should be solid green.
- Seleziona ingresso: Premere il tasto Pulsante di selezione dell'ingresso on the front panel to switch between HDMI and Analog audio inputs. The Status LED may change color or blink to indicate the active input (refer to specific model documentation for LED behavior).
- Verify Input in Software: In your chosen software, confirm that the video and audio from your selected source are being received. Adjust any necessary settings within the software, such as resolution, frame rate, or audio levels.
- Avvia l'applicazione: Begin your video conference, streaming session, or recording.
Nota: The quality of the captured video and audio will depend on the source device and the capabilities of your computer and software.
7. Manutenzione
Proper maintenance ensures the longevity and optimal performance of your HD-CONV-USB-300.
- Pulizia: Disconnect the power before cleaning. Use a soft, dry, lint-free cloth to wipe the exterior of the device. Do not use abrasive cleaners, solvents, or chemical sprays.
- Magazzinaggio: Se si conserva il dispositivo per un periodo prolungato, scollegare tutti i cavi e conservarlo in un luogo fresco e asciutto, lontano dalla luce solare diretta e da temperature estreme.
- Gestione dei cavi: Ensure all cables are routed neatly and are not under strain or sharply bent to prevent damage.
8. Risoluzione Dei Problemi
If you encounter issues with your HD-CONV-USB-300, refer to the following common problems and solutions:
| Problema | Possibile causa | Soluzione |
|---|---|---|
| Nessuna alimentazione / LED di stato spento | Adattatore di alimentazione non collegato o difettoso. | Ensure the power adapter is securely connected to the converter and a working power outlet. Try a different outlet. |
| No video output in software | Incorrect input selected; HDMI cable issue; Software not configured correctly. |
|
| No audio output in software | Incorrect input selected; Audio cable issue; Software not configured correctly; Source audio settings. |
|
| Il computer non riconosce il dispositivo | USB cable issue; USB port issue; Driver conflict. |
|
9. Specifiche
| Numero di modello | 6512272 |
| Marca | Crestron |
| Interfacce | HDMI, USB, Analog Audio (3.5mm) |
| Dimensioni (L x P x A) | Dimensioni: 10.69 x 25.9 x 29.4 cm |
| Peso | 730 grammi |
| Produttore | Crestron |
| Data di disponibilità | 18 maggio 2023 |
10. Informazioni sulla garanzia
Crestron products are typically covered by a limited manufacturer's warranty. The specific terms and duration of the warranty may vary by region and product type. For detailed warranty information, please refer to the warranty card included with your product or visit the official Crestron websito.
Nota: Conserva la prova d'acquisto per le richieste di garanzia.
11. Informazioni di supporto
For technical support, product updates, or additional resources, please visit the official Crestron websito:
You may also find FAQs and community forums on their support pages.