
XTUGA BT4
XTUGA BT4 Karaoke Mixer User Manual
Modello: BT4
Marca: XTUGA
1. Prodotto finitoview
The XTUGA BT4 is a versatile 4-channel audio mixer designed for karaoke, DJ mixing, home entertainment, and various audio applications. It features wireless microphone connectivity, Bluetooth 3.0, 48V phantom power, and a USB audio interface, providing a comprehensive solution for sound control and mixing.

Image 1.1: The XTUGA BT4 mixer unit shown alongside its two accompanying wireless handheld microphones.
2. Contenuto della confezione
Si prega di verificare che tutti gli articoli siano presenti nel pacco:
- 1 x XTUGA BT4 Mixer Unit
- 2 x Handheld Wireless Microphones (requires 2*AA batteries each, not included)
- 1 x cavo di alimentazione
- 1 x 5V2A Power Plug
- 1 x USB to USB Cable
- 2 x Mic Protection Rings
- 1 x Manuale utente

Image 2.1: All components included in the XTUGA BT4 mixer package.
3. Controlli e collegamenti
Familiarize yourself with the various inputs, outputs, and controls on the BT4 mixer for proper operation.
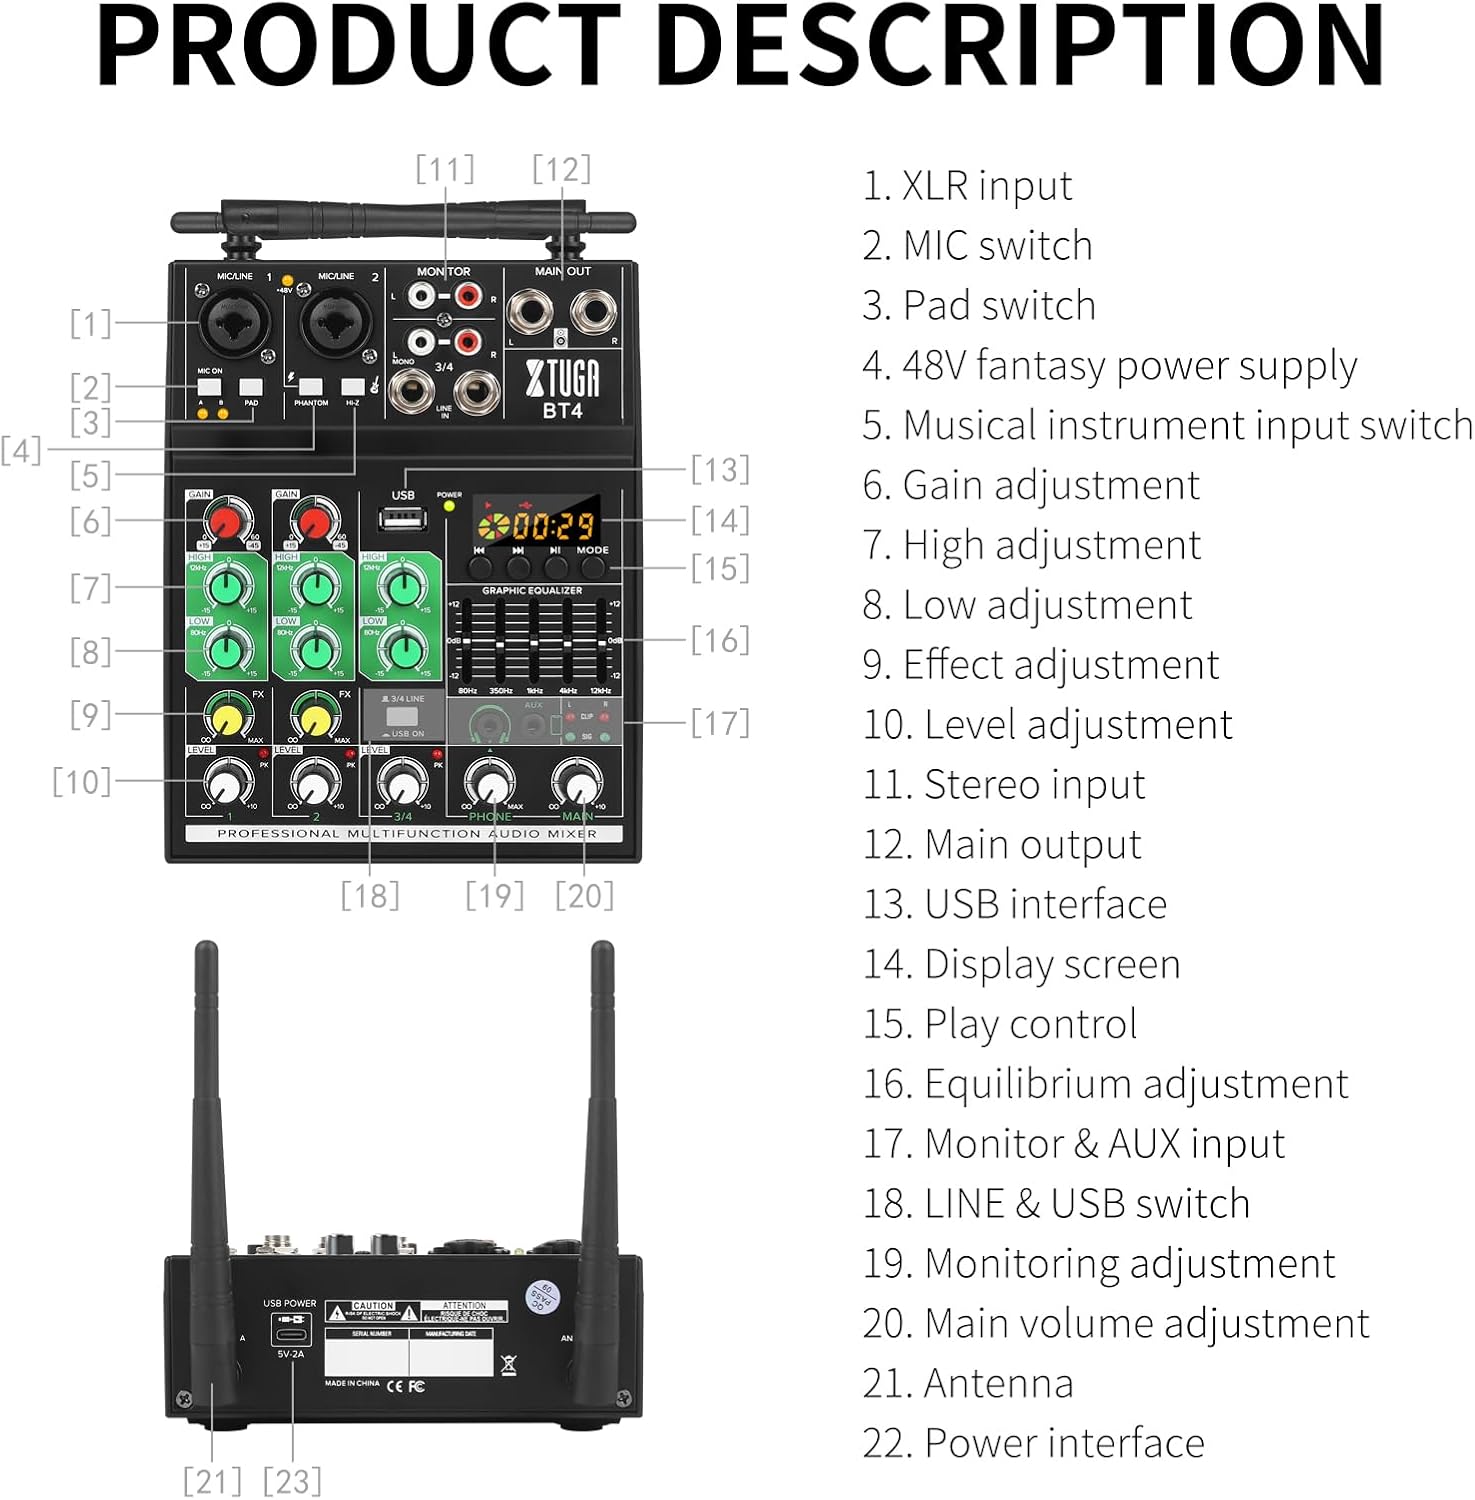
Image 3.1: Detailed diagram of the BT4 mixer's front panel and rear connections with corresponding labels.
- XLR Input (Channels 1 & 2)
- MIC Switch (for wireless microphones A/B)
- Pad Switch (attenuates input signal)
- 48V Phantom Power Switch (for condenser microphones)
- Hi-Z Switch (for high impedance instruments like guitar)
- Gain Adjustment (input sensitivity)
- High Adjustment (treble EQ)
- Low Adjustment (bass EQ)
- FX Adjustment (effect send level)
- Level Adjustment (channel volume)
- Stereo Input (RCA L/R for channels 3/4)
- Main Output (1/4" L/R)
- Interfaccia USB
- Display Screen (for USB/Bluetooth)
- Play Control (USB/Bluetooth transport controls)
- Graphic Equalizer (7-band master EQ)
- Monitor & AUX Input (3.5mm headphone jack, AUX input)
- LINE & USB Switch (selects input for channels 3/4)
- Monitoring Adjustment (headphone volume)
- Main Volume Adjustment (master output volume)
- Antenna (for wireless microphones)
- Power Interface (5V DC input)
4. Guida all'installazione
4.1 Collegamento di alimentazione
Connect the provided power cable to the 5V DC Power Interface (22) on the rear of the mixer and plug the 5V2A power plug into a suitable power outlet. The POWER indicator light will illuminate.
4.2 Collegamento del microfono
- Microfoni cablati: Connect XLR microphones to the XLR Input jacks (1) on channels 1 or 2. If using condenser microphones requiring phantom power, activate the 48V Phantom Power switch (4).
- Microfoni wireless: Insert 2 AA batteries into each wireless microphone. Turn on the microphones. Ensure the antennas (21) on the mixer are upright. Press the MIC Switch (2) to 'A' or 'B' to activate the corresponding wireless microphone channel. The mixer will automatically link to the microphones.

Image 4.1: Detail of the XLR inputs, MIC ON, PAD, PHANTOM, and Hi-Z switches.
4.3 Connessioni di ingresso/uscita audio
- Ingresso stereo (canali 3/4): Connect audio sources like CD players, smartphones, or other line-level devices to the Stereo Input (11) RCA L/R jacks.
- Ingresso ad alta impedenza: For instruments like electric guitars or basses, connect to Channel 2's XLR input and activate the Hi-Z Switch (5).
- Uscita principale: Connect the Main Output (12) 1/4" L/R jacks to your amplificatore, altoparlanti amplificati o dispositivi di registrazione.
- Monitorare l'uscita: Connect headphones to the Monitor & AUX Input (17) 3.5mm jack for personal monitoring.
5. Istruzioni per l'uso
5.1 Funzionamento di base
- Accensione: Ensure all connections are secure, then plug in the power adapter.
- Regola il volume principale: Start with the Main Volume Adjustment (20) at a low setting.
- Adjust Channel Gain: For each active channel, adjust the Gain Adjustment (6) to achieve a healthy signal level without clipping (the PK indicator should not light up consistently).
- Regola il livello del canale: Use the Level Adjustment (10) for each channel to balance the mix.
5.2 Utilizzo del microfono wireless
The BT4 mixer supports two wireless microphones with automatic frequency pairing.
- Ensure microphones have fresh AA batteries.
- Turn on the microphones.
- Press the MIC Switch (2) on the mixer to 'A' or 'B' to activate the corresponding wireless channel. The mixer will automatically find an available frequency (16 frequencies per channel, 32 groups total).
- Adjust the Gain, Echo, Equalization, and Level for the wireless microphone on Channel 2.
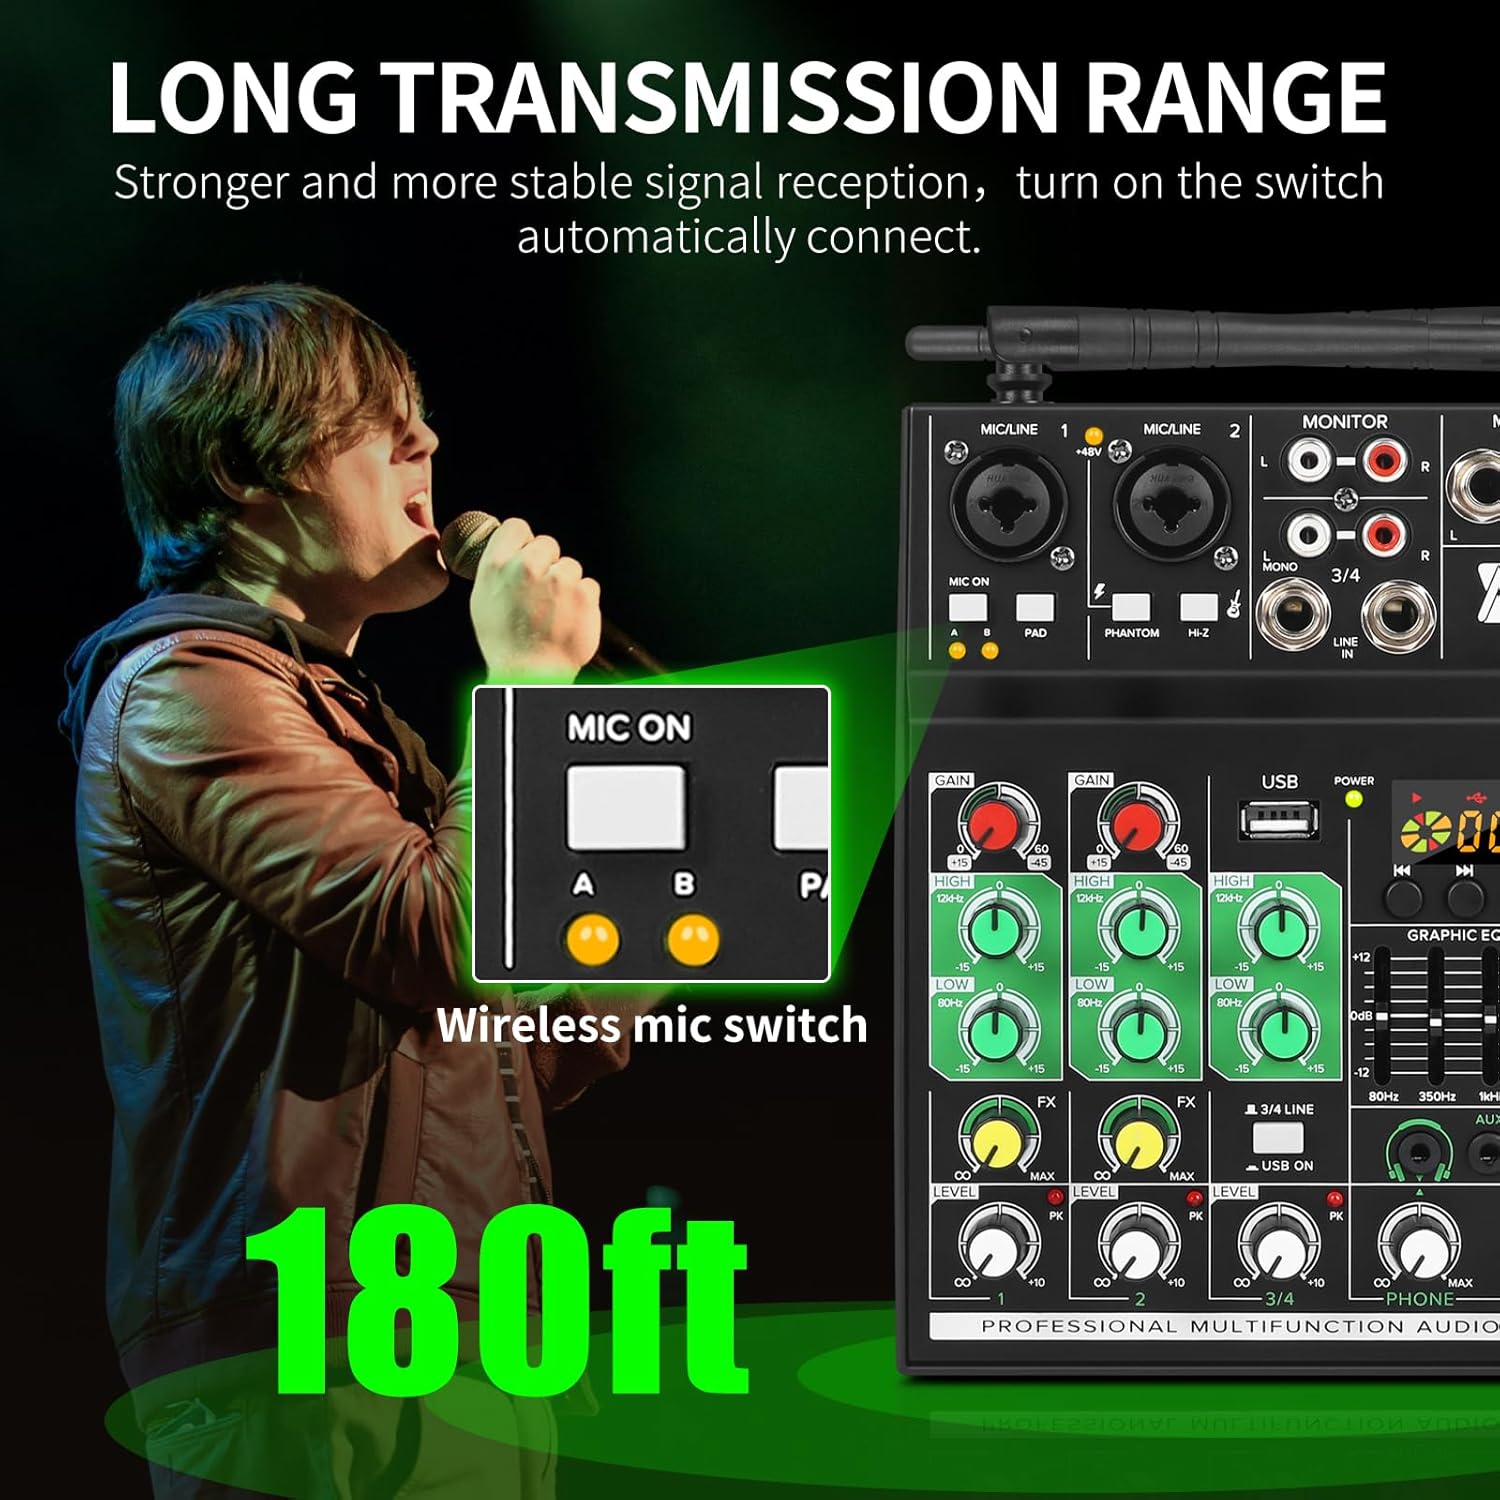
Image 5.1: Illustration of the wireless microphone's long transmission range, up to 180 feet.

Image 5.2: The mixer and microphones automatically select from 16 frequencies per channel for stable connection.
5.3 Equalization and Effects
- Equalizzatore canale: Use the High Adjustment (7) and Low Adjustment (8) knobs on each channel to shape the tone of individual inputs.
- Master Graphic EQ: The 7-band Graphic Equalizer (16) allows for fine-tuning the overall sound output. Adjust the sliders to boost or cut specific frequencies (80Hz, 350Hz, 1kHz, 2.5kHz, 5kHz, 8kHz, 12kHz).
- Effetti (FX): Use the FX Adjustment (9) knob on each channel to send a portion of that channel's signal to the built-in effects processor. The overall effect level can be adjusted via the master FX control.

Image 5.3: Visual representation of the mixer's five-band equalization and high-bass adjustment capabilities.
5.4 Connettività Bluetooth
To play music wirelessly via Bluetooth:
- Assicurarsi che il mixer sia acceso.
- On your Bluetooth device (smartphone, tablet), search for available devices and select "XTUGA BT4".
- Once paired, audio from your device will play through channels 3/4. Use the Play Control (15) buttons on the mixer to control playback (play/pause, skip tracks).
5.5 Interfaccia audio USB
The BT4 can function as a USB audio interface for playback and recording with a computer or for playing MP3 files da un'unità USB.
- Riproduzione da unità USB: Inserire un'unità flash USB contenente MP3 files into the USB Interface (13). Use the Play Control (15) buttons to navigate and play tracks.
- Connessione al computer: Connect the mixer to your computer using the provided USB cable. The mixer will be recognized as an audio device. You can then use it for recording audio from the mixer or playing computer audio through the mixer.

Image 5.4: The mixer's USB port allows connection to a computer for mixing and recording, or direct playback from a USB drive.
6. Manutenzione
- Pulizia: Utilizzare un panno morbido e asciutto per pulire la superficie del mixer. Evitare l'uso di detergenti abrasivi o solventi.
- Magazzinaggio: Conservare il mixer in un luogo fresco e asciutto, lontano dalla luce solare diretta e da temperature estreme.
- Sostituzione della batteria: Replace AA batteries in the wireless microphones when the battery indicator is low or performance degrades.
7. Risoluzione Dei Problemi
| Problema | Possibile causa | Soluzione |
|---|---|---|
| Nessuna uscita audio | Power off; incorrect connections; volume too low; input not selected. | Check power supply; verify all cables are correctly connected; increase Main Volume and individual channel Levels; ensure LINE/USB switch is correct. |
| Il microfono wireless non funziona | Microphone off; low batteries; MIC switch not engaged; interference. | Turn on microphone; replace batteries; press MIC switch (A/B); try moving closer to mixer or away from other wireless devices. |
| Rumore di ronzio o ronzio | Ground loop; faulty cable; nearby electronic interference. | Check cable connections; try different cables; ensure proper grounding; move mixer away from other electronics. |
| Il Bluetooth non si connette | Mixer not in pairing mode; device too far; incorrect device selected. | Ensure mixer is powered on; move Bluetooth device closer; re-scan for devices and select "XTUGA BT4". |
| Distorsione del suono | Input gain too high; output level too high. | Reduce Gain Adjustment (6) for the affected channel; reduce Main Volume Adjustment (20). |
8. Specifiche
| Caratteristica | Specificazione |
|---|---|
| Numero di modello | Modello BT4 |
| Numero di canali | 4 |
| Tecnologia di connettività | Bluetooth, USB |
| Fonte di alimentazione | Elettrico con cavo (5 V CC) |
| Peso dell'articolo | 2.99 libbre (1.36 chilogrammi) |
| Dimensioni del pacco | 12.32 x 10.47 x 3.19 pollici |
| Gamma di microfoni wireless | Up to 35 Ft (Bluetooth 3.0), Up to 180 Ft (UHF) |
| Potenza fantasma | 48V |
| Regolazione della frequenza | 7-band balanced total volume adjustment |
9. Garanzia e supporto
For warranty information or technical support, please contact XTUGA customer service through their official websito o il rivenditore presso cui è stato acquistato il prodotto. Conservare la ricevuta d'acquisto come prova d'acquisto.
Visit the official XTUGA Store for more information: XTUGA Store on Amazon
Ask a question about this manual
Ask about setup, troubleshooting, compatibility, parts, safety, or missing instructions. Manuals+ will review the question and use this page’s manual context to help answer it.