
Introduzione
This user manual provides comprehensive instructions for the installation, operation, and maintenance of your Cuifati ATX B75A Motherboard. Please read this manual thoroughly before proceeding with installation to ensure proper setup and optimal performance. This motherboard is designed for desktop systems, supporting LGA1155 processors and DDR3 memory.
Prodotto finitoview e Caratteristiche principali
The Cuifati ATX B75A Motherboard offers a robust platform for your desktop computing needs. Key features include:
- Uscita video ad alta definizione: Equipped with VGA and HD Multimedia Interface ports for digital high-definition video output.
- Connettività avanzata: Features 2 x DDR3 memory slots, 1 x SATA3.0, 3 x SATA2.0 hard disk interfaces, and a total of 10 USB interfaces (including USB 3.0).
- Capacità di rete: Supports a 100M network card interface for reliable internet connectivity.
- Erogazione di potenza stabile: Utilizes multiphase power design for enhanced stability and efficiency.
- Installazione semplice: Constructed with premium printed circuit board material for durability and straightforward setup.
- Supporto NVMe M.2: Includes an NVMe M.2 slot for high-speed storage solutions.
- Slot PCIe 16X: Provides a dedicated slot for graphics cards.

Figura 1: Top-down view of the Cuifati ATX B75A Motherboard, showcasing the CPU socket, DDR3 memory slots, PCIe slot, and various ports.

Figura 2: Sopraview of the Cuifati B75A Motherboard highlighting key features such as 2xDDR3, 1xNVMe M.2, 1xPCIe 16X, 1xSATA3.0, 1xVGA, 1xWiFi M.2, 1xHDMI, and 3xSATA2.0.

Figura 3: Diagram illustrating product features including Intel LGA 1155 socket, DDR3 memory support, WiFi M.2, PCIe 16X, SATA 3.0 and 2.0 ports, and NVMe M.2 slot.

Figura 4: Scheda madre view accompanied by icons representing solid state capacitance for stability, 100M network card, front USB 3.0 interface, and VGA/HD Multimedia Interface.
Specifiche tecniche
| Caratteristica | Dettaglio |
|---|---|
| Marca | Cuifati |
| Nome del modello | Cuifatipg823zgbh9 |
| Presa CPU | LGA1155 |
| Processori compatibili | Intel Core 2 DUO (and other LGA 1155 compatible CPUs) |
| Tipo di chipset | Intel B75 espresso |
| Tecnologia della memoria RAM | DDR3 |
| Velocità di clock della memoria | Fino a 2400 MHz (OC) |
| Capacità di archiviazione della memoria (max) | 16 GB |
| Dimensioni del prodotto | 6.69 x 6.69 x 6.7 pollici |
| Peso dell'articolo | 1.1 libbre |
| Uscita video | VGA, HD Multimedia Interface |
| Interfacce di archiviazione | 1 x SATA3.0, 3 x SATA2.0, 1 x NVMe M.2 |
| Slot di espansione | 1 x PCIe 16X |
| Interfacce USB | Multiple USB 2.0 and USB 3.0 ports |
| Rete | 100M Ethernet |
| Piattaforma | Windows 10 compatible |
Guida all'installazione
Follow these steps to properly install your Cuifati ATX B75A Motherboard into your computer system.

Figura 5: Detailed diagram highlighting key components and connectors on the motherboard, including CPU Slot, DDR3 Memory Slots, 24PIN CPU Power Supply, SATA ports, NVMe M.2, USB ports, HDMI, VGA, and front panel connectors. Refer to this diagram for component locations during installation.
1. Preparazione
- Assicurarsi che l'alimentatore sia scollegato dalla presa a muro.
- Procuratevi gli strumenti necessari: cacciavite a croce, cinturino da polso antistatico (consigliato).
- Prepare your computer case by removing the side panel.
2 Installazione della CPU
- Individuare il socket della CPU LGA 1155 sulla scheda madre (fare riferimento alla Figura 5).
- Gently lift the load plate lever and open the load plate.
- Carefully align your LGA 1155 processor with the socket, ensuring the gold triangle on the CPU matches the indicator on the socket. Do not force the CPU into the socket.
- Chiudere la piastra di carico e fissarla con la leva.
- Applicare la pasta termica alla CPU e installare il dissipatore della CPU seguendo le istruzioni del produttore.
3. Installazione della memoria (RAM)
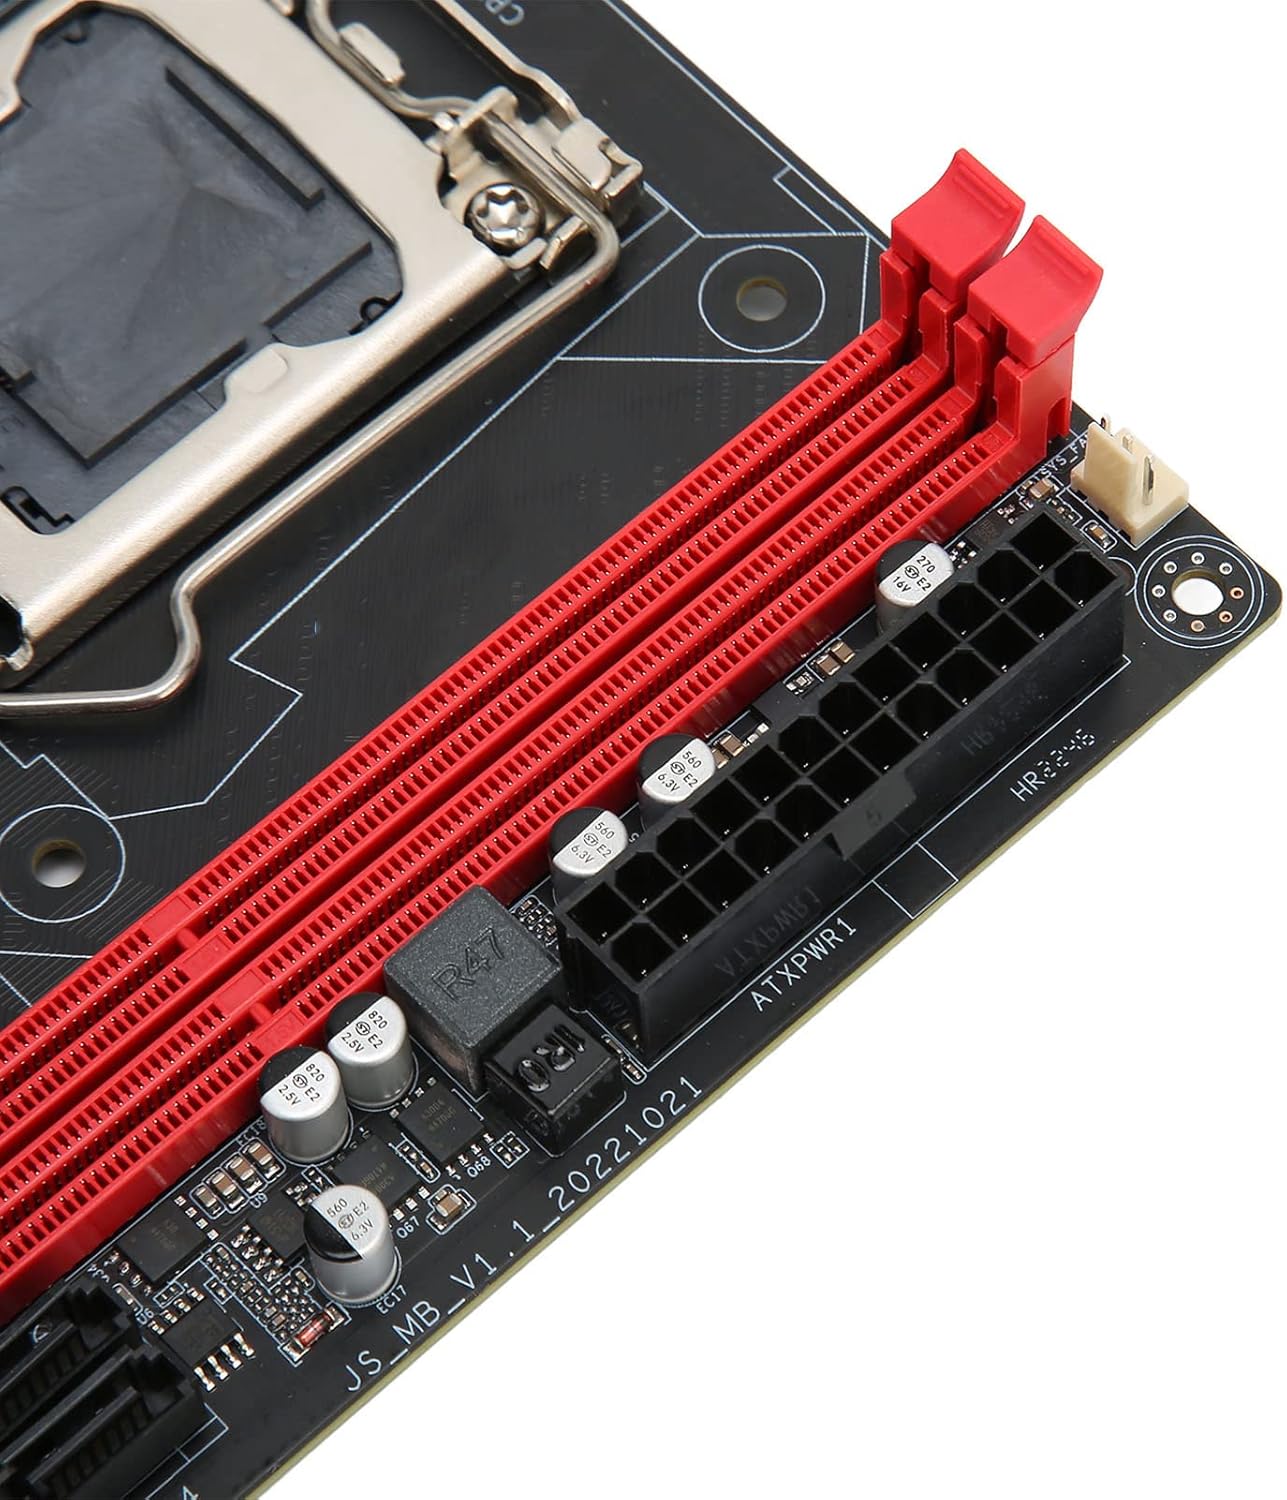
Figura 6: Avvicinamento view of the DDR3 memory slots and the 24-pin ATX power connector, essential for RAM and main power connections.
- Identify the DDR3 memory slots (refer to Figure 5 and Figure 6).
- Aprire le clip su entrambe le estremità dello slot di memoria.
- Allineare la tacca sul modulo di memoria DDR3 con la chiave nello slot di memoria.
- Premere con decisione su entrambe le estremità del modulo di memoria finché le clip non scattano in posizione.
4. Installazione della scheda madre nel case
- Installare la schermatura I/O nell'apertura posteriore del case del computer.
- Posizionare con attenzione la scheda madre nel case, allineando i fori delle viti con i distanziatori.
- Fissare la scheda madre con le viti. Non stringere eccessivamente.
5. Collegamenti di alimentazione
- Connect the 24-pin ATX power connector from your power supply to the 24PIN CPU Power Supply header on the motherboard (refer to Figure 5 and Figure 6).
- Connect the 4-pin or 8-pin CPU power connector (if applicable) to the 4PIN Power Supply header near the CPU socket.
6. Connessioni dei dispositivi di archiviazione
- Connect your SATA storage devices (HDDs/SSDs) to the SATA3.0 (1 port) or SATA2.0 (3 ports) connectors on the motherboard using SATA data cables (refer to Figure 5).
- If using an NVMe M.2 SSD, insert it into the NVMe M.2 slot and secure it with the provided screw (refer to Figure 5).
7. Collegamenti del pannello frontale
Connect the front panel cables (Power SW, Reset SW, Power LED, HDD LED, Front USB, Front Audio) to their respective headers on the motherboard. Refer to Figure 5 for the location of these headers.
- POTENZA SW: Connects to the power button on your case.
- RESET SW: Connects to the reset button on your case.
- LED DI ALIMENTAZIONE: Connects to the power indicator light. Observe polarity.
- LED HDD: Connects to the hard drive activity indicator light. Observe polarity.
- USB anteriore: Connects to the front USB ports on your case.
- Audio anteriore: Connects to the front audio jacks on your case.
8. Schede di espansione
If installing a dedicated graphics card or other PCIe expansion cards, insert them into the PCIe 16X slot and secure them with the case's retention mechanism (refer to Figure 5).
9. Verifiche finali

Figura 7: Avvicinamento view of the rear I/O panel, showing various ports including USB, Ethernet, VGA, and HD Multimedia Interface, where external devices will connect.
- Ricontrolla tutte le connessioni per assicurarti che siano sicure.
- Ensure no loose screws or cables are obstructing fans or components.
- Close the computer case side panel.
Istruzioni per l'uso
Once the motherboard and all components are correctly installed, you can proceed with operating your system.
1. Accensione iniziale
- Connect your monitor, keyboard, and mouse to the appropriate ports on the rear I/O panel (refer to Figure 7).
- Connect the power cable to your power supply and plug it into a wall outlet.
- Premere il pulsante di accensione sul case del computer.
- Il sistema dovrebbe accendersi e dovresti vedere l'output sul tuo monitor.
2. Configurazione BIOS/UEFI
Upon initial boot, you may need to enter the BIOS/UEFI setup to configure settings such as boot order, date/time, and enable specific features. Typically, you can access BIOS by pressing the DEL or F2 ripetutamente il tasto durante l'avvio.
3. Installazione del sistema operativo
Install your preferred operating system (e.g., Windows 10) from a bootable USB drive or DVD. Follow the on-screen instructions provided by the operating system installer.
4. Installazione del driver
After installing the operating system, install the necessary drivers for the motherboard chipset, audio, network, and any dedicated graphics cards. These drivers are usually provided on a CD/DVD with your components or can be downloaded from the manufacturer's websiti.
Manutenzione
Una corretta manutenzione garantisce la longevità e le prestazioni stabili della scheda madre e del sistema nel suo complesso.
- Mantienilo pulito: Regularly clean the interior of your computer case to prevent dust buildup on components, especially heatsinks and fans. Use compressed air for this purpose.
- Garantire un flusso d'aria adeguato: Make sure your computer case has adequate ventilation and that fans are operating correctly to prevent overheating.
- Aggiorna driver: Periodically check for and install the latest drivers for your motherboard chipset, graphics card, and other peripherals to ensure optimal performance and compatibility.
- Aggiornamenti BIOS/UEFI: Only update the BIOS/UEFI if necessary, and follow the manufacturer's instructions precisely. Incorrect BIOS updates can render your motherboard inoperable.
- Evitare lo stress fisico: Handle the motherboard with care. Avoid bending or applying excessive force to components or connectors.
Risoluzione dei problemi
Questa sezione fornisce soluzioni ai problemi più comuni che potresti riscontrare.
Nessuna alimentazione / Il sistema non si accende
- Controllare i collegamenti di alimentazione: Ensure the 24-pin ATX power connector and the 4-pin/8-pin CPU power connector are securely seated on the motherboard.
- Alimentazione elettrica: Verify that the power supply is switched on and connected to a working power outlet. Test the power supply if possible.
- Collegamenti del pannello frontale: Double-check the POWER SW header connection on the motherboard.
- Corto circuito: Remove the motherboard from the case and test it on a non-conductive surface (e.g., cardboard box) with only essential components (CPU, one RAM stick, CPU cooler, power supply). This helps rule out short circuits caused by the case.
Nessuna uscita di visualizzazione
- Monitorare la connessione: Ensure the monitor is properly connected to the VGA or HD Multimedia Interface port on the motherboard (or dedicated graphics card) and is powered on.
- Memoria RAM: Reseat the DDR3 memory modules. Try booting with only one RAM stick.
- Scheda grafica: If using a dedicated graphics card, ensure it is properly seated in the PCIe 16X slot and has auxiliary power connected (if required).
- Impostazioni BIOS: If you have a dedicated graphics card, ensure the BIOS is configured to use it as the primary display output.
System Instability / Random Crashes
- Surriscaldamento: Check CPU and case temperatures. Ensure CPU cooler is properly installed and fans are working. Clean dust from heatsinks.
- Problemi di RAM: Eseguire uno strumento di diagnostica della memoria per verificare la presenza di moduli RAM difettosi.
- Problemi con i driver: Assicurarsi che tutti i driver siano aggiornati e installati correttamente.
- Alimentazione elettrica: Un'alimentazione insufficiente o difettosa può causare instabilità.
Slow Performance / Lagging
- Magazzinaggio: Check the health of your storage drives (HDD/SSD). Ensure the operating system is installed on a fast drive (e.g., NVMe M.2 SSD).
- CPU/RAM Usage: Monitor CPU and RAM usage to identify resource-intensive applications.
- Autisti: Outdated drivers can sometimes lead to performance issues.
- Sistema operativo: Ensure your operating system is optimized and free from malware.
Garanzia e supporto
For warranty information and technical support, please refer to the documentation provided with your purchase or visit the official Cuifati websito. Conservare la prova d'acquisto per eventuali reclami in garanzia.
For further assistance, you may contact Cuifati customer support through their official channels. Please have your product model number (Cuifatipg823zgbh9) and purchase details ready.